Most computer users resort to file compression when they want to minimize the file size as much as possible. WinRAR and 7-Zip are two of the most popular file archivers that let you do this with ease. That being said, not everyone has this software installed on their PCs. So, if you’re going to send a compressed file to someone who doesn’t have WinRAR, 7-Zip, or any similar file archiving utility on their system, they will not be able to extract and access these RAR or ZIP files. This lack of compatibility issue can be resolved with self-extracting RAR and ZIP files.
Many users who use WinRAR and 7-Zip on their systems don’t really know what a self-extracting RAR or ZIP file does and how to create a self-extracting archive file, and that’s exactly why we’ve decided to cover it here.
What is a Self-Extracting Archive?
In layman’s terms, a self-extracting archive is nothing but a Windows executable file that can be run natively on the system without the need for any additional software like WinRAR or 7-Zip. This executable file contains the target RAR or ZIP file with all its contents along with a small program to quickly extract the contents. One more key advantage of using a self-extracting file is that it can house multiple compressed files or folders as a single executable making it easier for file distribution. Since WinRAR and 7-Zip are widely used by most users to compress and extract files, we’ll be taking a look at how you can create a self-extracting archive on both of them.
How to Create A Self Extracting RAR File with WinRAR
Even though WinRAR is arguably the most popular file archiving utility for Windows devices, most people just use it to extract and compress files. Creating a self-extracting RAR file is more of an advanced feature, so if you haven’t been able to find it, take a look at the steps below:
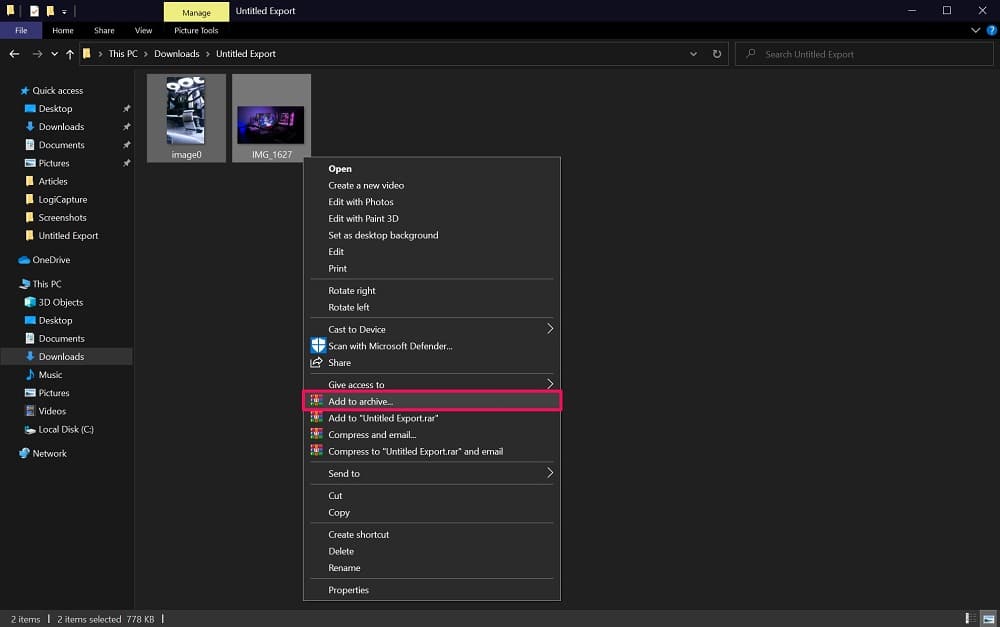
Step 1. First, head over to the directory where the files you want to add to the archive are stored. Now, select the required files, right-click on them and select ‘Add to Archive.’
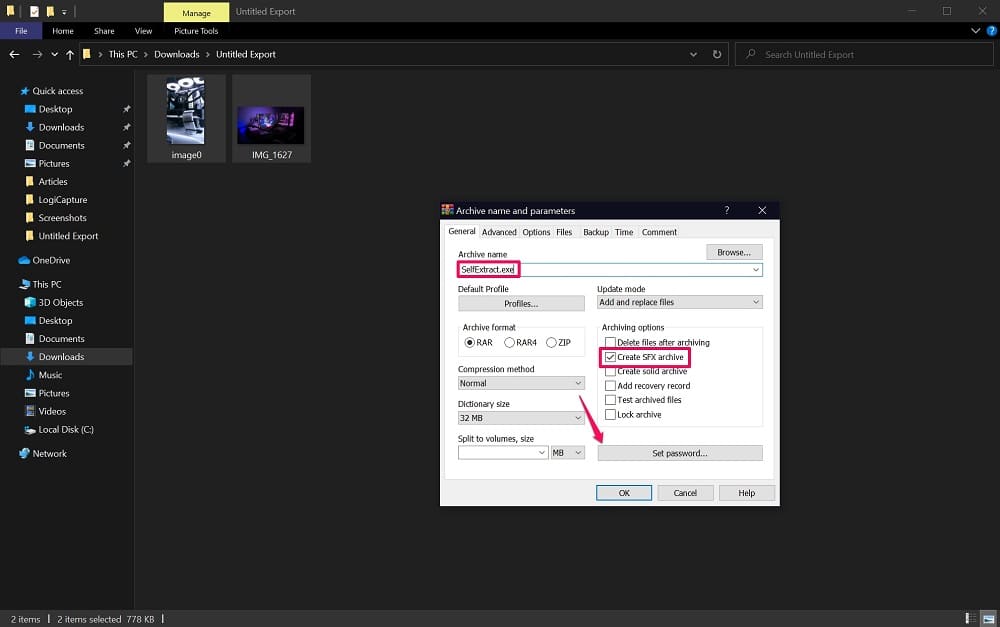
Step 2. Doing this will open a new window on your screen. Here, check the box next to ‘Create SFX Archive’ and give a preferred name for the executable file by clicking under Archive name. To protect the archive with a password, click on “Set Password” from the window.
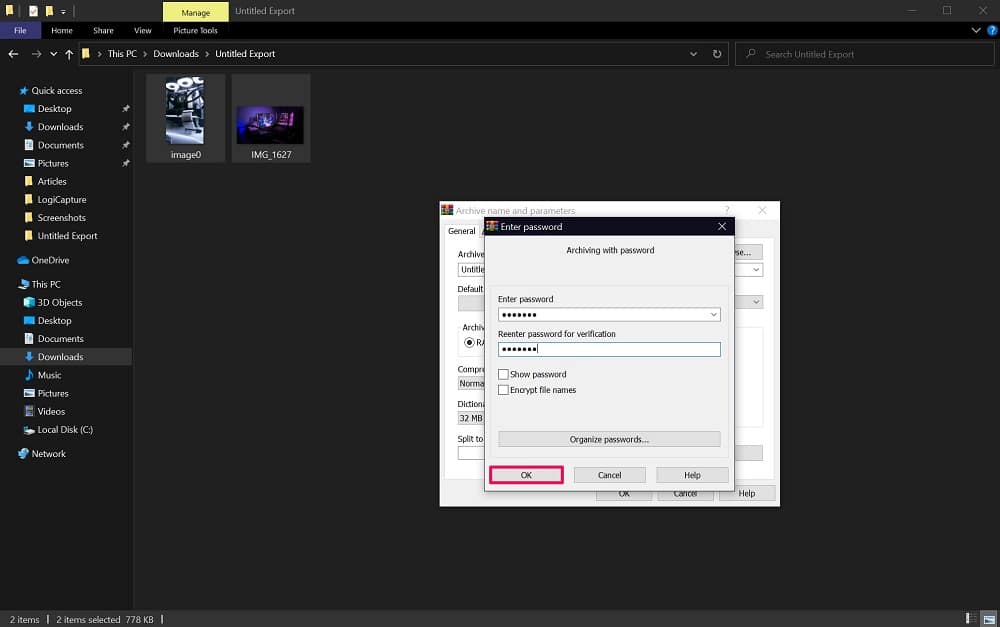
Step 3. Now, type in your desired password, verify it and click on ‘OK.’ Note that this is completely optional, and you don’t have to use a password if you don’t need it.
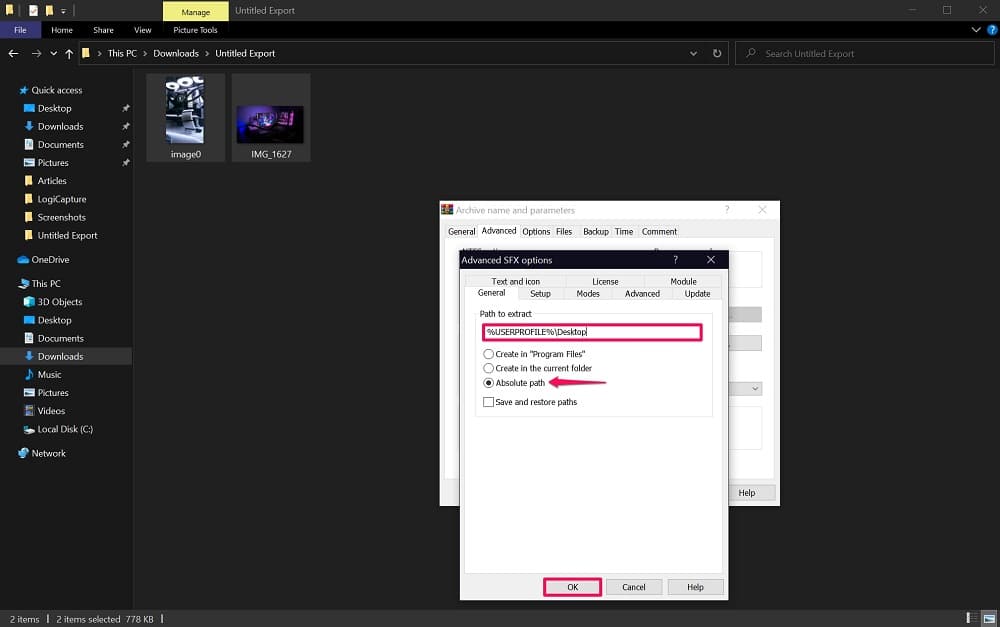
Step 4. Next, head over to the Advanced tab from the WinRAR window and click on ‘SFX options,’ where you’ll be able to access some optional settings.
Step 5. This will take you to the General section of Advanced SFX options, where you’ll be able to type in a path to extract the executable archive. In this instance, we’ve used ‘%USERPROFILE%\Desktop’ so that the executable file extracts the contents of the compressed file to the Desktop, but you can use any path of your choice. Click on “OK” when you’re done creating the executable.
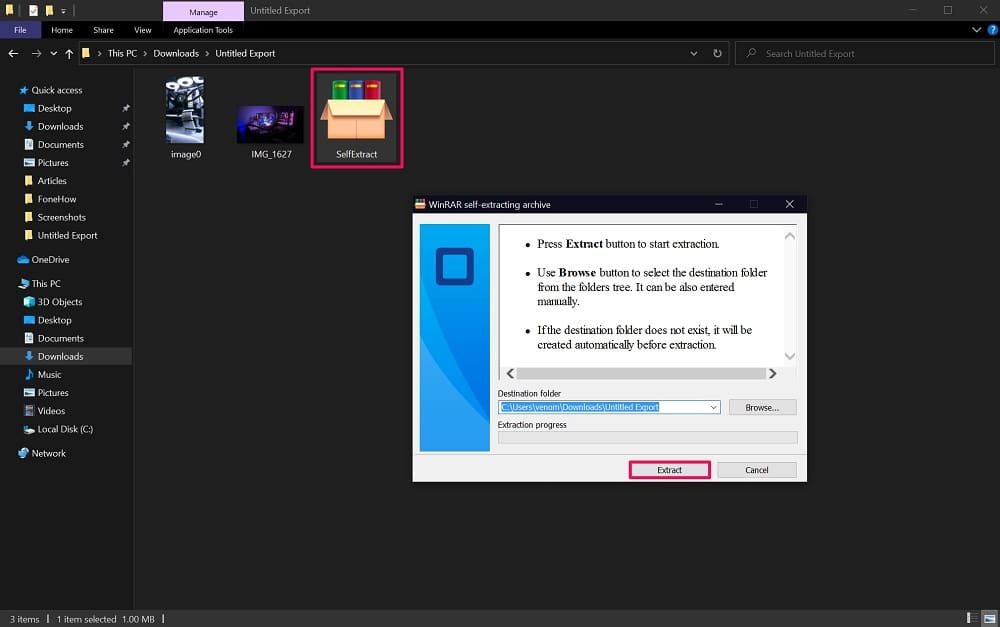
Step 6. The self-extracting RAR file will now show up in the same directory as the files you selected. Simply click on it to run the WinRAR self-extracting executable. To begin the extraction, click on ‘Extract.’
Note that if you’ve protected the archive with a password, you’ll be prompted to enter it before the extraction begins. We’d like to point out that Steps 3 and later are all completely optional, and you don’t have to do it unless you want to change the directory where the files are extracted to.
How to Create A Self Extracting ZIP File with 7-Zip
If WinRAR is not the file archiver of your choice, 7-Zip may just be the one you use. Several users prefer this software since it’s open-source, completely free of charge, and offers a slightly better compression ratio. Creating a self-extracting ZIP file is fairly similar to the WinRAR method, although 7-Zip has managed to make the process slightly simpler. Let’s check it out:
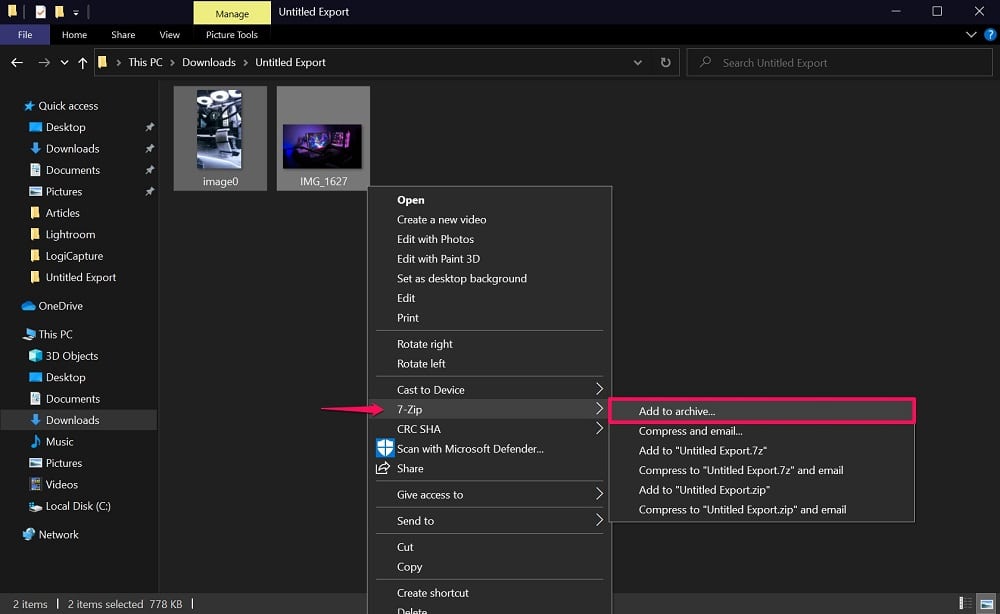
Step 1. Go to the directory where the files you want to add to the archive are stored. Select the necessary files, right-click and choose ‘7-Zip’ to expand the options. Now, click on ‘Add to Archive.’
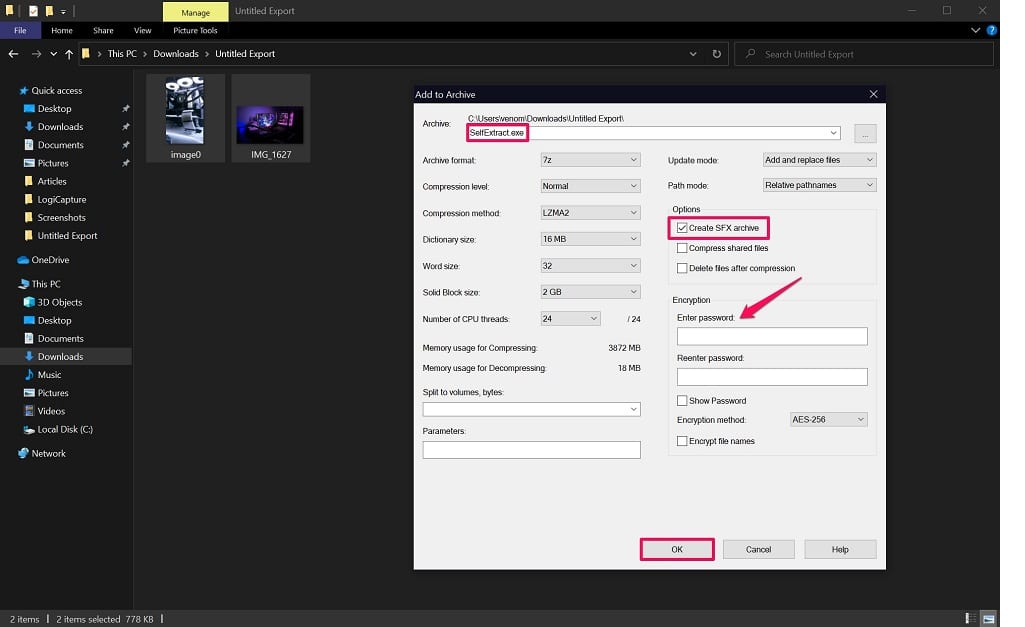
Step 2. This will launch the 7-Zip window on your screen. Check the ‘Create SFX Archive’ box under Options, name the executable file according to your preference, and type in a password if necessary. Once you’re done with all this, click on ‘OK.’
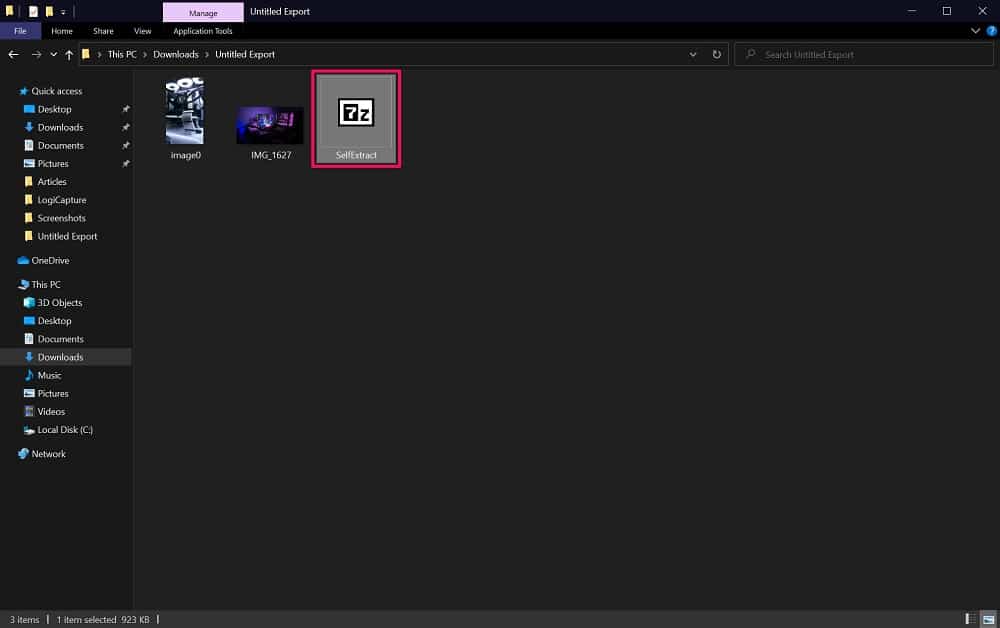
Step 3. The executable file will show up in the same directory where you selected the files. Just click on the executable file with the 7z icon to run it and extract its contents.
Unlike WinRAR, 7-Zip doesn’t natively have the option to select a path for the extracted files. Once again, if you entered a password, you will be prompted to type it for successful extraction.
Bonus Tip: What to Do If You Forgot RAR Password
If you have encrypted RAR archives and you forgot the password to one of them at some point, you’re not completely out of luck from accessing the files stored in it. You can take advantage of this neat RAR password recovery tool called PassFab for RAR, and you can unlock the password for all kinds of encrypted RAR files without losing data. The software uses three unique methods to recover the RAR password depending on whether you have any clue regarding the forgotten password.
Free Download PassFab for RAR Now
Bottomline
In most cases, self-extracting archives are used for distributing or transferring several files or folders as a single file. Regardless of whether you’re using WinRAR or 7-Zip as the default file archiver on your computer, you can follow the above procedure to create self-extracting archives before sending the files over to someone who’s inexperienced or doesn’t have the necessary software installed.
Which file archiving utility do you prefer and why? Are you using a different software instead of WinRAR or 7-Zip? Do you have any additional tips or tricks to share? Make sure to let us know in the comments section down below.
