Learning how to recover unsaved Word documents on a Windows 10/11 computer is essential because you never know when the program or OS crashes and lead to data loss.
In the following sections, you will understand the processes of getting your saved or unsaved Word files back should you lose them for any reason.
Can I Restore Unsaved Word Documents?
Yes, you can. Microsoft is quite particular about keeping your data safe. That’s why it has integrated several data backup and recovery features in MS Office Suite and Windows. However, learning how to restore unsaved Word documents could be challenging for new users, especially when they don’t come from a technical background.
Nevertheless, the sections discussed here give you an in-depth understanding of the procedures to recover your unsaved Word files most simply.
How to Recover Unsaved Word Documents
If MS Word crashes before you can save the document, you can try the following solutions to recover the file and continue working normally:
Solution 1: Recover Unsaved Word Documents from Temporary Files
When you prepare a document in MS Word, the program automatically creates its temporary instance and stores your content. Such a temporary file usually has ‘ ~WR ’ as a suffix to its name and uses the *.tmp extension, and Word saves it in the same folder you saved the main document.
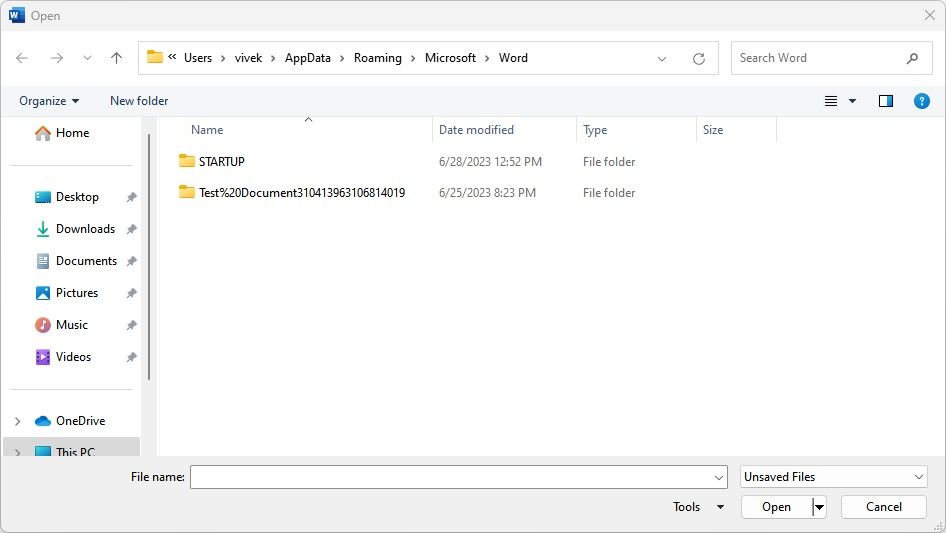
On the other hand, if you didn’t save the file, you may need to check the general temporary folder C:\Users\<yourname>\AppData\Roaming\Microsoft\Word\. In the case of Office 365, you should also check the C:\Users\<yourname>\AppData\Local\Microsoft\Office\UnsavedFiles folder.
Note: In the above path, replace <yourname> with your account name.
(E.g., C:\Users\vivek\AppData\Roaming\Microsoft\Word\ or C:\Users\<vivek>\AppData\Local\Microsoft\Office\UnsavedFiles)
If none of the above containers has your unsaved file, you can also conduct a manual search by typing “*.tmp” (without quotes) in the Search bar at the upper-right corner of the File Explorer window.
However, before proceeding, you must configure your operating system to show all hidden and protected operating system files to ensure that you can see the recovered data.
You can follow the process below to learn how to find unsaved Word documents from temporary files.
Note: Windows 11 and MS Office 2021 are used here for illustrations.
Pre-Process Configuration: How to Show Hidden and Protected Operating System Files
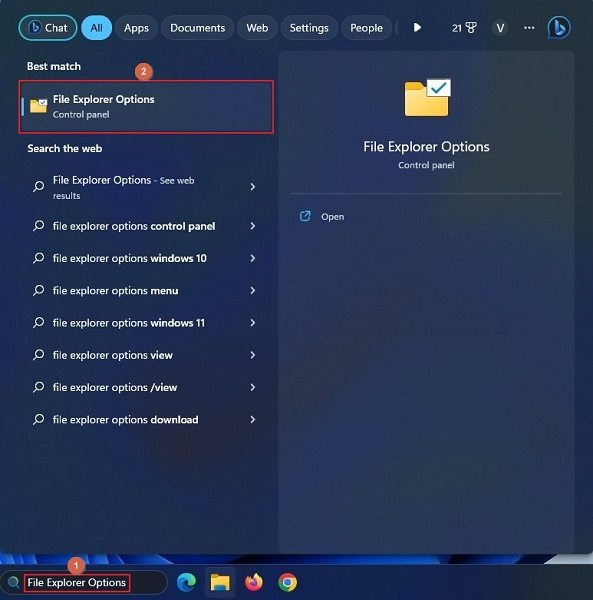
- Click inside the Search box in the Taskbar
- Type File Explorer Options
- Click File Explorer Options from the Best match section of the results list
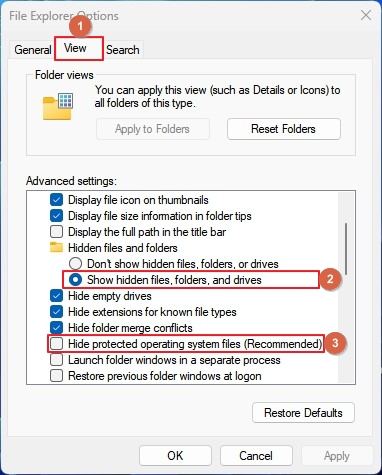
- Go to the View tab of the File Explorer Options box
- Click to select the Show hidden files, folders, and drives radio button from the Hidden files and folders section
- Uncheck the Hide protected operating system files (Recommended) box
- Click OK to save the changes
The Process: How to Find Unsaved Word Documents from Temporary Files
- Launch File Explorer from the Taskbar
![]()
- In the address bar at the top, type C:\Users\<yourname>\AppData\Roaming\Microsoft\Word\ or C:\Users\<yourname>\AppData\Local\Microsoft\Office\UnsavedFiles
Note: Replace <yourname> with your account name.
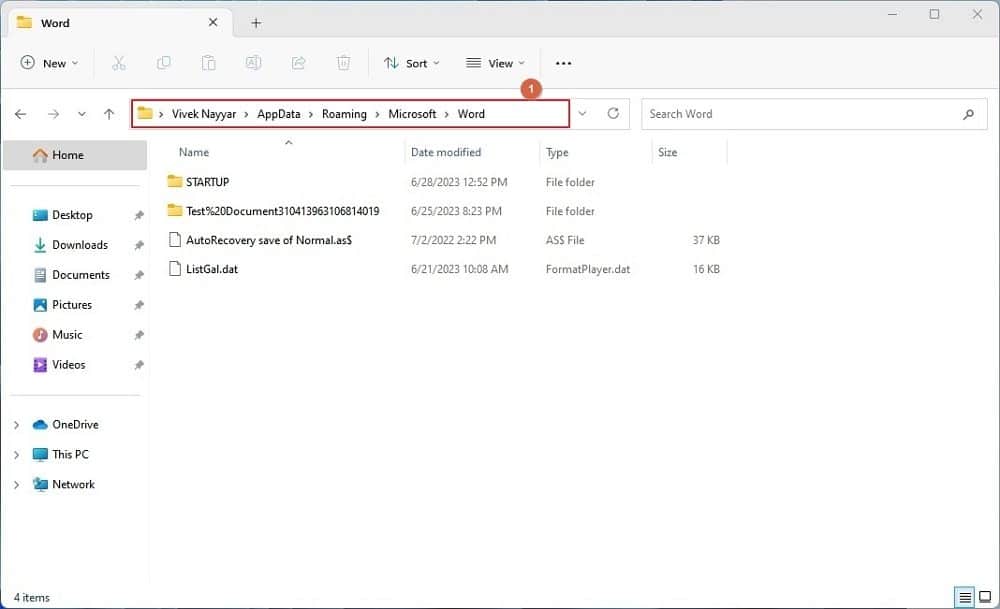
- Press Enter
- Locate and open your unsaved Word document
Alternate Solution 1: If the Previous Solution Fails
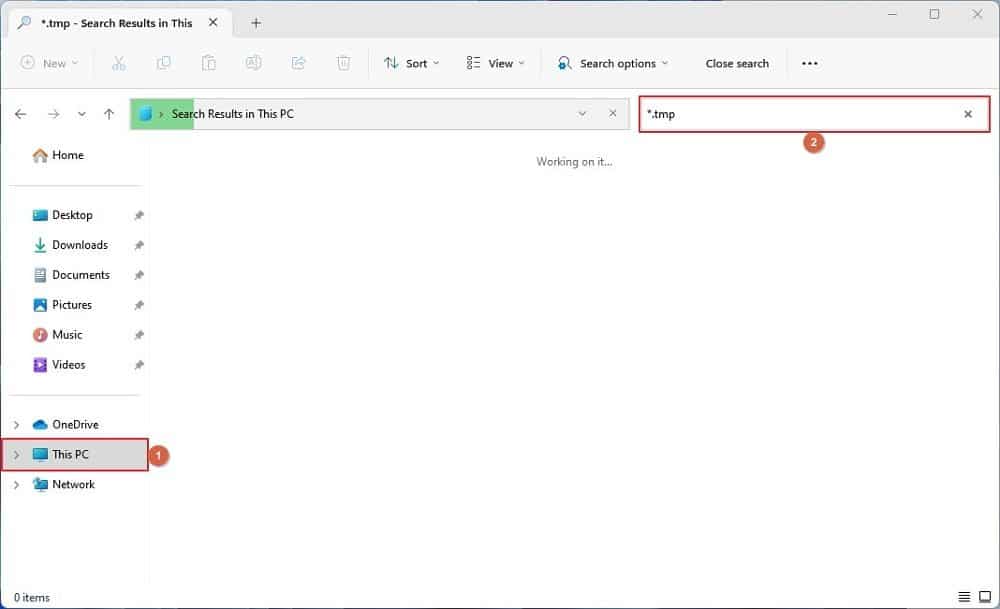
- Launch File Explorer
- Click This PC from the navigation bar on the left
- Type *.tmp in the Search box at the upper-right corner of the right window
- Press Enter
- Wait while Windows searches for all the files with the TMP extension
- Once Windows finishes its search, you may have to check each file from the results list to find the one you wish to recover
Note: You can start with the files beginning with ~WR as their names
Alternate Solution 2: If Both the Previous Solutions Fail
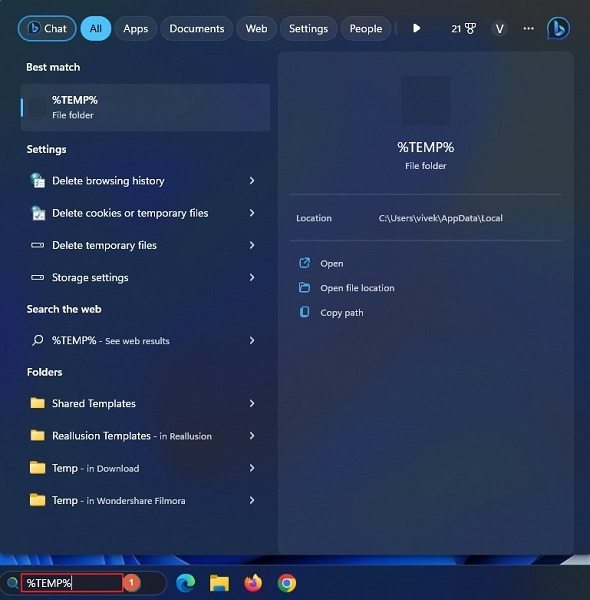
- Type %TEMP% in the Search box in the Taskbar
- Press Enter
- Check all the files with the *.tmp extension in the Temp folder that opens next
Solution 2: Recover Unsaved Word Documents from AutoRecover
AutoRecover is another built-in feature in MS Word that automatically saves your document updates every ten minutes. This allows you to recover your content from a Word file if the application crashes before saving. Furthermore, AutoRecover also enables you to configure its frequency of saving updates.
To learn how to recover a Word document not saved through AutoRecover, you can follow the step-by-step process given below:
- Launch MS Word
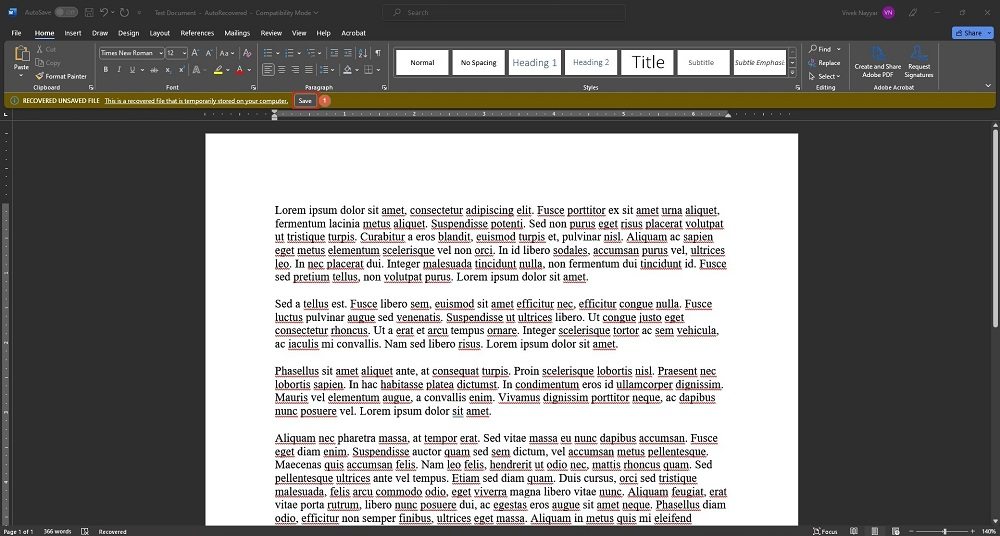
- Wait while MS Word automatically opens the document that had unsaved updates
- Click Save from the message bar at the top (under the Ribbon)
- Check the content of your document after recovering
- Save the file with a new name
Note: You will see the Save button in the message bar only if you saved the document at least once after creating it. If you didn’t, you must go to the folder explained in the previous solution, which is C:\Users\<yourname>\AppData\Roaming\Microsoft\Word\ or C:\Users\<yourname>\AppData\Local\Microsoft\Office\UnsavedFiles and recover the unsaved file from there.
Solution 3: Restore Unsaved Word Files with Document Recovery
For your convenience, Microsoft Word has a quick button that opens the C:\Users\<yourname>\AppData\Roaming\Microsoft\Word\ folder with all the unsaved documents. From here, you can recover your Word files and save them to your PC.
You can follow the instructions given below to learn how to restore unsaved Word documents with Document Recovery:
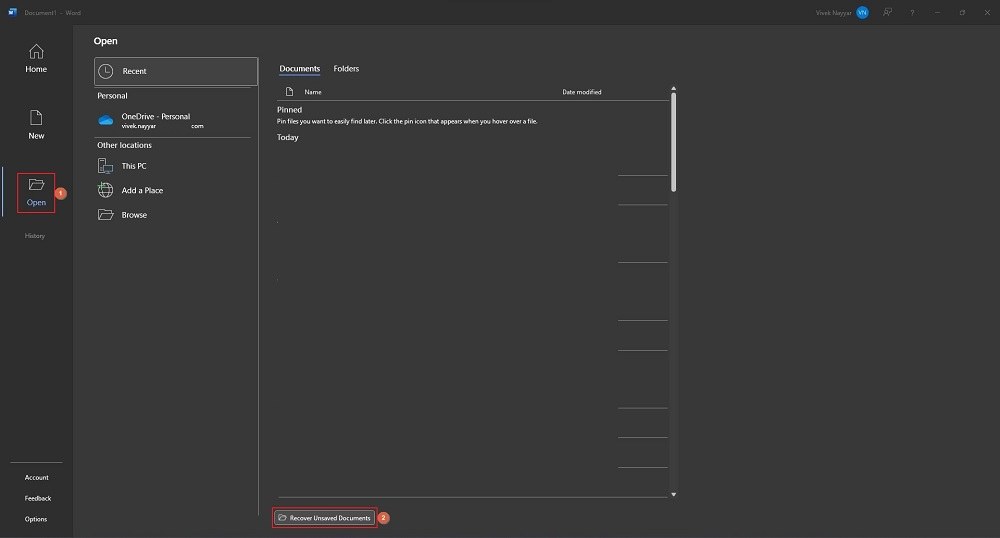
- Launch MS Word
- Click Open from the left pane
- Click Recover Unsaved Documents from the bottom of the right window
- When the C:\Users\<yourname>\AppData\Roaming\Microsoft\Word\ folder opens, you can check the creation date of the file and use it to recover your unsaved content
Solution 4: Search for Backup Files
Your instance of Microsoft Word can automatically create backup copies of documents. These backup files have a *.wbk extension, making it easy to search them.
The first place you may want to look for an unsaved Microsoft Word backup file is C:\Users\<yourname>\AppData\Roaming\Microsoft\Word\.
In the case of Office 365, you may also find backup files in the C:\Users\<yourname>\AppData\Local\Microsoft\Office\UnsavedFiles folder.
If none of the above folders have a file with the *.wbk extension, you can conduct a manual search. The process is explained below:
- Launch File Explorer from the Taskbar
- Click This PC from the navigation bar on the left
- Type *.wbk in the Search box at the upper-right corner of the right window
- Press Enter and wait while Windows searches for all the files with the *.wbk extension
- Once found, you can check the documents’ creation dates to locate and open the one you’re looking for
IMPORTANT
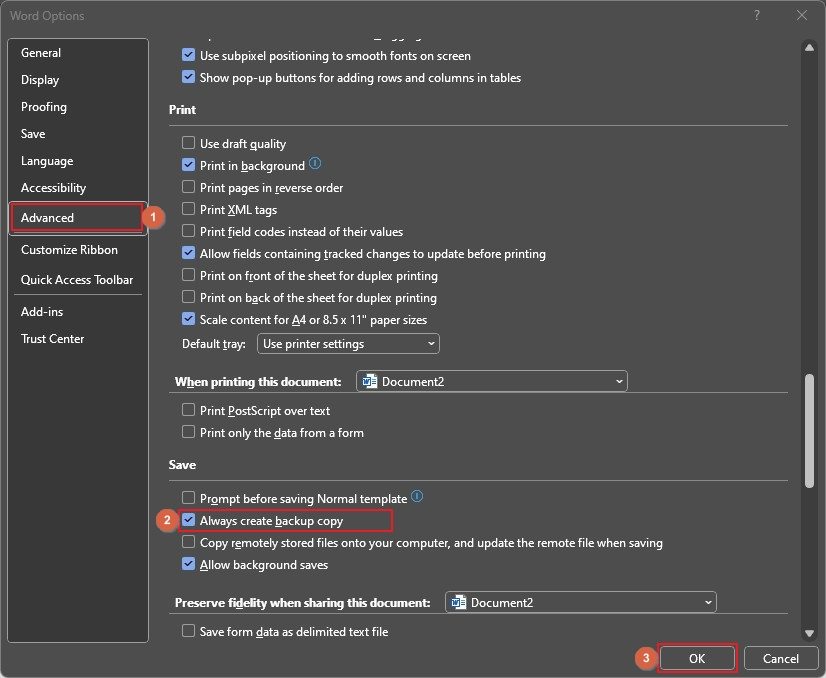
You must manually enable the backup creation feature before Microsoft Word can create backup copies. To do so, you must:
- Launch Microsoft Word
- Click Options from the bottom of the left pane (If Word is already open, go to File and then click Options)
- Click Advanced from the left pane of the Word Options box
- Scroll down the right pane to the Save section
- Check the Always create backup copy box
- Click OK to save the changes
Note: Enabling backups for Word documents is a proactive step you must take right after installing Microsoft Office Suite.
Bonus Tips
How to Recover Deleted Word Documents with Data Recovery
Sometimes, you save documents and consider everything OK, only to notice that you have erroneously deleted those importing files. In such scenarios, you can recover them from the Recycle Bin (or Trash Can in macOS). However, if you have also emptied those containers to save space on the local drive, your documents are gone forever and for good.
But!
There’s still hope.
You can use an efficient third-party Windows data recovery tool to get your files back.
In this context, a product called 4DDiG by Tenorshare has received positive reviews from millions of satisfied users across the globe.
The good thing is that 4DDiG not only recovers deleted Word documents but all types of files you may have erased from your PC accidentally or purposely. This means that the tool is a one-stop shop for all your data recovery tasks.
Furthermore, the program is available for both Windows and Mac platforms, and therefore it has your back regardless of the computer or operating system you are using.
You can learn how to recover deleted files using Tenorshare 4DDiG by following the instructions given below:
Step 1: Get to the Tenorshare 4DDiG’s Main Interface
Download and install Tenorshare 4DDiG. Once done, launch the program to get to its main interface.
Step 2: Choose File Type and Scan
From the right window of the first screen, hover the mouse over the icon of the drive that had your deleted file and click Scan from the lower-right area of the tile.
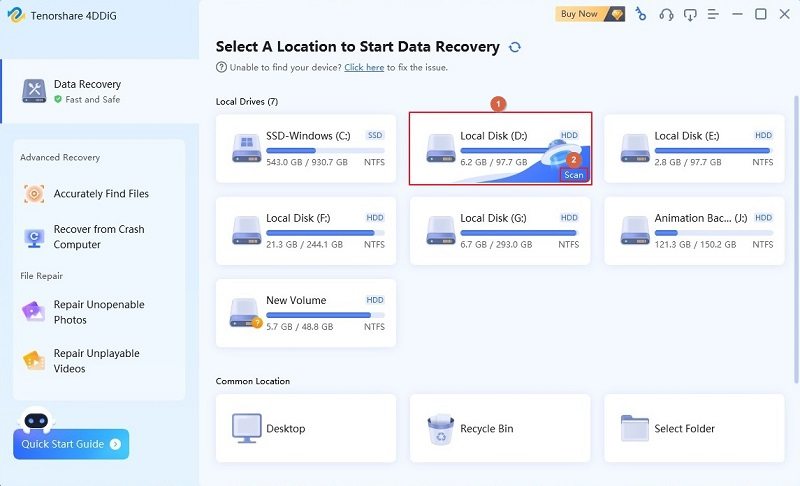
On the box that pops up next, ensure that the Documents tile is selected. Optionally, click to deselect all other tiles to narrow down the scope of the search and expedite the process.
Click Scan Selected File Types to begin scanning.
Step 3: Recover Deleted Files
Once 4DDiG completes scanning and displays the results, check the box representing the document you want to restore and click Recover from the bottom-right corner.
Follow the on-screen instructions to recover the deleted file.
Forgot Your Password? How to Recover Word Password
If you encrypted your MS Word file to prevent unwanted data exposure but forgot the decryption password, don’t panic.
In such a situation, you can use an efficient password recovery tool called PassFab for Word. The program offers three attack methods to recover passwords from Word files namely:
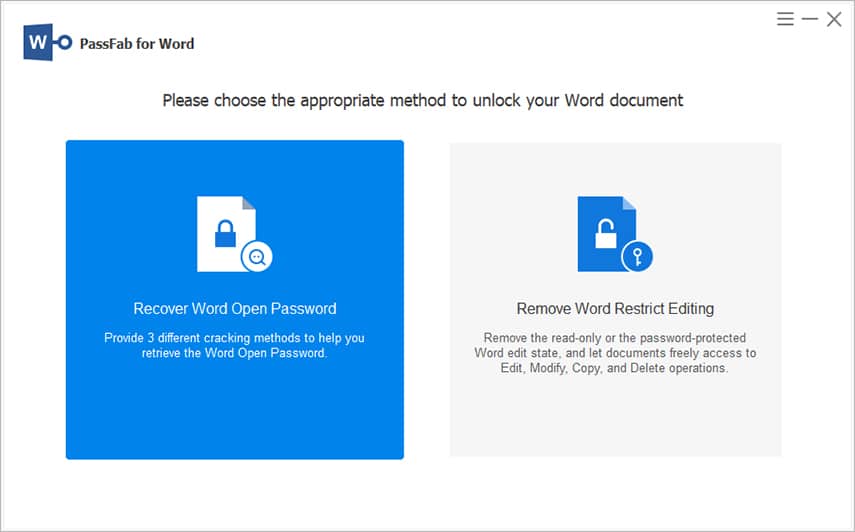
- Dictionary Attack – When you protect your Word document with a password you regularly use
- Brute-Force Attack – When you know nothing about the password or the number of characters it has
- Brute-Force with Mask Attack – When you can recall some part of the password but have forgotten most of it
Furthermore, you can install PassFab for Word on Windows 7 through Windows 11, and the app supports Microsoft Word 97 through 2021. Therefore, you can rest assured that you are in safe hands.
FAQs
How to turn on AutoRecovery in MS Word?
AutoRecovery is already enabled in MS Word and configured to automatically save your documents every 10 minutes. To change this frequency, you can:
- Launch MS Word
- Click Options from the bottom of the left pane (go to File and then to Options if Word is already open)
- Click Save from the left pane of the Word Options box
- In the Save AutoRecovery information every field under the Save documents section, change the frequency from 10 minutes to your preferred one
- Click OK from the bottom-right to save the changes
Note: Each time AutoRecover saves your document, it consumes processing and memory. Therefore, you may want to avoid setting the frequency too low.
Where does MS Word store unsaved auto-recovered documents in my local hard drive?
They are saved in the C:\Users\<yourname>\AppData\Roaming\Microsoft\Word\ folder. Also, if you have subscribed to a Microsoft Office 365 plan, you can check the C:\Users\<yourname>\AppData\Local\Microsoft\Office\UnsavedFiles directory as well.
Another quick solution would be to launch MS Word, click Open, and click Recover Unsaved Documents from the bottom of the right pane.
Is PassFab for Word safe to use?
Because the program works offline and all your files remain on your local PC, the chances of your sensitive information getting exposed to unauthorized people are almost null. Simply put, yes, using PassFab for Word is safe.
Conclusion
Learning how to restore an unsaved Word document is easy. However, the challenge begins when you encrypt your file and forget the password. In such a case, you can use a third-party tool like PassFab for Word. For anything related to getting your content back, you can learn how to recover unsaved Word documents using any of the solutions given above.