Windows 10 has a few notable keyboard features users can activate with various built-in options. Such features typically enable users to change their keyboards’ functionality for Windows. Sticky Keys is of the more notable keyboard features in Windows 10. That’s a keyboard feature some users accidentally enable on their desktops or laptops.
To activate many Windows 10 keyboard shortcuts, you often need to press and hold down the Ctrl, Alt, Shift, or Windows modifier keys. For example, you can open the Task Manager by pressing the Ctrl + Alt + Delete hotkey. You need to press and hold down both the Ctrl and Alt keys for that hotkey.
The Sticky Keys accessibility feature eliminates the need for users to hold down modifier keys. That feature effectively keeps the Ctrl, Alt, Shift, and Windows keys pressed down (active) even after you’ve taken your figures off those buttons. Those keys remain active with Sticky Keys enabled until after you press a non-modifier one. So, you don’t need to press and hold the modifier keys for hotkeys when you’ve enabled Sticky Keys.
Sticky Keys is not enabled by default in Windows 10. However, users can accidentally activate that feature by pressing the Shift key a few times. Your PC beeps when you press the Shift, Ctrl, Alt, and Windows modifier keys with Sticky Keys enabled. So, you’ll know you’ve activated Sticky Keys when you hear beeping sounds.
Although Sticky Keys can be handy for keyboard shortcuts, users who accidentally enable that feature don’t usually want to keep it on. There are a few different ways users can turn off Sticky Keys in Windows 10 via the Control Panel and Settings. This is how to disable sticky keys in Windows 10 with three alternative methods.
Method 1. Turn Off Sticky Keys in Windows 10 by Pressing Shift Five Times
Sticky Keys has a Shift shortcut that many users accidentally active that feature with. You can also turn off Sticky Keys in Windows 10 with that same shortcut. Press the Shift key five times in a row. You’ll hear a beep every time you press that key until the fifth time. Thereafter, the Sticky Keys feature will no longer be enabled.
Note that this method will only work if you have the “Allow the shortcut key to start Sticky Keys” checkbox selected in Windows 10. That setting enables you to toggle Sticky Keys on and off by pressing the Shift key five times. You can disable that option as outlined within method 2.
Method 2. Turn Off Sticky Keys in Windows 10 from Settings
The Ease of Access section in Settings includes numerous options to configure Windows 10’s keyboard features. You can both enable and disable Sticky Keys from there. This is how to remove Sticky Keys in Windows 10 via Settings.
Step 1: Click the “Start” taskbar button to open the Start menu.
Step 2: Then press the “Settings” cog button to the left of the Start menu to open the Settings window directly below.
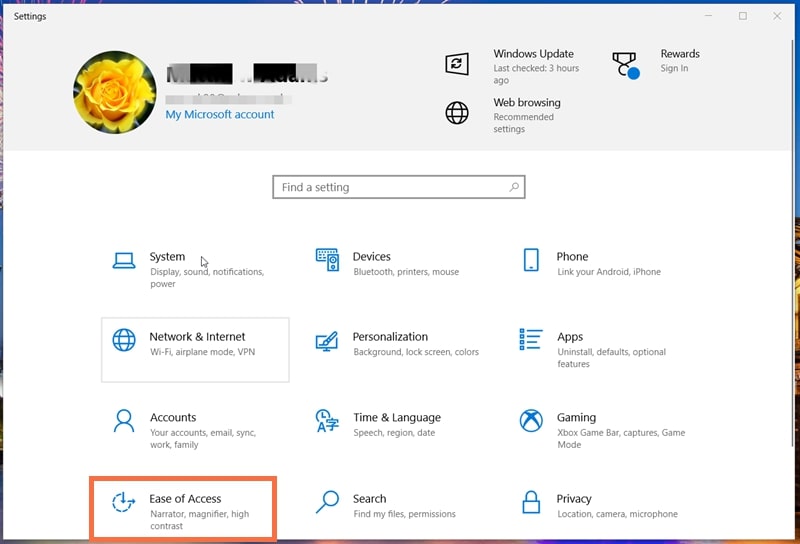
Step 3: Next, click “Ease of Access” to open that part of Settings.
Step 4: Select Keyboard on the left side of Settings to open the options in the snapshot directly below.
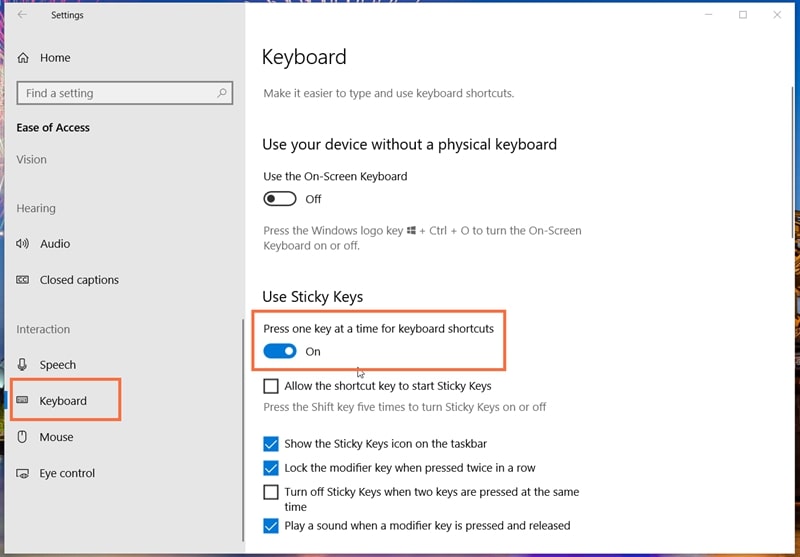
Step 5: Then click the “Press one key at a time for keyboard shortcuts” option to toggle it off.
Step 6: To disable the Shift keyboard shortcut, uncheck the “Allow the shortcut key to start Sticky Keys” checkbox.
If you scroll down the Keyboard tab, you’ll see the additional Sticky Key keyboard settings shown directly below. There you can select a “Show a warning message when turning on Sticky Keys, Toggle Keys, or Filter Keys from the keyboard” option. You can also check or uncheck a “Make a sound when turning Sticky Keys, Toggle Keys, or Filter Keys on or off from the keyboard” checkbox there. Those options are only relevant if you keep the Shift shortcut key for Sticky Keys enabled.

Method 3. Turn Off Sticky Keys in Windows 10 via Control Panel
Of course, you can still utilize the Control Panel in Windows 10. The Control Panel has very similar Sticky Key options to Settings. If you’re wondering how to disable sticky keys in Windows 10 via the Control Panel, follow the steps directly below.
Step 1: First, press the Windows key and R simultaneously to launch Run window box. With Sticky Keys enabled, you won’t need to press both those keyboard keys at the same time!
Step 2: Type Control Panel in the Open box within Run’s window.

Step 3: Click “OK” to open the Control Panel.
Step 4: If your Control Panel isn’t in the category view, click the “View by” drop-down menu. Then select the “Category” option on that drop-down menu.

Step 5: Select “Ease of Access” to open that category.
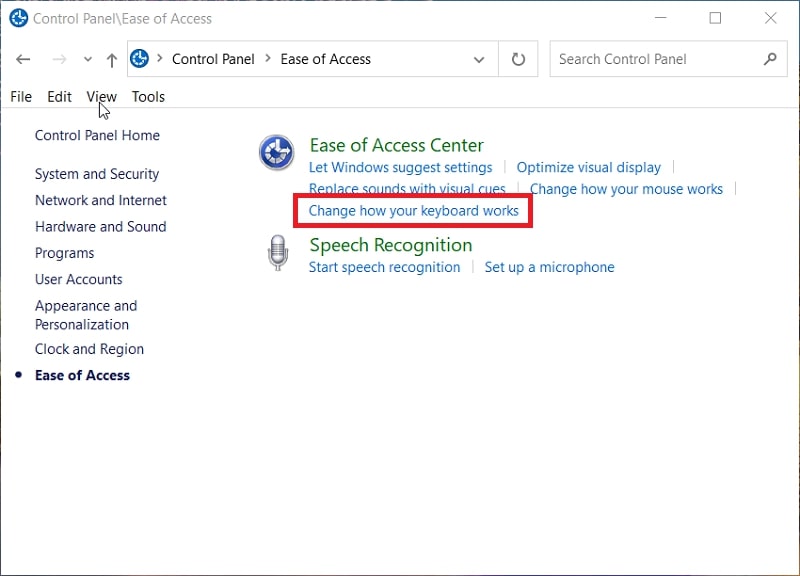
Step 6: Then click “Change how your keyboard works” to open the Control Panel options in the screenshot directly below.
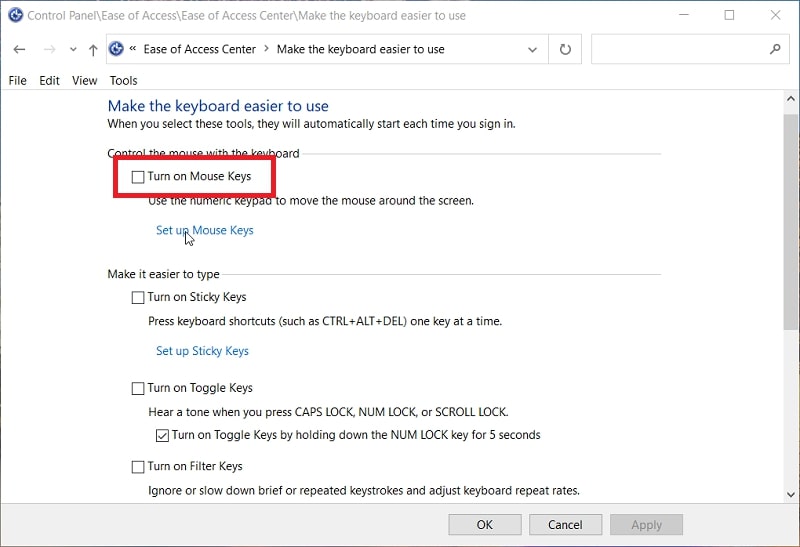
Step 7: Next, uncheck the selected “Turn on Sticky Keys” option.
Step 8: You can view the options shown directly below by clicking “Set up Sticky Keys” just below the “Turn on Sticky Keys” checkbox.
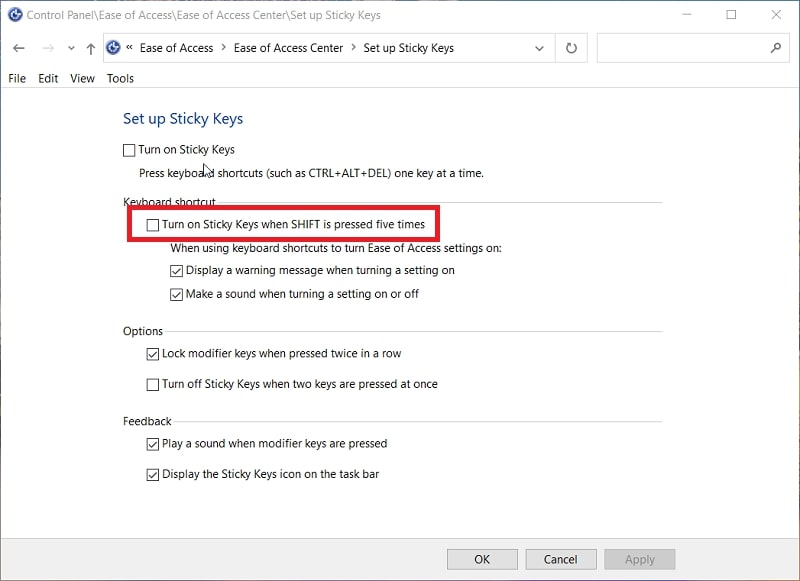
Step 9: There, you can deselect a “Turn on Sticky Keys when Shift is pressed five times” option to disable that shortcut.
Step 10: Also note the “Turn off Sticky when two keys are pressed at once” option. By selecting that option, you can turn off Sticky Keys in Windows 10 by pressing any two keyboard keys at once.
Step 11: Press the “Apply” button within the Control Panel to save your new settings.
Step 12: Click the “OK” button to exit the Set up Sticky Keys applet.
Note that when the Sticky Keys feature is enabled, you’ll see a StickyKeys icon in the system tray, as shown in the snapshot directly below. You can double-click that system tray icon to open the Control Panel’s Sticky Key options, which is a handy shortcut.
![]()
FAQs About Sticky Keys in Windows 10
Is the Sticky Keys feature in other Windows platforms?
Yes, Windows 8.1, 8, 7, Vista, and XP also have Sticky Keys.
Can I disable Sticky Keys in those other Windows platforms as outlined above?
You can enable and disable Sticky Keys with the Control Panel in Windows 8.1, 8, 7, Vista, and XP. As Windows XP, Vista, and 7 don’t have a Settings app, method two is not relevant for those platforms.
Do Mac platforms have anything like Sticky Keys?
Yes, Mac OS X has a very similar Sticky Keys feature you can enable or disable in that platform by clicking the “Apple menu” > “System Preferences” > “Universal Access.” You can turn Sticky Keys off or on via the Keyboard tab on the Universal Access window.
What should I do if the standard methods for turning off Sticky Keys don’t work?
If the standard methods above don’t disable Sticky Keys for you, try scanning for malware and updating or reinstalling your keyboard’s drivers. Try troubleshooting the issue with the Keyboard Control Panel troubleshooter. Also, check if any of the Ctrl, Alt, Shift, and Windows modifier keys are stuck on your keyboard. As a last resort, you might need to replace your keyboard with a new one if the methods above don’t disable Sticky Keys.
Is it worth keeping Sticky Keys on?
Sticky Keys can streamline hotkeys because you don’t need to hold down the modifier keys with that feature enabled. Yet, Sticky Keys can ruin keyboard controls for some Windows games. Many users also prefer to disable Sticky Keys because of the bleeping sounds they get from that feature. However, you can disable those bleeps by deselecting the “Play a sound when modifier keys are pressed” Control Panel option.
Conclusion
So, you can turn off Sticky Keys in Windows 10 with any of the above methods. You can also turn on Sticky Keys with the above methods by selecting the same options for turning that feature off. However, most users who don’t choose to enable Sticky Keys will no doubt prefer to turn that feature off.