BitLocker is an advanced security feature available in Windows 10 Pro and Enterprise. It is a feature that enables users to encrypt whole hard drive partitions on their desktops or laptops. BitLocker is undoubtedly a good feature for users who need to protect document data. However, there will be times when some users need to disable BitLocker in Windows 10.
One reason some users might prefer to disable BitLocker is to ensure they don’t lock their drives from themselves! Forgetting BitLocker encryption passwords can leave some users in a bit of a pickle when it comes to accessing encrypted drives. If BitLocker encryption isn’t entirely essential, disabling that feature might be more preferable for some users.
There are various ways you can turn off BitLocker in Windows 10 to decrypt encrypted drives. You can disable that feature with Windows 10’s Control Panel, Settings, Group Policy, and command-line tools. Here are several methods for disabling BitLocker in Windows 10.
Method 1. Disable BitLocker in Windows 10 from Control Panel
Step 1: Click the magnifying glass icon or search box on the left side of Windows 10’s taskbar.
Step 2: Type Control Panel in the search utility’s text box.
Step 3: Click Control Panel in the search results to bring up the window shown directly below.
Read More: How to Open Control Panel in Windows 10
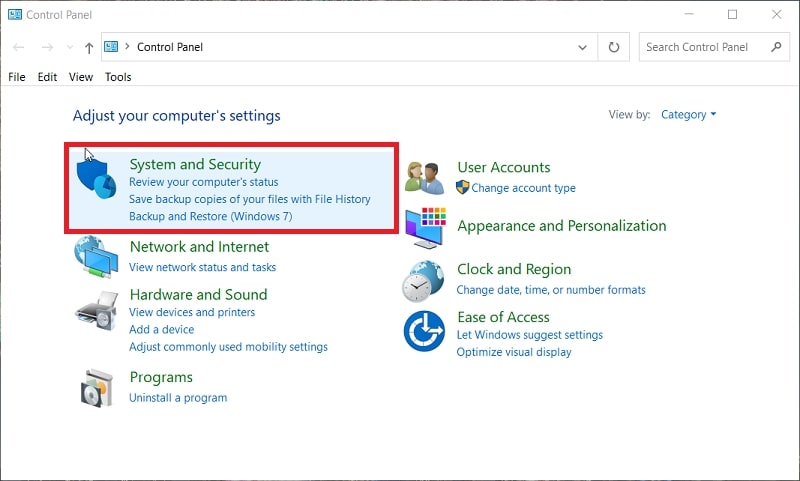
Step 4: Select “Category” on the “View by” menu if it’s not already selected.
Step 5: Click “System and Security” on the Control Panel.
Step 6: Next, click “BitLocker Drive Encryption” to open the Control Panel applet in the snapshot directly below.
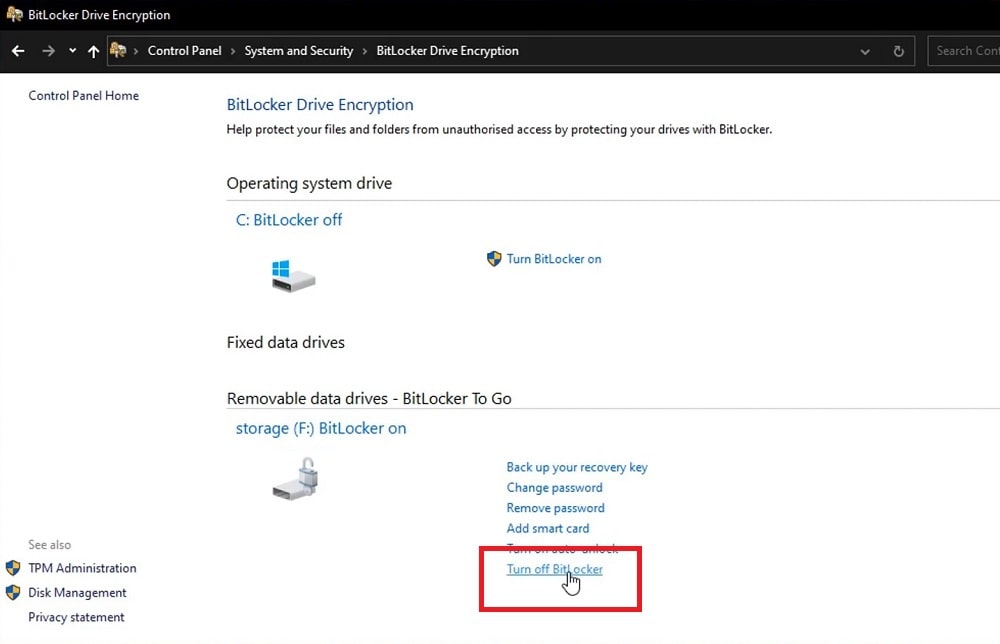
Step 7: Then click the “Turn off BitLocker” option there.
Step 8: Finally, press the “Turn off BitLocker” button to confirm.
Step 9: Wait for the decryption process to complete, after which you’ll be prompted to enter the password a final time to disable BitLocker in Windows 10.
Method 2. Disable BitLocker in Windows 10 from Settings
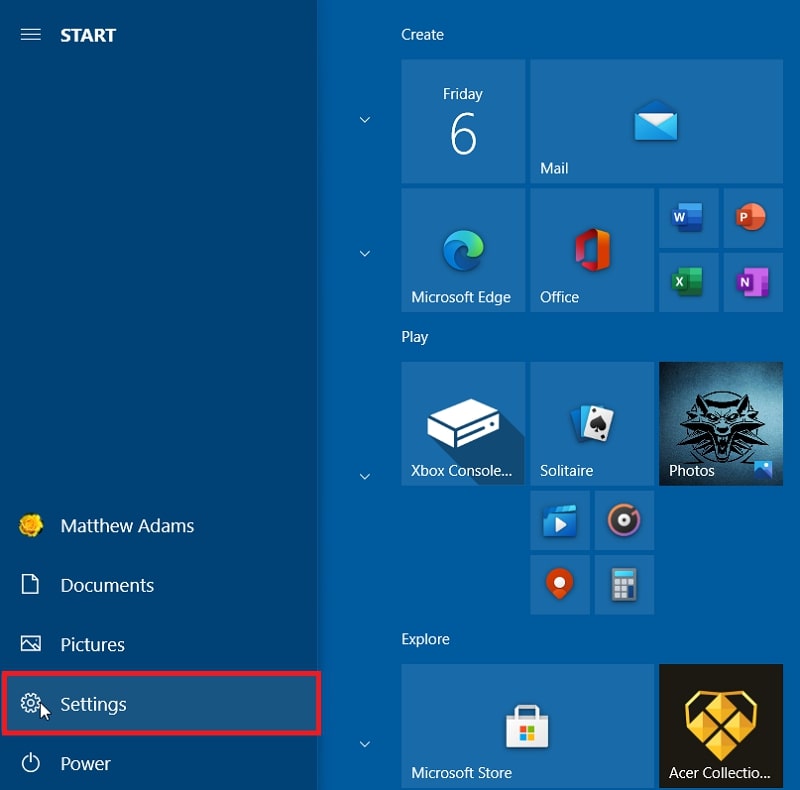
Step 1: Click the “Start” button to bring up the menu.
Step 2: Press the “Settings” cog button on the Start menu.
Read More: How to Open Settings in Windows 10
Step 3: Select “System” within Settings.
Step 4: Then click the About tab in the screenshot directly below.
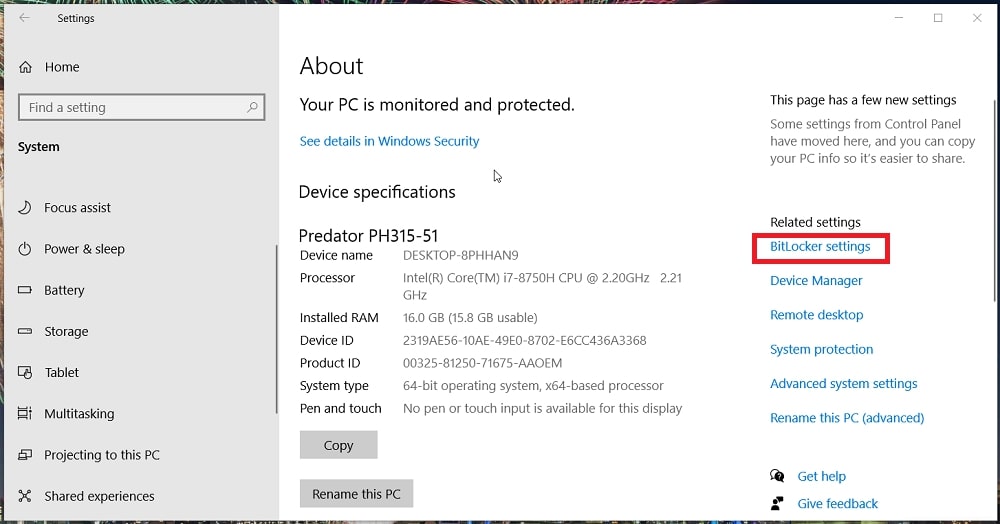
Step 5: Click “BitLocker settings” on the right side of the About tab.
Step 6: Select the “Turn off BitLocker” option.
Step 7: Then click “Turn off BitLocker” on the BitLocker Driver Encryption dialog box window.
Method 3. Disable BitLocker in Windows 10 from Command Prompt
The Command Prompt (CMD) is one of two command-line tools in Windows 10. You can disable BitLocker with CMD by entering a specific command in the Prompt’s window. This is how you can disable BitLocker from Command Prompt.
Step 1: Bring up the search tool, which you can do by pressing the Windows key + S keyboard shortcut for it.
Step 2: Type cmd in the search text box to find Command Prompt.
Step 3: Right-click Command Prompt to select a “Run as administrator” option for it.
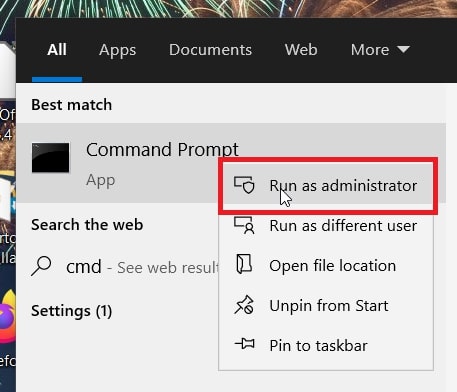
Read More: How to Run Command Prompt as Administrator in Windows 10
Step 4: Next, enter the command manage-bde -off X within the Command Prompt’s window. Note that you’ll need to replace X in that command with the letter of your encrypted drive. For example, the command will be manage-bde -off C for the C: drive.
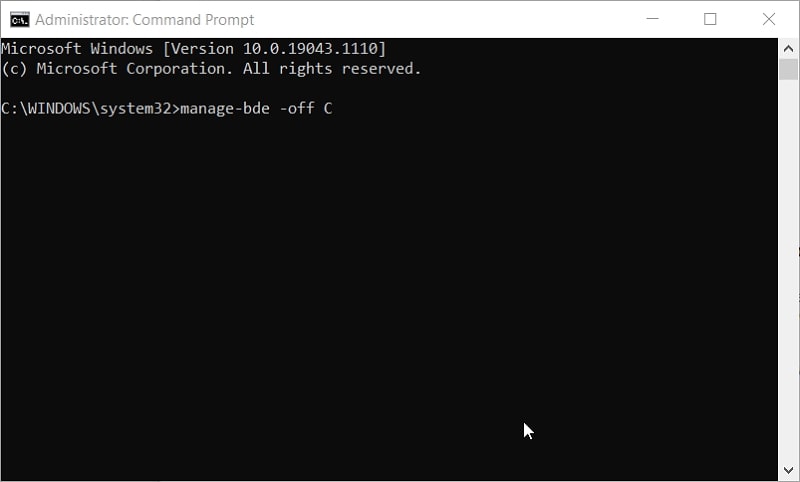
Step 5: Press the Enter keyboard key after typing the command in to initiate the decryption process.
Method 4. Disable BitLocker in Windows 10 From PowerShell
PowerShell is another Windows 10 command-line tool, which is a bit more advanced than the Command Prompt. You can also turn off BitLocker with PowerShell, but that utility has a different disable command. To disable BitLocker in Windows 10 with PowerShell, follow the steps directly below.
Step 1: Open Windows 10’s search tool.
Step 2: Type the keyword PowerShell in the search tool’s text box.
Step 3: Click the “Run as administrator” option for Windows PowerShell on the right of the search tool.

Read More: How to Open PowerShell in Windows 10
Step 4: Next, input the Disable-BitLocker -MountPoint “X:” command within PowerShell’s window. Replace X in that command with the letter of the drive you need to disable BitLocker for.
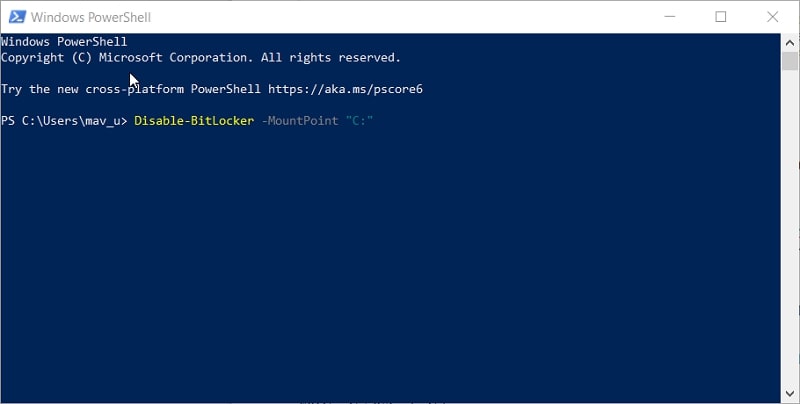
Step 5: Hit the Enter key to initiate the entered command, which will disable BitLocker. Note that the process can take a while.
You can also input two different commands to disable BitLocker for all volumes. To do that, you’ll need to input these two separate commands in the order specified:
First command: $BLV = Get-BitLockerVolume
Second command: Disable-BitLocker -MountPoint $BLV
Method 5. Disable BitLocker in Windows 10 From Local Group Policy Editor
Group Policy Editor is a useful feature in Windows 10 Pro and Enterprise that includes myriad configuration settings. If you prefer, you can disable BitLocker with that feature. You can turn off BitLocker with Group Policy Editor as follows.
Step 1: Right-click Windows 10’s “Start” button to bring up the Win + X menu.
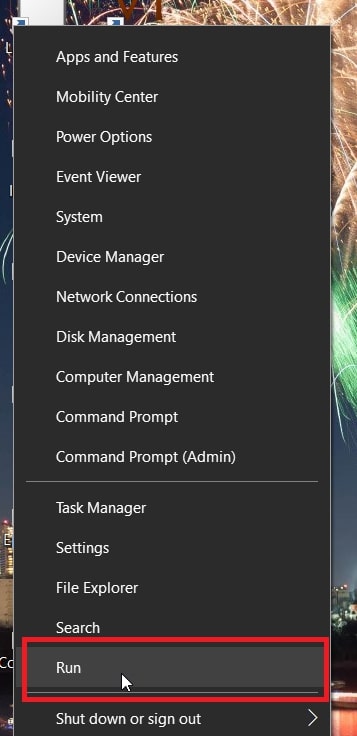
Step 2: Select “Run” on the menu.
Step 3: Type gpedit.msc in the Open text box and click “OK” to open the Group Policy Editor window shown directly below.
Step 4: Next, click “Computer Configuration” on the left of Group Policy Editor.
Step 5: Click “Administrative Templates” > “BitLocker Drive Encryption” > “Fixed Data Drives” to open the policy list in the screenshot directly below.
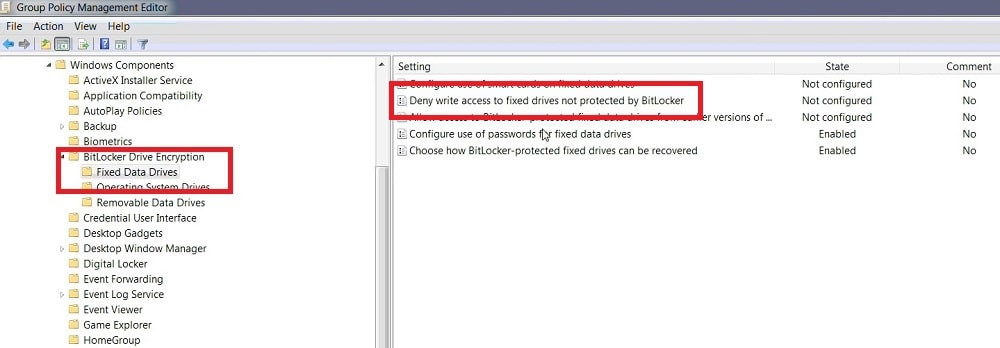
Step 6: Double-click “Deny write access to fixed drives not protected by BitLocker” to open that policy’s window.
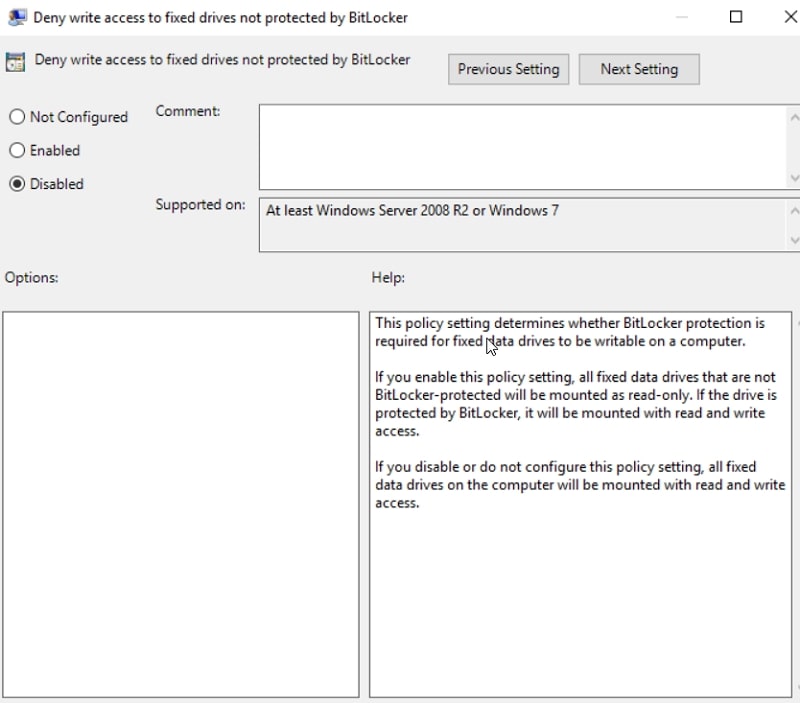
Step 7: Click the “Disabled” radio button on that window.
Step 8: Select the “Apply” button to save the new policy settings.
Step 9: Press the “OK” button to exit the Deny write access policy window.
Method 6. Disable BitLocker via the Services Windows
Step 1: To open the Type here to search tool, press the Windows key + S keyboard shortcut.
Step 2: Enter the keyword services within the search box.
Step 3: Click Services to open that app’s window.
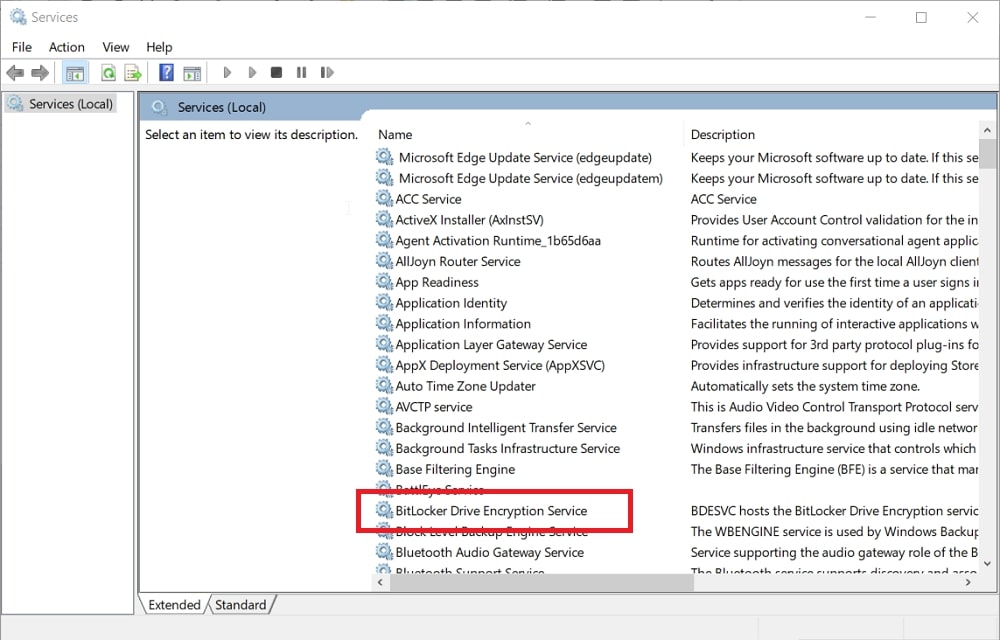
Step 4: Double-click the BitLocker Drive Encryption Service to open the window in the snapshot directly below.
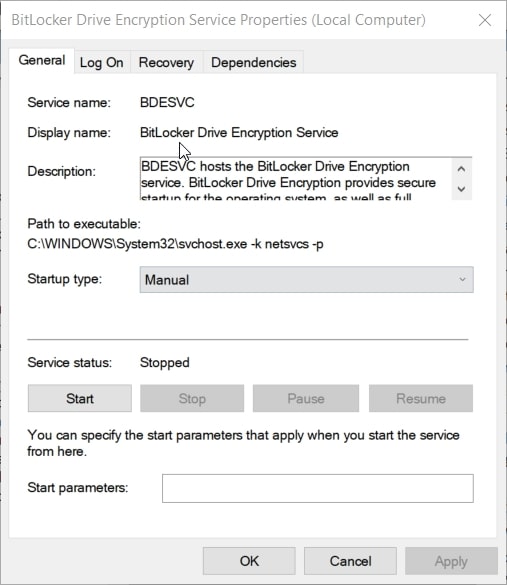
Step 5: Click the “Startup type” drop-down menu to select the “Disabled” option.
Step 6: Press the “Apply” button to apply the changed settings.
Step 7: Click “OK” to close the properties window.
Method 7. Turn Off BitLocker Using A Third-party Tool
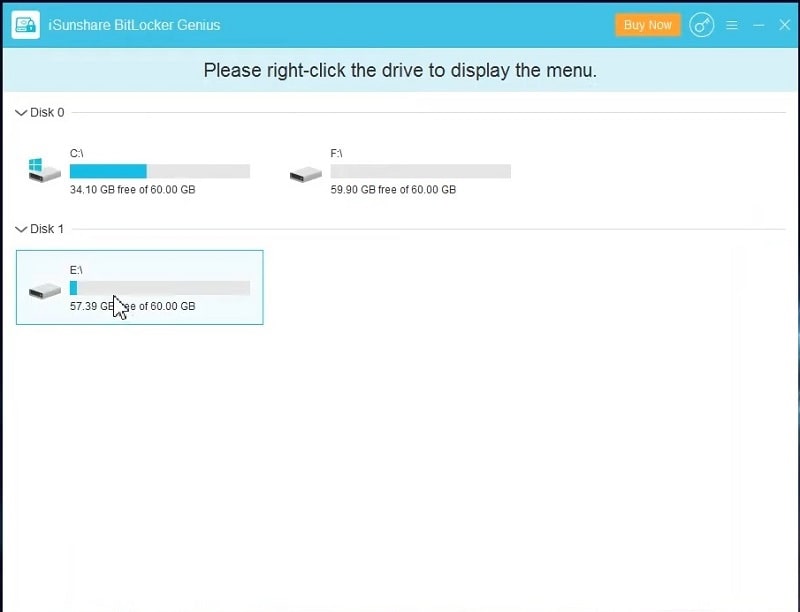
Alternatively, you can disable BitLocker with some third-party software packages, such as iSunshare BitLocker Genius for Windows. BitLocker Genius for Windows is an encryption management utility that incorporates various BL options. You can utilize that software to encrypt drives with BitLocker, lock them, change BL passwords, and turn off the encryption. It makes BitLocker somewhat easier to utilize.
BitLocker Genius is compatible with Windows 10/8.1/8/7 Pro and Enterprise editions. This is how you can disable BitLocker in Windows 10 with BitLocker Genius.
Step 1: Open the BitLocker Genius window after you’ve installed the software.
Step 2: Right-click an encrypted drive and select the “Turn off BitLocker” option.
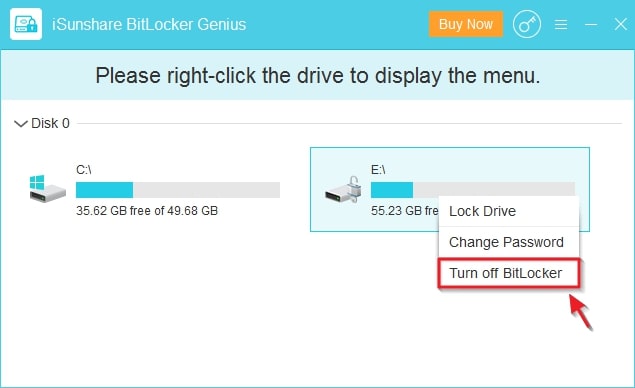
Step 3: Click the “Decrypt” button.
Step 4: Wait for the decryption to end, and then press the “OK” button. Alternatively, you can click a “Shutdown computer after completion” checkbox for your PC to automatically shut down when the decryption process has finished.
FAQ About BitLocker Decryption in Windows 10
How long does it take for the BitLocker decryption to take?
The time it takes for BitLocker’s decryption to complete can vary greatly depending on how much data is encrypted and your PC’s speed. It can take anywhere from 30 minutes to a couple of hours, and maybe longer, for the BitLocker decryption to finish.
Is there a way I can check BitLocker’s decryption progress?
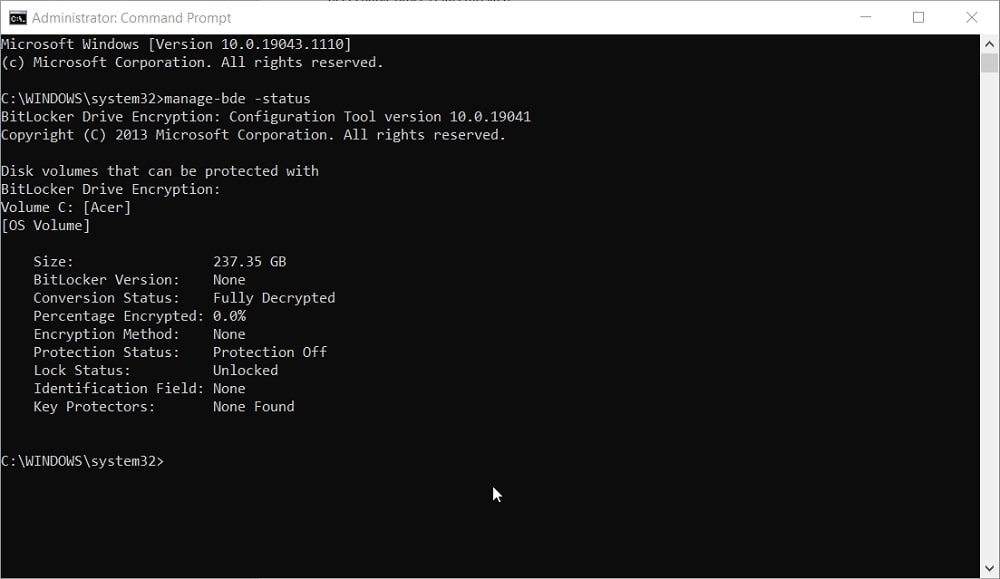
Yes, you can check decryption progress by entering a BitLocker status command in the Command Prompt. To do that in Windows 10, follow the steps directly below.
Step 1: First, open up the search box in Windows 10.
Step 2: Type cmd in Windows 10’s search utility to find Command Prompt.
Step 3: You’ll need to open an elevated Command Prompt by right-clicking it and selecting Run as administrator.
Step 4: Now input manage-bde -status within the Command Prompt’s window, and press the Enter keyboard key. Then the Command Prompt will display a BitLocker status as in the snapshot directly below. When the percentage encrypted figure is at zero, the decryption is complete.
Can I temporarily suspend BitLocker encryption instead of completely disabling it?
Yes, you can do so via the BitLocker Drive Encryption Control Panel applet. Open the BitLocker Driver Encryption applet as outlined within method one. Instead of clicking “Turn off Bitlocker,” select the “Suspend Protection” option. Then select “Yes” on the confirmation prompt that pops up. You can restore the BL encryption by selecting the “Resume protection” option within BitLocker’s Control Panel applet.
Are the above methods for disabling BitLocker applicable to Windows 8 and 8.1?
Yes, the methods above will also disable BitLocker in Windows 8 and 8.1. Note, however, that the instructions above for opening Control Panel, Settings, Services, Command Prompt, PowerShell, and Group Policy are more specifically for Windows 10.
Conclusion
It’s relatively straightforward to disable BitLocker with any of the above methods. If you ever need to upgrade Windows 10 versions, update BIOS or UEFI firmware, or change hardware, it’s recommended that you turn off BitLocker with one of those methods. Doing so will ensure you don’t need to enter a BitLocker recovery key after platform and firmware upgrades or hardware changes. Disabling BitLocker will at least ensure you never need BL password or recovery keys, which can stop you from opening your encrypted drives if you forget them.