Microsoft makes it easy to insert images into its Office apps, such as the Word document. However, what if you have multiple images that you didn’t want? Well, you can easily delete all pictures from Word document in a jiffy.
Pictures help you add visualized context to your content. However, too many of them can make your document look more like an album than a research or essay paper. To remove all pictures from your Word document, you can use the Find and Replace functionality of the Word app.
In this article, we show you the two ways to remove all images from word documents.
Steps to Delete All Pictures in Word Document
Almost all the word editing tools and text viewers feature a built-in Find and Replace tool. This helps you find a specific or paragraph in the document without having to screen an entire document manually.
In Microsoft Word, you can use the Find and Replace tool to search and replace text or delete images from your Word doc. Here’s how to do it.
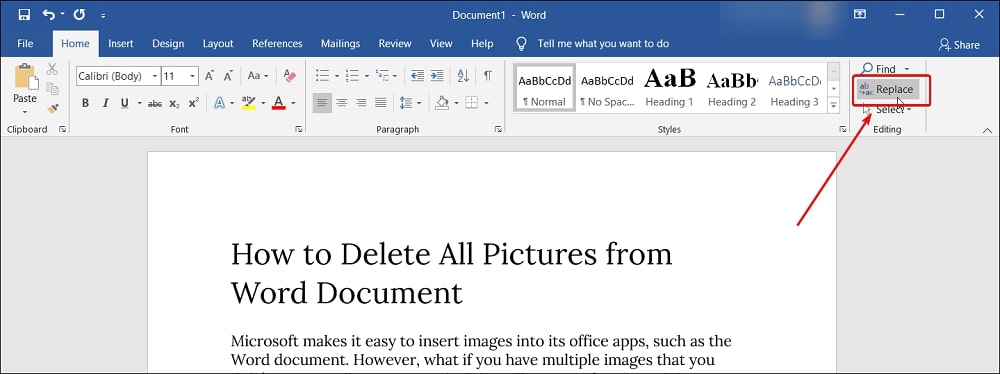
Step 1. Launch the Word app and open your document from where you want to remove the images. In the Home tab, locate and click on the Replace option under the Editing section. Alternatively, you can also press Ctrl + H shortcut to access Find and Replace in Word.
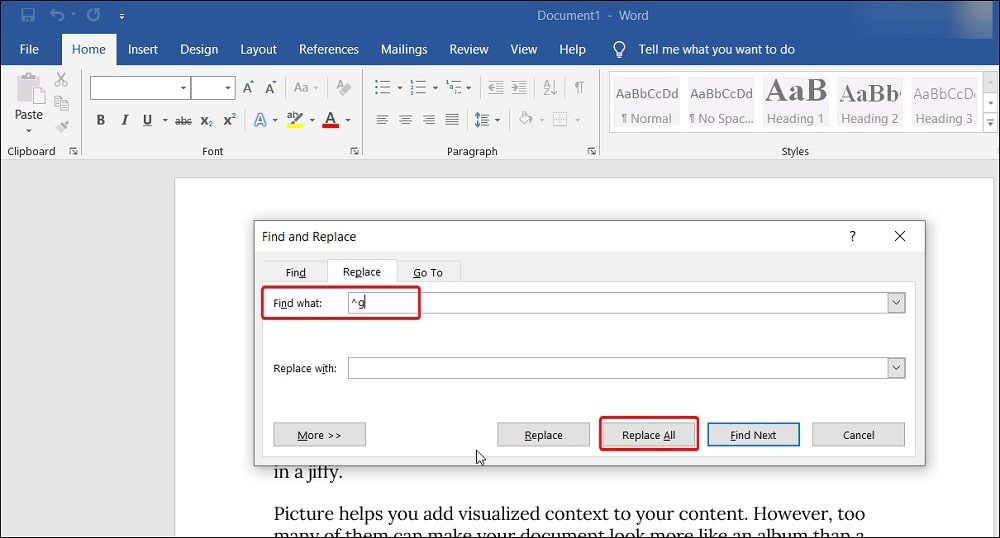
Step 2: A Find and Replace window will appear. In the Find what field, type ^g. Here, g is a special code that represents graphic. It includes all the image media such as graphics, charts, photos, and everything in the image format included in your document.
Alternatively, you can also do this from the Search Options. To do this, click the More >> button in the Find and Replace window. Click the Special button and choose Graphic from the list of options. You will see that ^g will appear in the Find what field.

Step 3: Click on the Replace All button. All the images in your Word document will be removed.
Bonus: The Easiest Way to Remove All Images from Word Document
Removing images from a Word doc using the Find and Replace tool is easy and a very convenient feature. However, what if you want to remove images from multiple Word documents?
You can use third-party image removal tools like Kutools for Word. It is a Microsoft Word add-on that allows you to remove images from your Word document with one click. Apart from the images, it can also remove separate, clear header lines, extra space, horizontal lines, remove footnotes and endnotes, and more.
To use the tool, download and install Kutools for Word. Once installed, open the Word document with images that you want to delete.
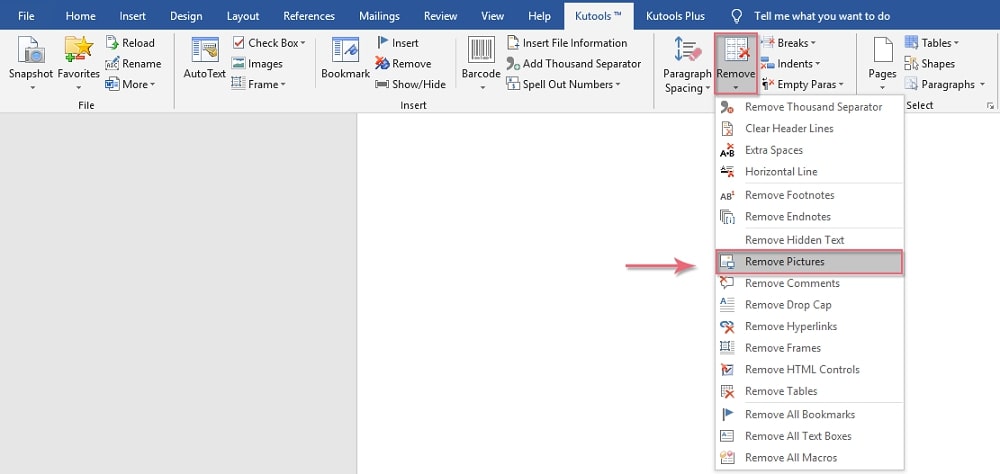
Open the Kutools tab from the menu. Click the Remove button and then select Remove Pictures. A prompt will appear to confirm if you want to remove all the images.
Click Yes, and all the images from your Word document will be removed. Repeat the steps with other documents you have to delete images.
Frequently Asked Question
How do you select all pictures in Word?
To select all images, hold down the Ctrl key and click on the pictures one by one to select them all.
How do I restore deleted images in Word?
You can use the undo feature in Windows to restore deleted images from a Word document. To do this, press the Ctrl + Z on your keyboard. However, this will only work if you haven’t closed the Word document after deleting the images.
Conclusion
Knowing how to batch delete all the pictures in Word can be helpful if you are trying to declutter your document. Microsoft Word has a useful Find and Replace function built into the app to help find and delete all the images.
However, the easiest way to delete images from multiple Word documents is to use the Kutools for Word. It has multiple useful tools for Office app users.