Microsoft Word is the world’s foremost word-processing application. It is the word processor of choice for many users because it includes an abundance of formatting tools and options. Those tools and options enable users to set up many different kinds of visually appealing documents. One way users can format documents in MS Word is to insert frames in them.
Many Word users might like to insert border frames into documents to enhance their designs. Users can apply frames to selected text in MS Word to add extra emphasis for more important passages. They can also select from various border styles and colors to give inserted frames a bit more visual pizzazz. Colorful and varied frames can considerably liven up plain MS Word documents.
One thing to note about paragraph frames is that they’re not the same as text boxes. Unlike text boxes, frames can be saved as styles. They can also incorporate captions, comments, and fields that text boxes can’t contain. Text boxes are separate graphical layers in Word documents.
Microsoft Word is also versatile software. Therefore, there’s more than one way you can add frames to Word documents. That application has three alternative tools with which you can insert border frames. Some add-ons also extend that application’s frame utilities. You can add frames to Word documents with the alternative methods below.
Method 1: Apply Frames to Text With the Borders and Shaders Tool
The Borders and Shading utility is Word’s primary tool for inserting frames. With that tool, you can apply borders to selected passages of text, specific pages, or whole documents. This is how to make a frame in word with that utility.
Step 1: First, select a passage of text in a Word document to apply a border frame.
Step 2: Then click the “Borders” button on Word’s Home tab.
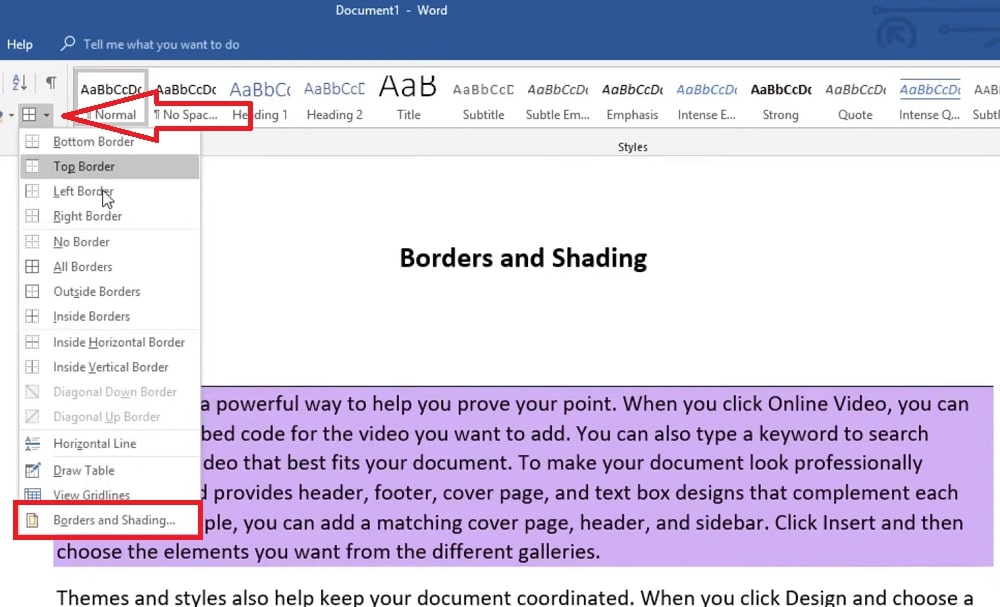
Step 3: Select “Borders and Shading” on the menu.
Step 4: Click the Borders tab shown directly below if it’s not already selected by default.
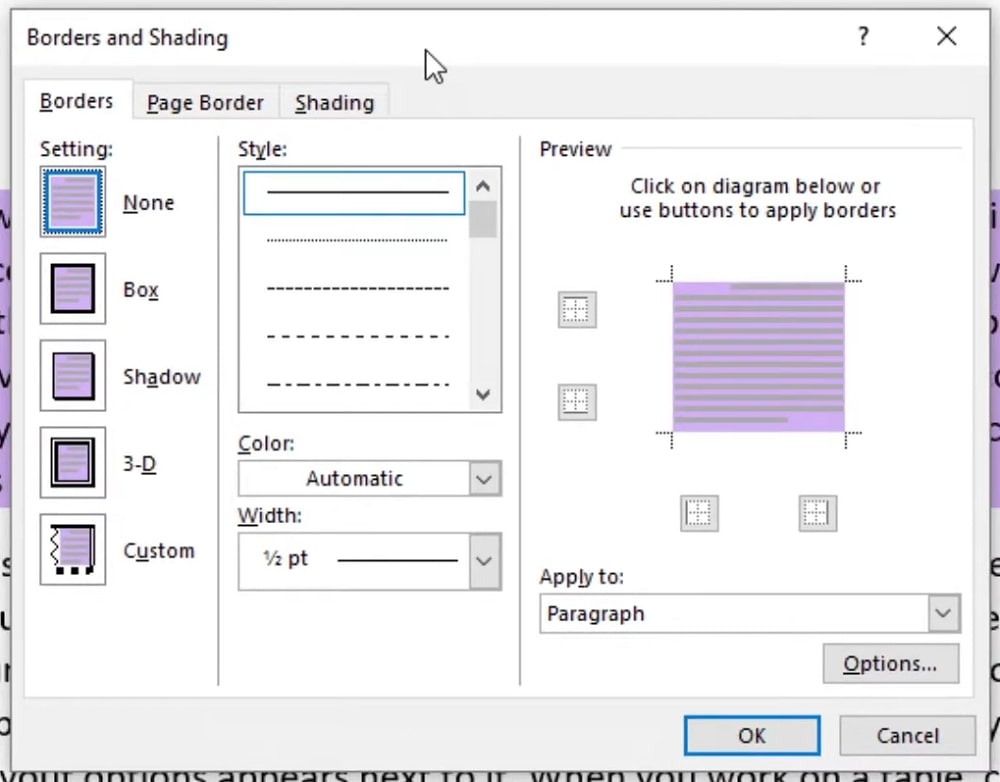
Step 5: Then select a “Box,” “Shadow,” or “3-D” frame option for your selected text passage depending on preference.
Step 6: Select a border style in the Style box.
Step 7: Click the “Color” drop-down menu to open a color palette. Then select a color for the text frame from there.
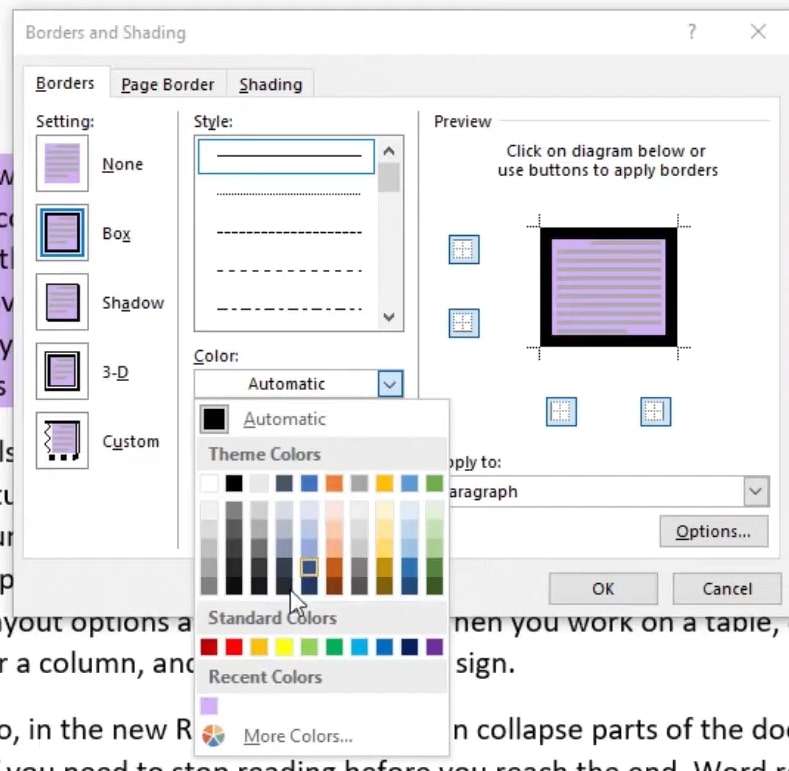
Step 8: Next, click the “Width” drop-down menu to choose a different border weighting option.
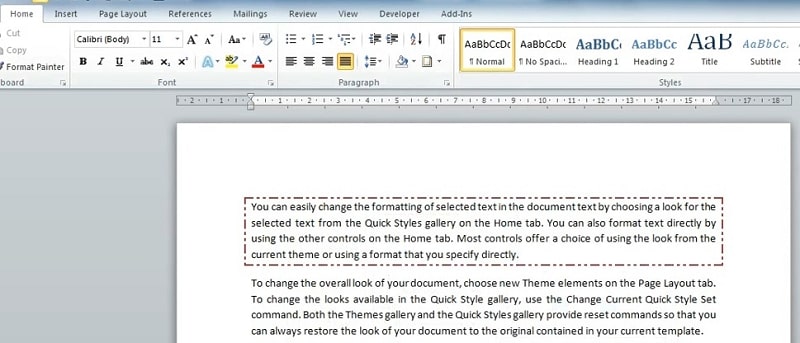
Step 9: Thereafter, click the “OK” button to apply the frame to the selected text.
Method 2: Insert Frames into Documents With Legacy Forms
MS Word has a hidden “Insert Frame” option on its Developer tab with which you can insert frames. That option is a part of Word’s Legacy Forms developer feature. As the Developer tab is not enabled by default, you’ll need to customize the application’s ribbon to select its “Insert Frame” option. This is how to create a frame in Word via Legacy Forms.
Step 1: First, select Word’s File tab.
Step 2: Next, click “Options” on the left side of MS Word.
Step 3: Then select “Customize Ribbon” in Word Options.
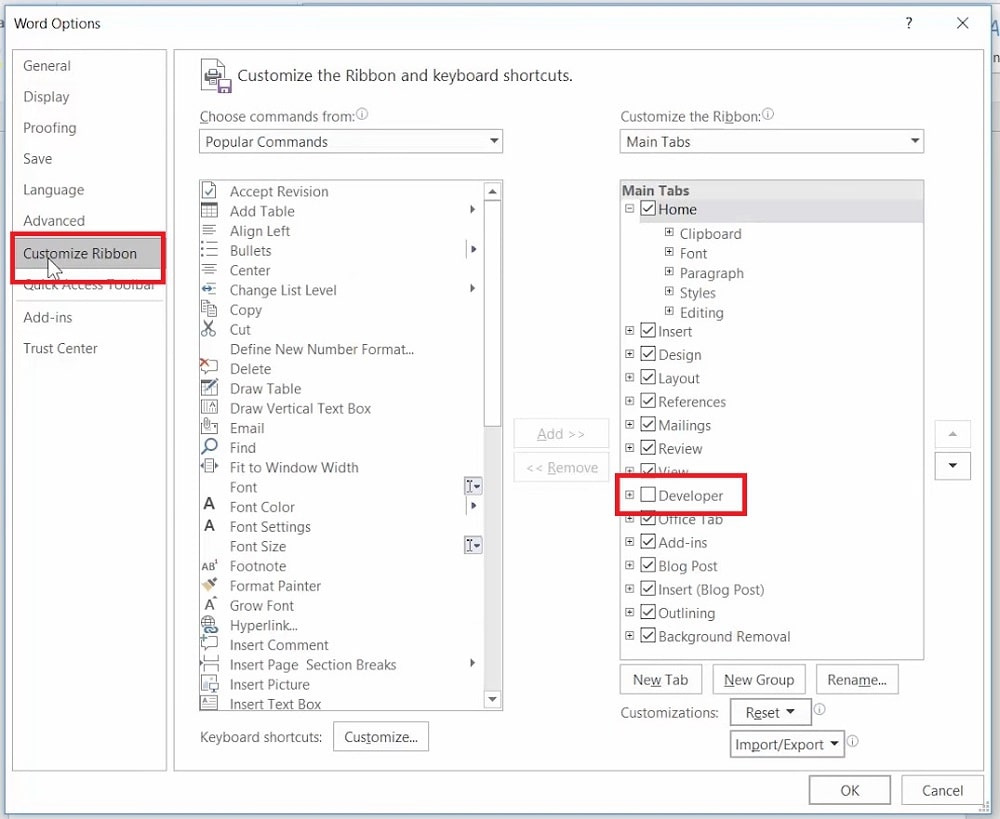
Step 4: Select the “Developer” checkbox on the right side of Word Options.
Step 5: Click “OK” to apply the settings.
Step 6: Thereafter, select the Developer tab in MS Word.
Step 7: Click the “Legacy Forms” button in the snapshot directly below.
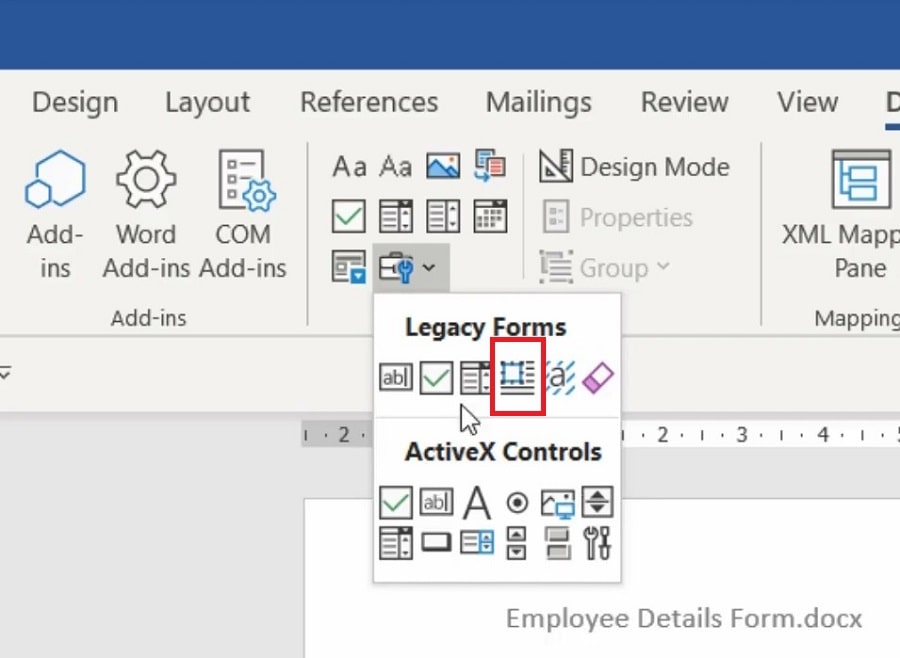
Step 8: Now click the “Insert Frames” button there.
Step 9: Expand the frame box by dragging the cursor to insert the border.
Step 10: Thereafter, you can click within the frame to enter some text into it.
Method 3: Add Frames With the Shapes Tool
The Shapes tool in MS Word proves yet another way to apply frames to text. You can insert various rectangular, circular, and square shapes into Word documents that can frame text passages with borders. By doing so, you can also select different shape styles for the borders. This is how to make a frame in Word with the Shapes utility.
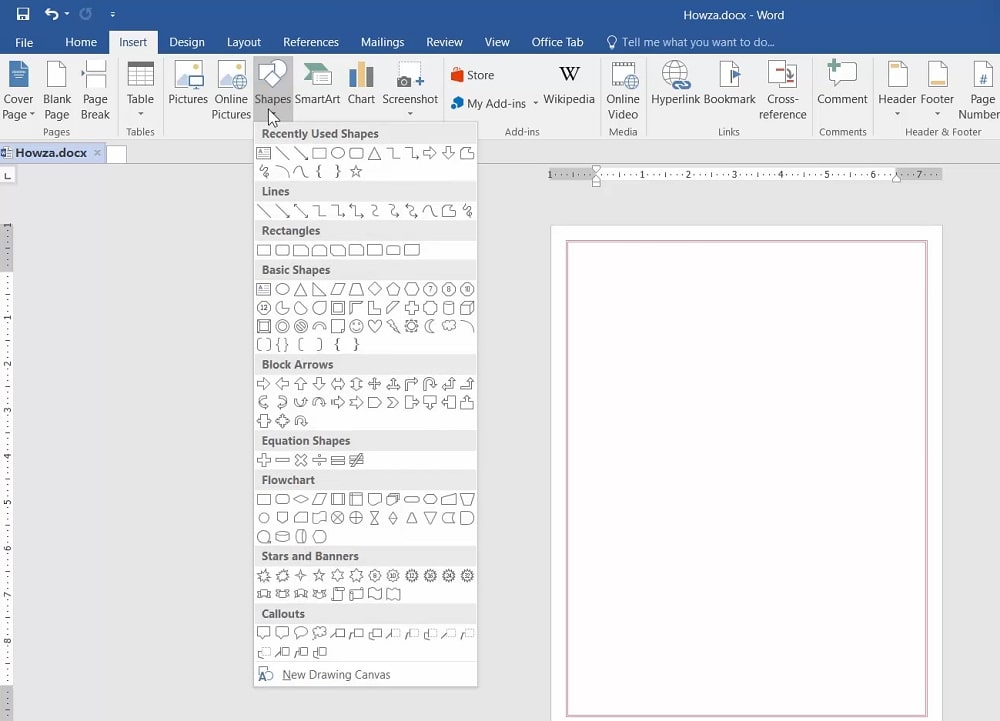
Step 1: First, select Word’s Insert tab.
Step 2: Next, click the “Shapes” button.
Step 3: Choose a suitable frame shape from the menu.
Step 4: Hold the left mouse button and drag the cursor to insert a border shape on the page.
Step 5: Click the small down arrow for the Shape Styles box to open the Themes Style menu show directly below.
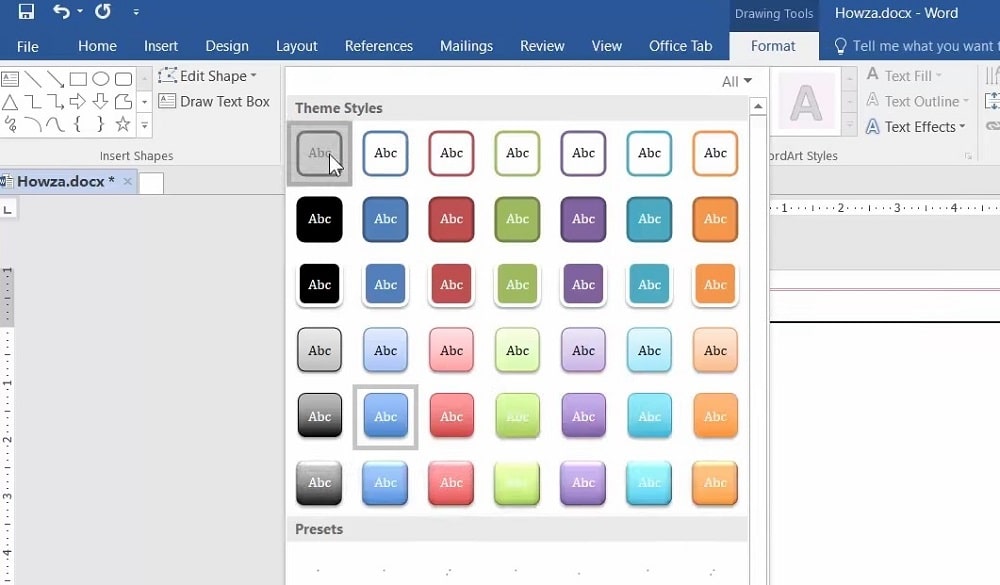
Step 6: Select a shape theme that doesn’t have a background fill color.
Step 7: To insert a passage, right-click the frame shape and select the “Add Text” option. Then enter some text in the shape.
Bonus: The Easiest Way to Insert Frames into Word Document
You can also insert text frames into MS Word documents with the Kutools For Word extension. That’s one of the ExtendOffice add-ons that add numerous extra features to Office applications. It adds a whole new tab to Word that includes a “Frame” option. You can insert text frames for Word documents with Kutools as follows.
Step 1: Select the Kutools tab in Microsoft Word.
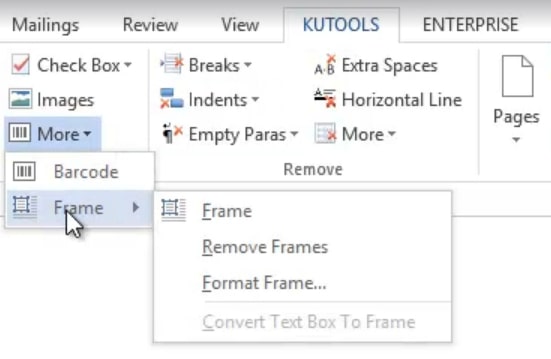
Step 2: Next, click the “More” button to open a small menu.
Step 3: Click the “Frames” submenu.
Step 4: Select the “Frames” option on the submenu.
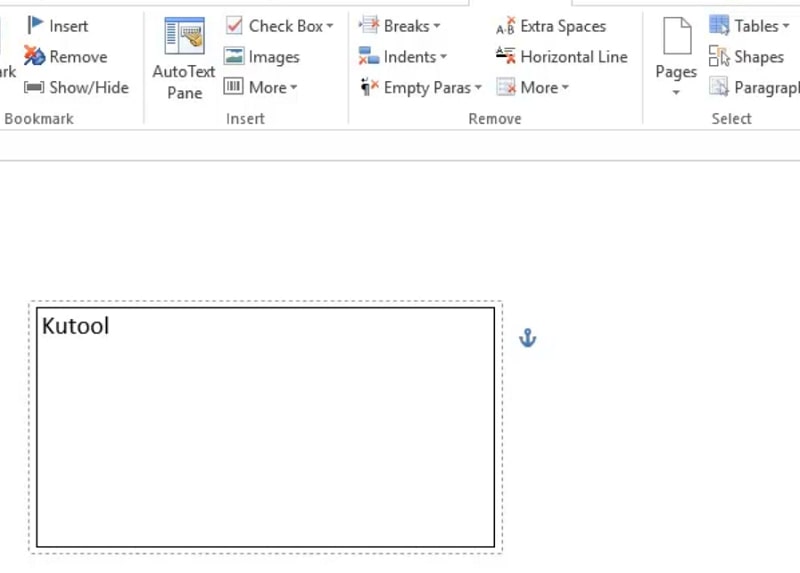
Step 5: Next, drag your mouse cursor to expand the frame on the page.
Step 6: To format the frame, click the “More” option again on the Kutools tab.
Step 7: Click “Frame” to select the “Format Frame” option.

Step 8: Then you can click the “Width” and “Height” drop-down menus to select options that will change the frame’s dimensions.
Step 9: Select the “Around” option if you prefer to have text wrapped around the frame.
Step 10: Click “OK” on the window to apply the new settings.
FAQs About Frames in Word Document
Can you insert frames into documents with the MS Word web app?
No, you can’t add new frames into documents with Word’s web app. However, that app will preserve frames applied with the MS Word desktop software in documents you open with it.
Can I add frames to inserted images in Word?
Yes, you can add frames to pictures in MS Word documents. You can do so via the Picture Format tab in Word as follows.
Step 1: Add an image to the document by clicking “Pictures” on the Insert tab. Then choose a suitable image on your hard drive, and click the “Insert” button.
Step 2: After inserting the image, click “Picture Border” on its Picture Format tab.
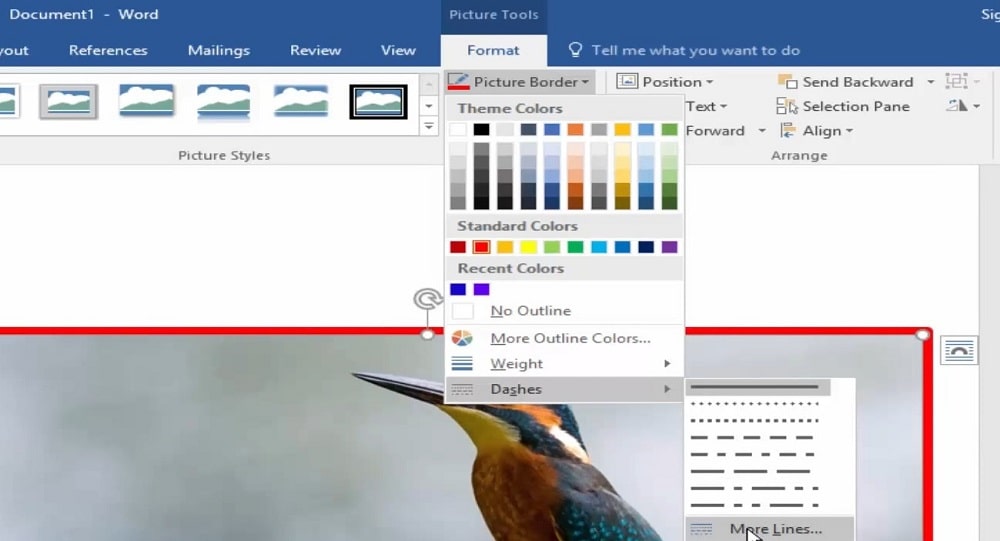
Step 3: Click “Weight” to select a frame line option there.
Step 4: Choose a color for the frame from the theme colors palette.
Step 5: Select “Dashes” to choose a dash frame effect.
Step 6: You can also choose different image frames from the Picture Styles gallery in the Picture Format tab.
Can I apply page frames to whole Word documents?
Yes, you can do so via the Page Border tab within the Borders and Shading utility. Select “Whole document” within the “Apply to” drop-down menu on that tab. Then choose a suitable page frame, and click the “OK” option.
What MS Word versions are the above methods applicable?
The above framing methods are generally applicable to MS Word applications dating back to 2010. However, the Kutools add-on is also compatible with MS Word software dating back to 2003.
Is the aforementioned Kutools for Word add-on compatible with Microsoft Word for Macs?
No, the Kutools add-on only supports Word for Windows platforms.
Conclusion
So, you can add frames to text in Word with the Borders and Shading tool, Kutools add-on, Legacy Forms, or even the Shapes utility. Whatever method you choose, frames can be a great addition to your Word documents. Adding frames to text passages with the methods outlined above can make your documents shine. It’s worth utilizing Word’s framing tools whenever you need to create party invitations, sale flyers, calendars, newsletters, menus, and any other document types that need appealing visual designs.