Excel worksheet is prone to holding very vital information about the company. It’s where all the arithmetic and possible financial statements are kept. Going by this, many organizations take lots of precautions when handling such sheets. They thrive to avoid sharing information with unauthorized users. And it’s all for the good reasons – to avert possible deletes or additions of information. Hence, the lock of a sheet or enforcement of password protection. This is all for the good until the unimaginable happens. What if you forget the password that you just used to lock a critical Excel worksheet or workbook? You must find a quick solution on how to unprotect an Excel sheet without password. Scroll through for possible ways to get out of the hook.
Method 1. Best Way to Unprotect Excel Sheet without Password
The top solution to unprotect Excel sheets without password is via PassFab for Excel. This easy solution lets you recover any forgotten Excel password in simple steps. It will losslessly recover your password in numerous scenarios. Use it when your Excel workbook is locked, when you can’t edit an Excel worksheet you are currently working on, or if you are unable to print your Excel workbook or worksheet.
And it doesn’t end there!
PassFab for Excel is one of the best Excel password recovery software, offers three password attack types – Dictionary Attack, Brute-force with Mask Attack, and Brute-force Attack. Follow these steps to unprotect Excel file without password.
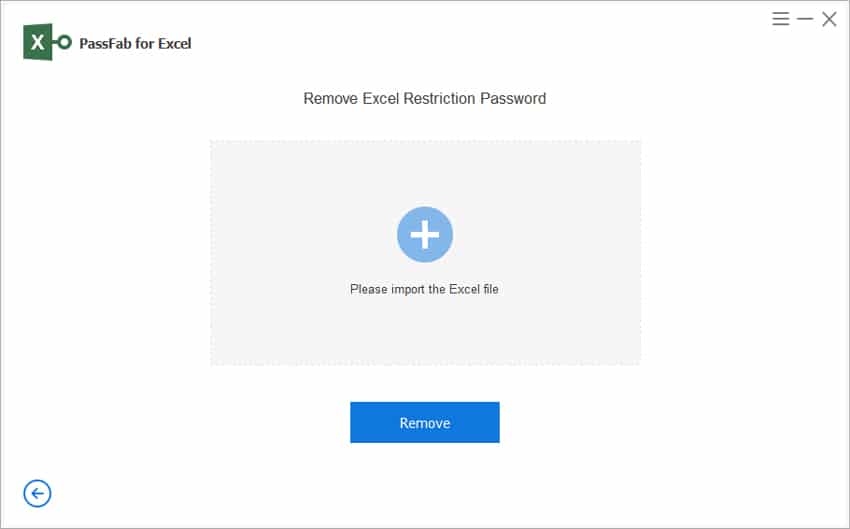
Step 1. Run PassFab for Excel
First, launch PassFab for Excel on your computer and select the ‘Remove Excel Restriction Password’ option to unprotect your Excel file. This will let you read any contents in the password-protected Excel files, when you have lost your Excel document password, or when your Excel worksheet password doesn’t work.

Step 2. Import Locked Excel File
Select the Excel file with the protected password to unlock. Just click the ‘+’ sign to add your files to the program. Next, hit the ‘Remove’ button for the program to commence the password removal process.
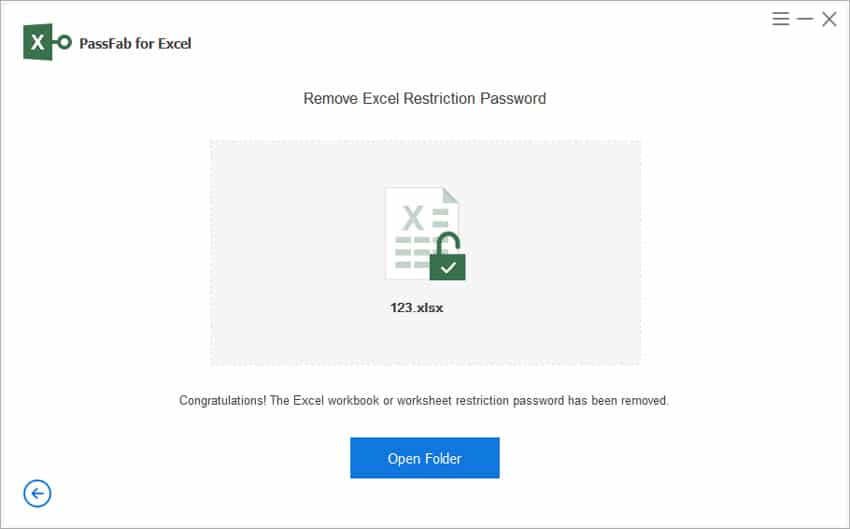
Step 3. Remove Restriction Password
The final step is for the program to run through and remove the restriction password. Just click on the ‘Open Folder’ option to locate your Excel file without a password restriction. You can now access the Excel file without a password.
Read More: PassFab for Excel Review
Method 2. Unprotect Excel Sheet without Password via VBA Code
Later versions of MS Excel allow you to unprotect Excel sheets without a password in Visual Basic Application code.
Step 1. Identify the Excel sheet that is password-protected and open it. Then press Alt+F11 to open the Visual Basic Editor.
Step 2. Next, go to the left pane and right-click on the Project-VBAProject pane – workbook name. While open, go to the ‘Context’ Menu and click the ‘Insert’ > ‘Module’ option.

Step 3. You’ll immediately be redirected to an open window requiring a code. Please write the below code to the window and click on the ‘Run’ option.
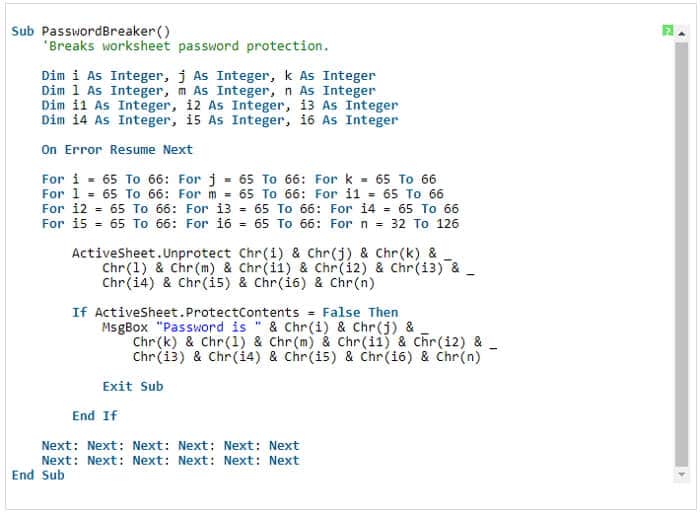
Give the macro a few minutes to generate a new password. And it is by no means related to the original password. It’s only to open the protected Excel sheet. Click on the ‘OK’ option and access your Excel file.
Note: Remember that each Excel sheet requires you to run an independent VBA macro. Likewise, save your file as an Excel 2003 workbook with ‘xls’ Extension before you run the macro. Once unprotected, save your file with the .xlsx file extension.
Method 3. Unprotect Excel File without Password Using ZIP
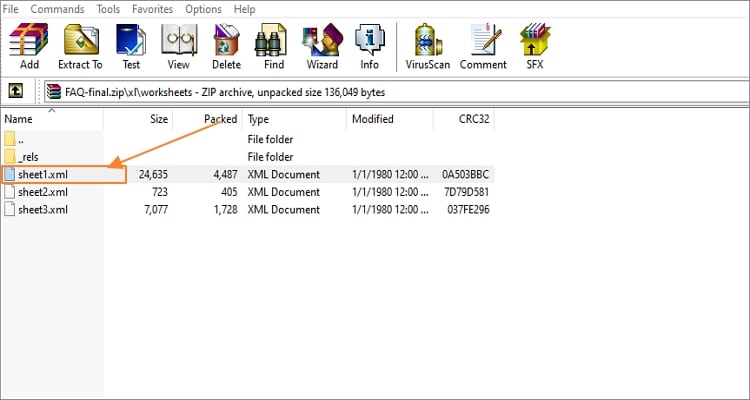
Zip offers you another quick way on how to unprotect Excel without password. However, it is only effective for Excel files saved in the ‘.xlsx’ format.
Step 1. Start by changing your protected Excel file from ‘.xlsx’ to ‘.zip’ extension.
Step 2. Then use the 7Zip software to open the ‘ZIP’ archive. Look out for the ‘xl-> worksheets’ folder and open it to access the files named under various sheets. They are usually named with the ‘.xml’ extension – such as sheet1.xml, sheet2.xml, and so on. Delete the tag that start and ends with ‘sheetProtection.’
Step 3. Finally, change the extension of the file to .xlsx. With this, the protected Excel file would have been unprotected, and you can now freely edit your Excel sheet.
Method 4. Unprotect Excel Without Password Using Google Sheet
You will need a Google Drive account to use this option. But again, it offers you a quick way to unprotect your Excel worksheet in few steps as below.
Step 1. Open your Google Drive, then create a new Google Sheet. You can also sign up for a new account if you don’t already own one.
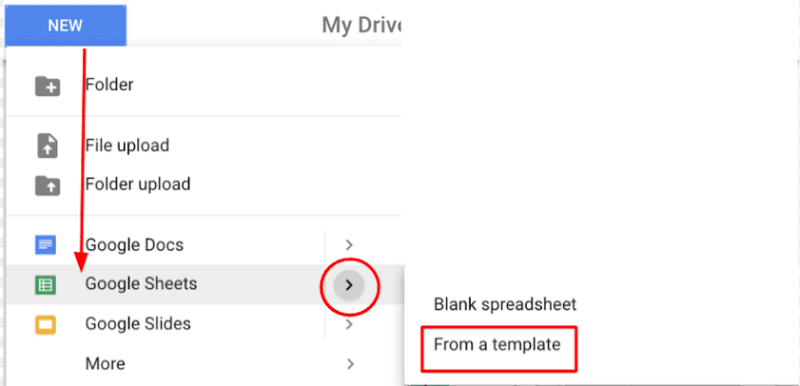
Step 2. Once you sign in, click on the ‘File’ menu > ‘Import’ option.
Step 3. Check the ‘Import file’ box and select the ‘Upload’ option.
Step 4. Hit the ‘Select a file from your device’ tab.
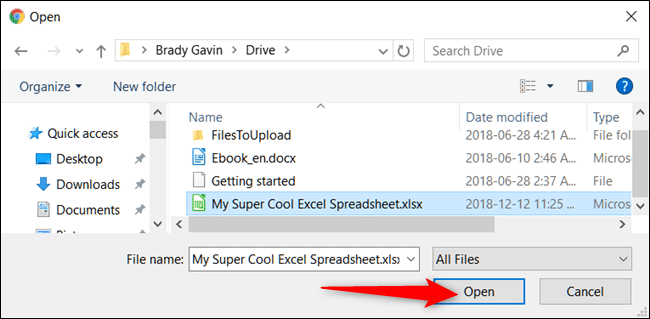
Step 5. Next, peruse among your Excel files and select the protected Excel Sheet that you wish to unprotect. Then click the ‘Open’ tab.
Step 6. You’ll be redirected to the ‘Import file’ window, choose the ‘Replace spreadsheet,’ and select the ‘Import Data’ option. Your Excel sheet will automatically be imported to ‘Google worksheet.’ The good news is that it will now be ‘Unprotected’; hence, you can go ahead and edit the Excel file using Google Sheet or download it to your PC.
Method 5. Unprotect Excel Sheet without Password Online
The other way unprotect excel files without a password is online. LostMyPass can remove the password from your Excel sheet in a few steps.
Just visit the LostMyPass MS Excel Password Recovery Page and upload the protected Excel sheet.
Wait for a few days, and boom! Your Excel sheet will be unprotected.
Go ahead and make any changes as the Excel file will be without any password protection.

Bonus Tips: Unprotect Excel Sheet with Password
You probably know the password to your Excel sheet and wish to remove protection. Likewise, you may have recovered your password from other services or tools. If so, you can easily unprotect your Excel sheet with password via these steps.
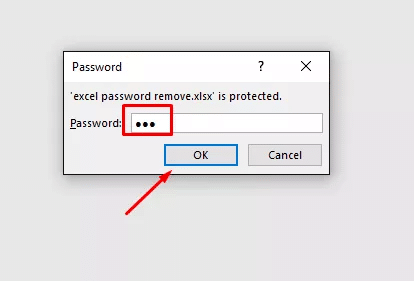
Step 1. Open your protected Excel sheet and key in the password, and click the ‘OK’ button.
Step 2. Next, click the ‘File’ tab > ‘Info’ option.
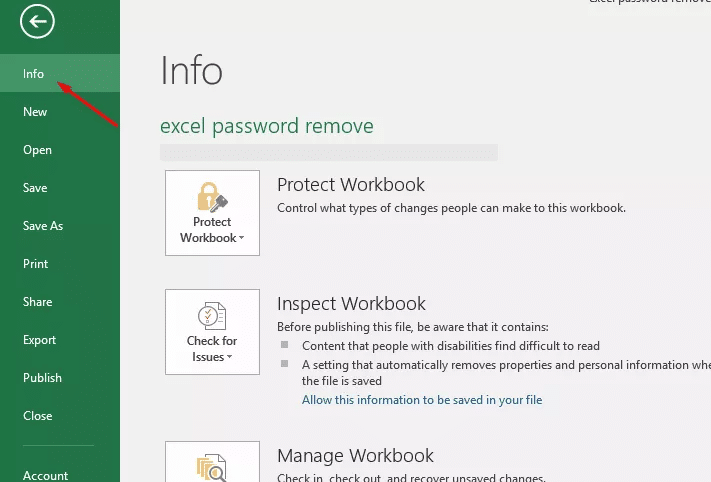
Step 3. Head on to the ‘Protect Workbook’ icon.
Step 4. Then click the ‘Encrypt with Password’ option. Finally, remove the password and click ‘OK.’
Step 5. You can now edit, save, and make other changes to the Excel file without password.

Conclusion
These methods are quick leeway on how to unprotect Excel file without password. Most Excel files hold confidential matters that you wouldn’t wish to share with online sources. That’s where PassFab for Excel comes in. It is efficient, with three modes to quick password removal protection. Use it for various scenarios like when your Excel workbook is locked or when you can’t edit your Excel worksheet.