Windows Explorer, currently also known as the File Explorer, is the default file manager on Windows devices. Windows Explorer is always running in the background as soon as you log in to your system. It’s a program management process that serves as a graphical interface for users to interact with the operating system. It allows users to interact with the Start Menu and taskbar and lets them access their files, folders, network connections, and more.
Moving on to why you’d want to restart the Explorer in Windows 10. Whenever you’re facing problems with the interface like a desktop crash or your computer is just slowing down for some reason, restart Windows Explorer can often resolve the issue. Restarting the explorer.exe process is like hitting the reboot button for the GUI without going through the regular restart process that could take anywhere up to a minute. Fortunately, Windows 10 users have access to multiple different ways to restart the Windows Explorer if they run into any issues. Here, we’ll be covering four unique methods on how to restart Windows Explorer.exe on Windows 10:
Method 1. Restart Explorer Windows 10 Using Task Manager
This is without a doubt the most popular way to restart the explorer on Windows 10 devices. You may already be familiar with how Task Manager can be used to end processes and close applications in Windows 10, and we’ll be doing just the same with Windows Explorer here. So, without further ado, let’s check out the steps:
Step 1. There are different ways to access Task Manager. Most users would use the keyboard shortcut ‘Ctrl+Alt+Delete’ to bring up the Task Manager quickly. In Windows 10, you can also right-click on the taskbar and choose ‘Task Manager’ from the context menu.

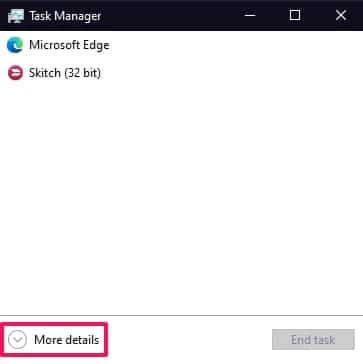
Step 2. If the Task Manager opens in simple mode showing only the running apps, click on ‘More Details’ to proceed. If not, you can skip this step.
Step 3. Next, you’ll need to scroll down slowly and find Windows Explorer in the large list of applications and processes running in the background. Once done, select Windows Explorer and click on ‘Restart’ located at the bottom-right corner of the Task Manager window.
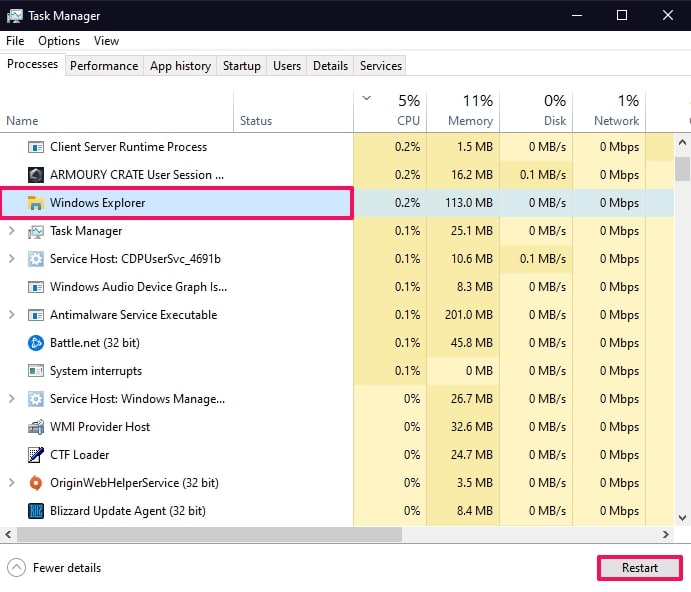
That’s it. Windows Explorer will now restart on your computer. For a split second, your taskbar will not be visible or flicker, confirming that Explorer has restarted in Windows 10 successfully.
Method 2. Restart Windows Explorer Windows 10 Using Exit Explorer
If you’d like to have more control over restarting Windows Explorer in Windows 10, this may be the method you’re looking for. Unlike the Task Manager technique, you decide when you want the explorer to run again on your system. Here’s what you need to do:
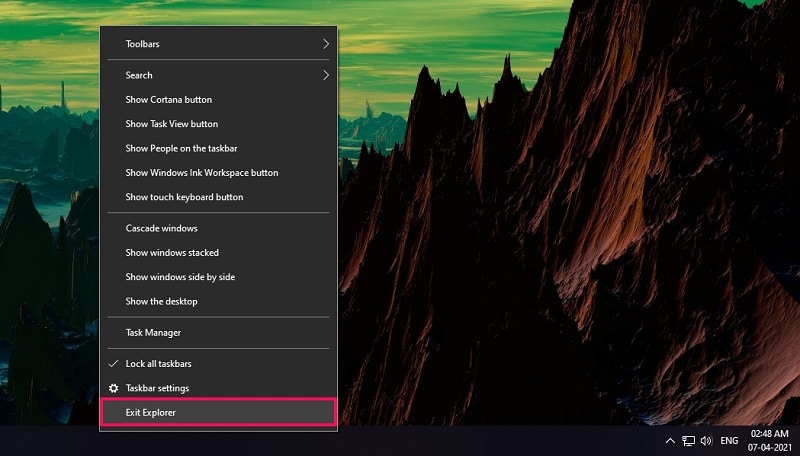
Step 1. We’ll start with the simple part, which is exiting Explorer. Press the ‘Ctrl+Shift’ keys on your keyboard and then right-click on the taskbar. You’ll see the ‘Exit Explorer’ option in the context menu that you’d typically not see. Click on it.
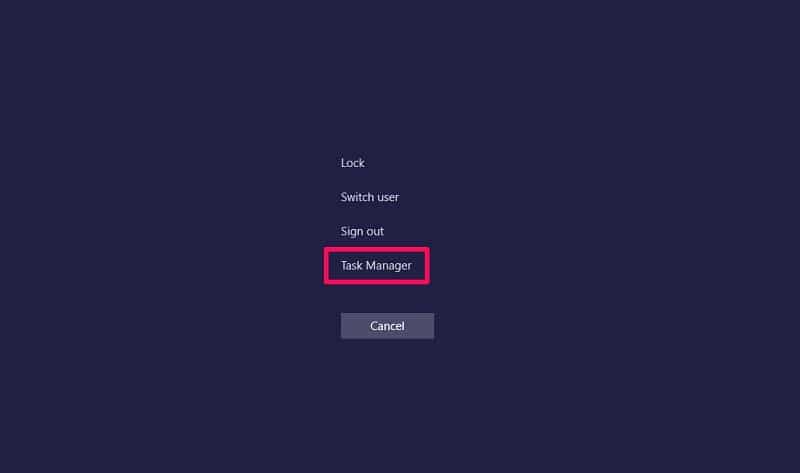
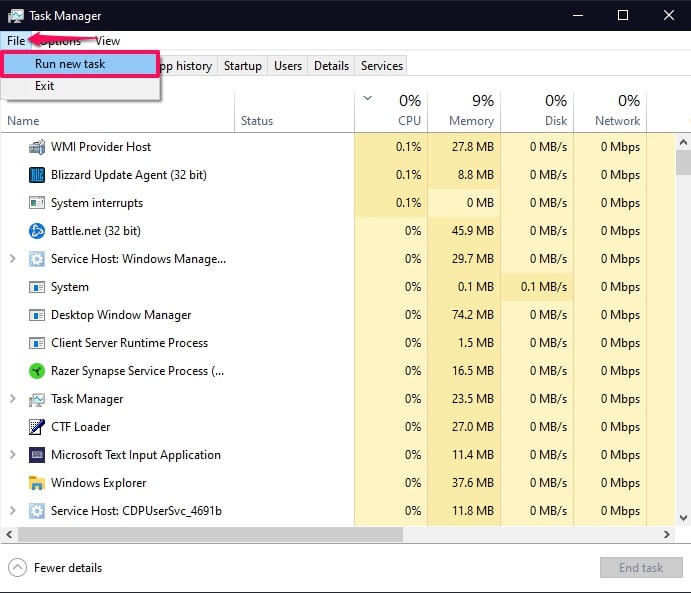
Step 2. Your screen will now be blank with just your mouse pointer visible. You’ll need to bring up the Task Manager now to restart Explorer, which can be done by pressing the ‘Ctrl+Alt+Delete’ keys. Select the ‘Task Manager’ from the logout screen as shown here.
Step 3. When Task Manager opens up on your desktop, click on ‘File -> Run New Task’ as indicated in the screenshot below.
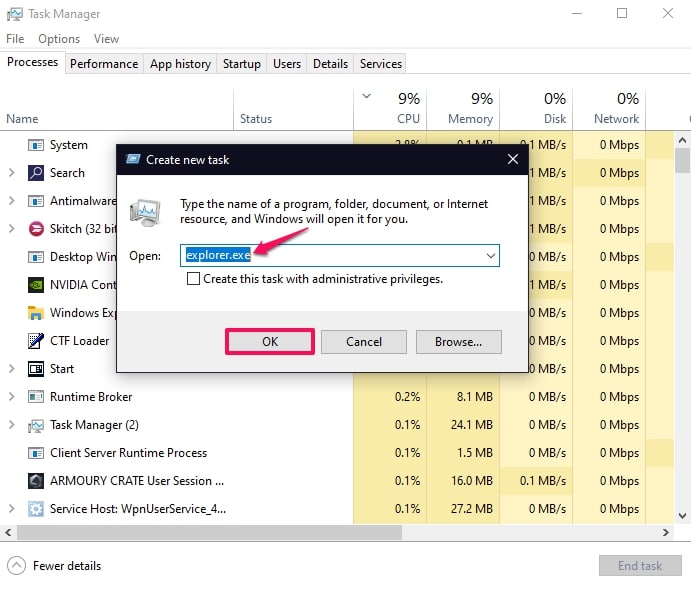
Step 4. This will open a tiny window within Task Manager, prompting you to type in the program you want to run. In the Open field, type ‘explorer.exe’ and click on ‘OK.’
At this point, you should be able to see and interact with your taskbar again, just like you were able to before you exited Windows Explorer.
Method 3. Restart Explorer.exe Windows 10 Using Command Prompt
Out of all the methods to restart Explorer.exe Windows 10 we’re covering in this article, this might arguably be the most complicated one since it requires you to type in command lines. But, we’ll try to make it as simple as possible. Just follow these steps:
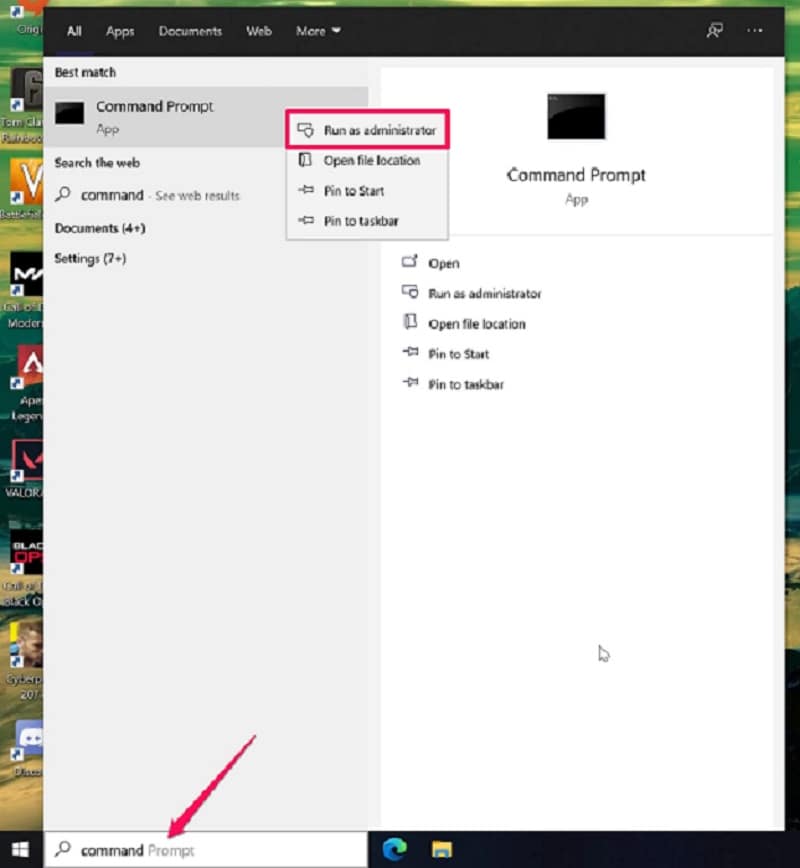
Step 1. First, you’ll need to launch Command Prompt on your computer. Use the search field, right-click on ‘Command Prompt’ from the search results and choose ‘Run as administrator’ to get started.
Step 2. Now, type in the following command line and press the ‘Enter’ key to execute it.
taskkill /f /im explorer.exe
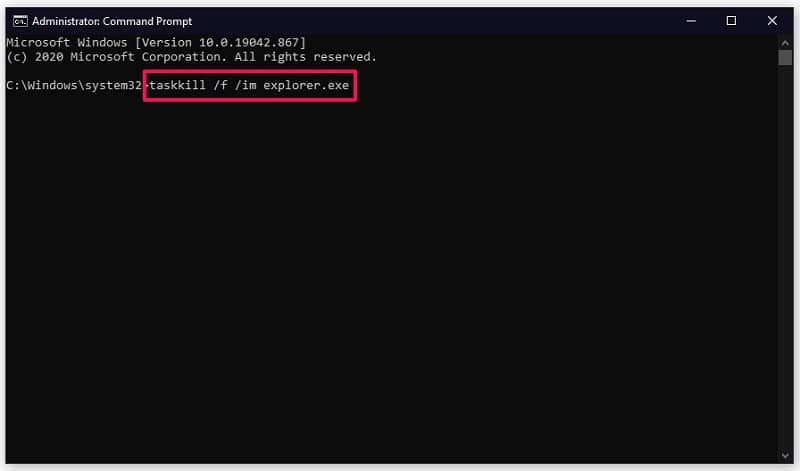
Step 3. This will stop explorer.exe, and you’ll no longer see your taskbar. To restart Explorer in Windows 10, type start explorer.exe in Command Prompt and hit ‘Enter.’
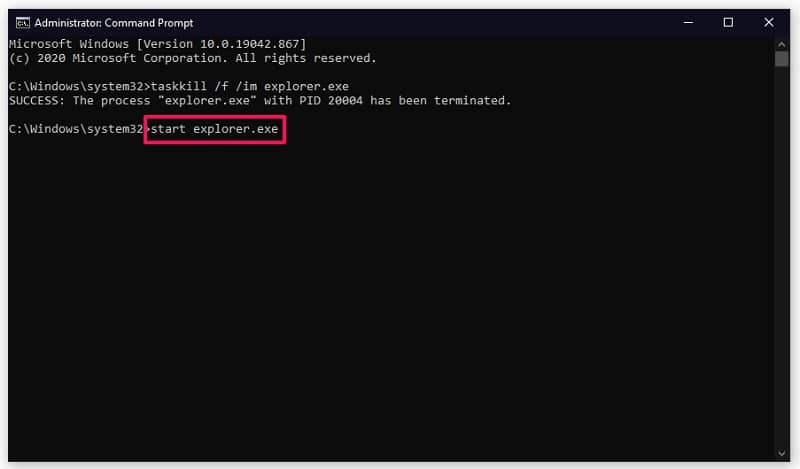
There you go. Windows Explorer will now restart on Windows 10, and you should be able to normally view and interact with the taskbar.
Method 4. Restart Explorer.exe Windows 10 Using an Automatic Batch File
The last method we’ll be taking a look at is fairly similar to the Command Prompt technique that we just discussed, except we’ll be making the entire process a whole lot easier with a batch file. You’ll need to go through a one-time process of configuring the file, but once it’s done, you can restart the explorer in Windows 10 with just a click. Here’s what you need to do:
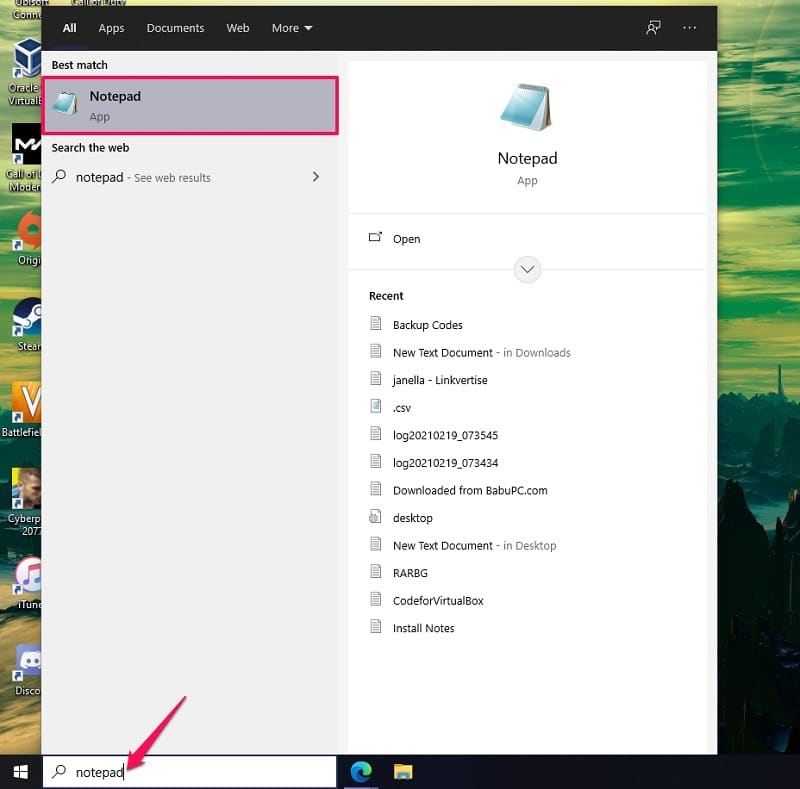
Step 1. We’ll be making use of Notepad on your computer to create the batch file. Type ‘Notepad’ in the search field on your taskbar and click on the app from the results to get started.
Step 2. Next, you’ll need to type the following code lines exactly as shown below in a blank document.
taskkill /f /im explorer.exe
start explorer.exe
exit

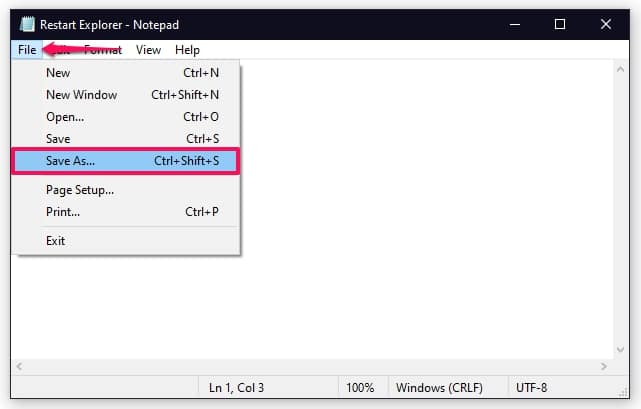
Step 3. Now, click on ‘File’ from the menu bar and choose ‘Save As’ from the dropdown menu to configure the file you’re going to save.
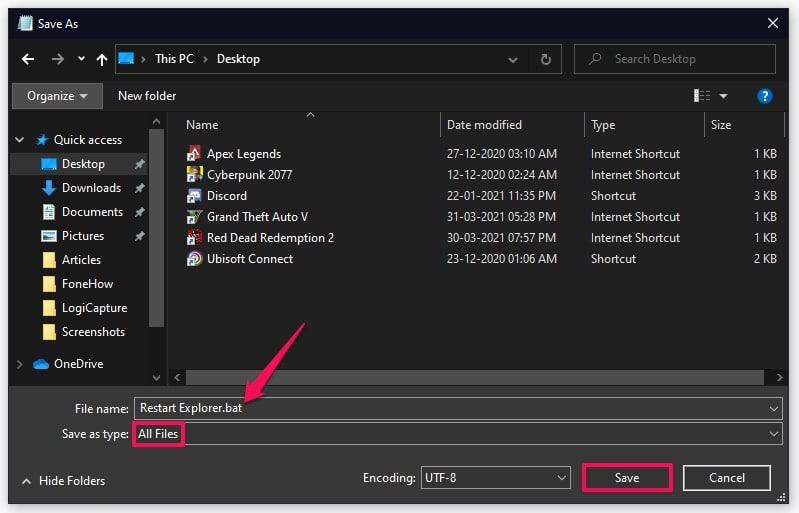
Step 4. This will open a File Explorer window where you’ll be able to rename the file and choose the location. You can name it anything you want, but type ‘.bat’ as the extension. Also, set the Save as type to ‘All Files’ to ensure the file saves as a batch file. Now, click on ‘Save.’
Step 5. You’re almost done. Now, head over to the location where the batch file is located and double-click on it to restart Windows Explorer in Windows 10.
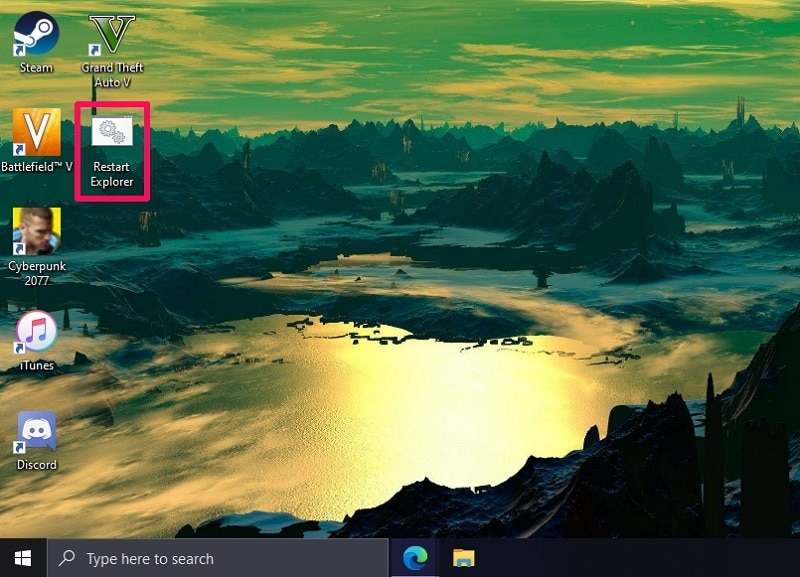
As you can see, the command lines you entered in the Notepad document are the same as the ones you used in the Command Prompt technique. The only difference between the two methods is that the batch file executes all the commands automatically when you run it. If you place the batch file in your Windows desktop, this could ideally become the fastest way to restart explorer in your Windows 10 PC.
Conclusion
Depending on how quickly you want to get this done, the steps you follow may vary. For instance, if you don’t want to restart the explorer right away, you’d likely take the Exit Explorer or Command Prompt route. But, if you’re looking to refresh your unresponsive desktop, you’d use the Task Manager or the batch file instead. Keep in mind that restarting Windows Explorer won’t be enough to fix just about any issue you’re facing on your PC. It’s suitable for issues related to the desktop, explorer, or user interface in general.
Hopefully, you were able to find a method that fits your requirements. So, which of these methods did you use to restart the explorer in Windows 10? Do you know any additional ways to restart Windows Explorer that you’d rather prefer? If so, feel free to share your knowledge with us in the comments. Also, make sure to leave your valuable thoughts and feedback down below.