We know that Windows uses Recycle Bin to store temporarily deleted files on your computer. It is a folder where your deleted files are stored for recovery in case you accidentally delete them. Though you can easily recover deleted files from the recycle bin, a common problem faced by Windows users is to recover deleted files from Recycle Bin after it has been emptied.
Recycle Bin contains files that have not been physically removed from the hard drive yet. You have to manually remove or wait for it to automatically empty the recycle bin for the files to get permanently deleted. But even after the files are deleted from the Recycle Bin, many methods are available for users to recover their completely deleted files. Through this article, let us see how to recover deleted files from Recycle Bin after empty.
Is It Possible To Recover Emptied Recycle Bin Windows 10?
Yes, it is possible to recover files from emptied trash in Windows 10 if we act fast. When a file is deleted from the Recycle Bin, it is not permanently deleted from the system. It is still on the hard drive occupying some space in the memory. Only the storage space allocated to that file is now marked as available to the system, and other applications can make use of that storage space to store data. However, the file data is not linked to a file name for us to search and recover; it still is present in the system. To recover it, we must act fast before other application uses up this freed space. Let us look at the methods.
Method 1. The Easiest Way to Recover Deleted Files from Recycle Bin After Empty
There are several Windows data recovery tools available to download and recover your deleted data. A standout option of the lot is 4DDiG by Tenorshare. This tool can be downloaded onto your system and is very easy to use. Once downloaded, launch the software and follow the below-mentioned steps to recover files from emptied trash:
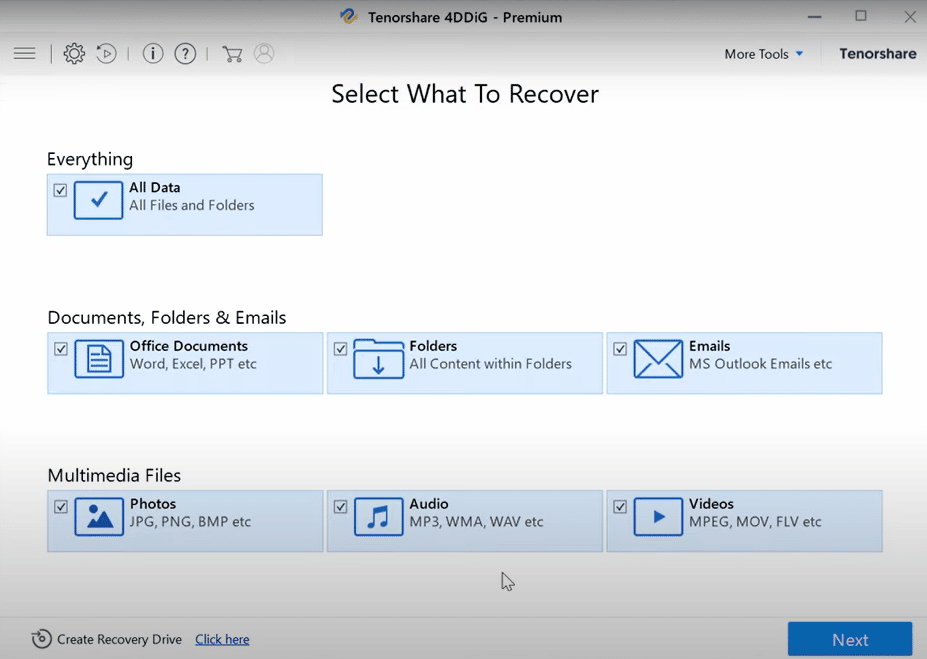
Step 1. Select the files you want to recover. It can be all the data that has been deleted or can be specific file types like docs, photos, audio files, etc. Once you have selected what to recover, click ‘Next.’
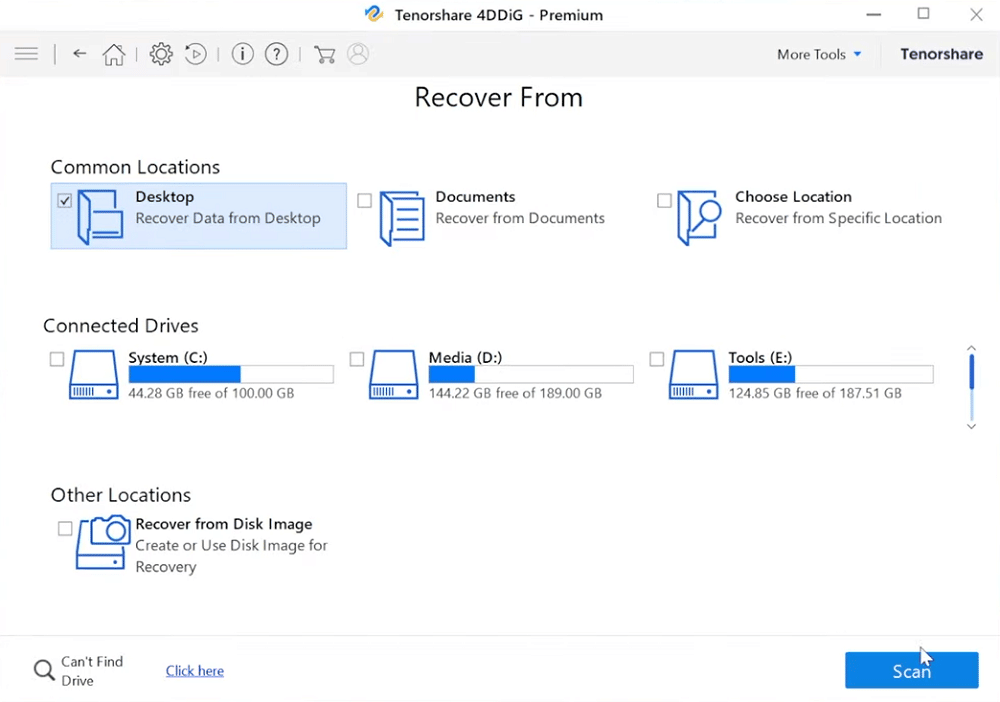
Step 2. Now, choose where you lost the files and hit the ‘Scan’ button.
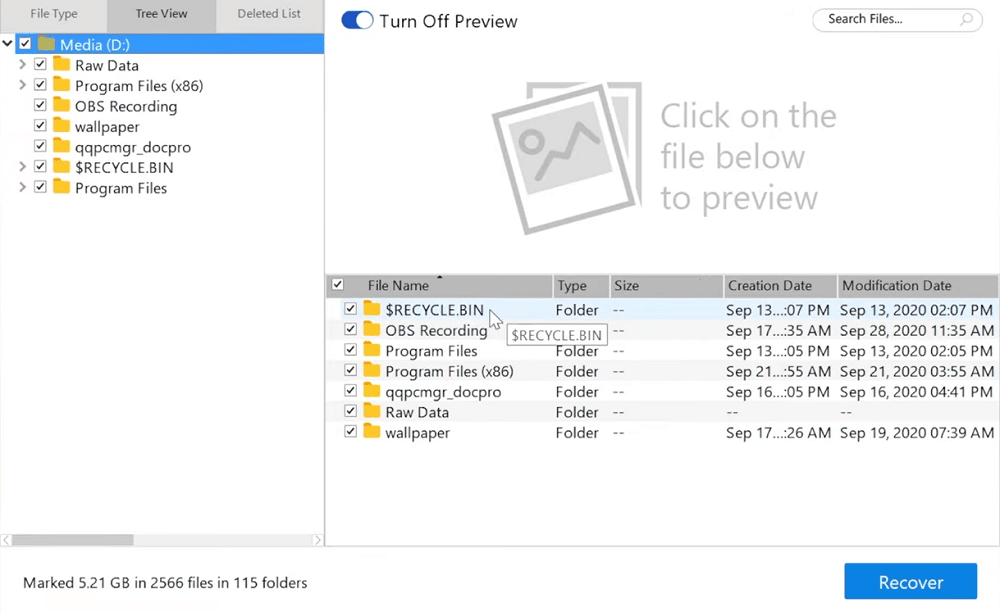
Step 3. The software will now scan for the data. If no data is found in the quick scan, it will scan deeply. Once the scanning is 100% completed, it will display the results of all the files found that can be recovered. Here you will find your deleted files from the Recycle Bin folder. Select the files/folder you wish to recover and click ‘Recover’.
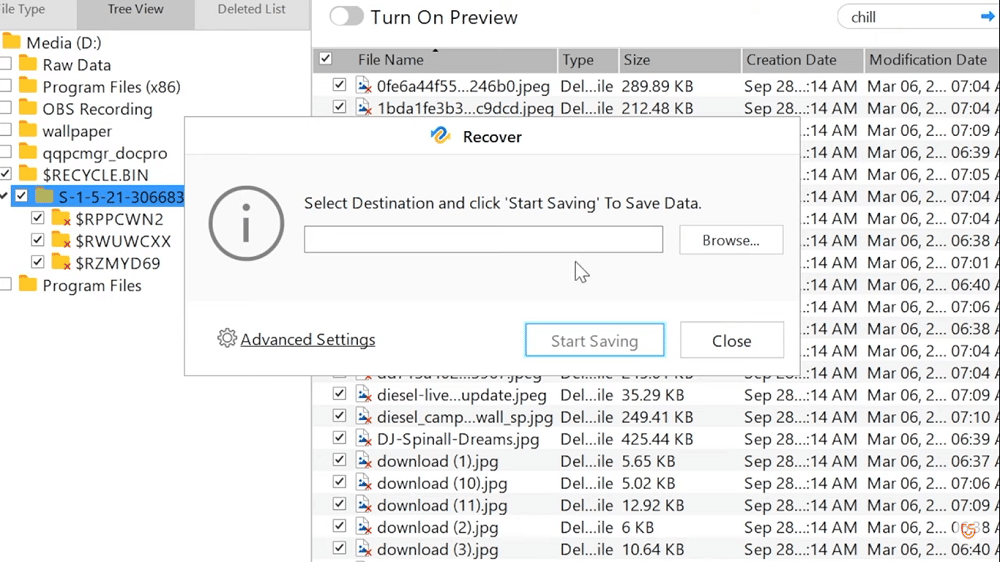
Step 4. After this, you need to specify a location to store the recovered files. Select the destination and hit the ‘Start Saving’ button.
Once completed, you will find all of your recovered files/folders in that location. You are now free to use those files as before.
Method 2. Recover Deleted Files from Recycle Bin after Empty Using Windows Backup
Windows Backup is a built-in file recovery option for your system that allows you to recover your files using the Backup file. It must be set up beforehand for it to work, though. If your Windows Backup is already set up, it regularly backs up your files to a pre-chosen destination storage space. If you need to recover some deleted files, you can easily restore your computer system to the previous state before the file was deleted. But keep in mind when you restore the system to a previous date, all data from that date to the current date is lost as the system is now restored to its version on that particular date.
The steps involved in Windows Backup are very simple as follows:
Step 1. Click on ‘Start/Windows logo’ and traverse to ‘Control Panel.’ You can even type it out in the top-right search field.
Step 2. Open the ‘Control Panel.’ Now select ‘System and Security.’ Then click on ‘Backup and Restore’.
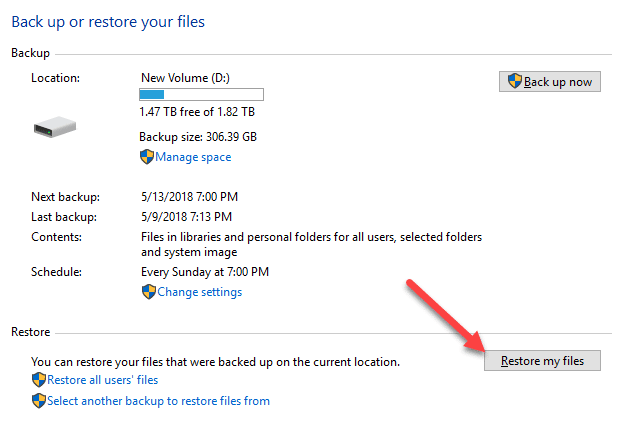
The restore wizard then opens up to start the recovery process. All you have to do now is follow the on-screen instructions and recover your deleted files.
Method 3. Recover Deleted Files from Recycle Bin after Empty Using Command Prompt
Command Prompt is a text-based User Interface screen available in Windows OS which helps in executing commands entered by the user. It is a powerful inbuilt utility tool used for troubleshooting purposes but can also be used to recover deleted files in your system. Let us see how to recover deleted files from Recycle Bin after empty using the command prompt.
NOTE: This is a technical method and may require some technical understanding.
- First, we need to launch the command prompt by pressing the Windows key + X key and clicking Command Prompt (Admin) in Windows 10. For Windows 8,7, and earlier versions, press the Window key + R key, type in CMD, and press Enter.
- Now, in the command prompt dialog window, enter/type chkdsk <drive letter>:/f and press Enter key. Ex: chkdsk E:/f where ‘E’ is the drive name.
- Press Y till the lines in the command prompt are reset again to type.
- Type the <Drive letter> again. Now hit Enter. The command line should now revert to the starting position.
- Next, type drive letter:\ >attrib-h-r-s/s/d*.* and hit Enter.
This command will now start recovering all files present in the storage drive (attrib-r-s-drive:\<path>\<foldername>) where
- –r is a Read-only attribute that signifies the files are readable and can’t be changed
- –s for assigning ‘System’ attribute to those selected files
- –h for assigning the ‘Hidden’ attribute to those selected files
- ‘/S’ for searching the specified location/path including the subfolders
- ‘/D’ for including the process folders.
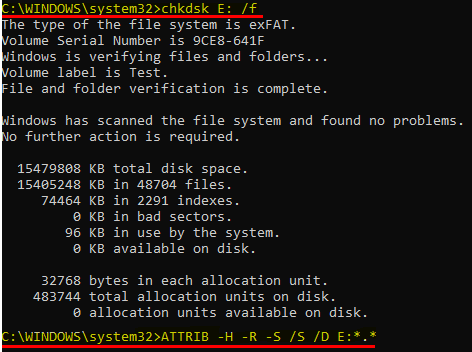
After the process, a new folder is created on the drive with all the recovered files. These files would have a “.chk” format, and you will have to change the format and save the files at your preferred location, and you’re good to go.
Alternatively, there can also be a case where-in your system has crashed, or you accidentally deleted some files, which makes your system unable to boot under normal conditions. In such cases, the command prompt can also be used to recover files permanently deleted from the recycle bin. See the below-mentioned steps in this case:
- While you boot up your computer system, press the F8 key on the keyboard and select “Safe Mode with Command Prompt.”
- Type” cd../..” and press Enter key. If using Windows 7 or newer, type “ cd$Recycle.Bin” or “cd RECYCLER.”
- Type cd and then press the Tab key. You will now see the directory name. Now press Enter key. Type “dir/a” , then press the Enter key to display all the files.
- Type “copy [file name] [file location]” and press the Enter key.
- Type “cd../..” and press Enter. Then type “dir” and press Enter.
- Type “ren[file name]” and again press Enter key.
Method 4. Recover Deleted Files from Recycle Bin after Empty via Previous Versions
With the introduction of Windows 7, Microsoft introduced a brand new feature for system protection that helps in the recovery of files. But for this feature to work, prior to setting up the option of automatically backing up each version of your file in the system is necessary. This helps in creating a restore point of the file in the storage which helps in restoring any of the deleted files, even if permanently deleted. Deleted files can also be restored to a previous version via this feature.
Let us see the steps involved in the recovery:
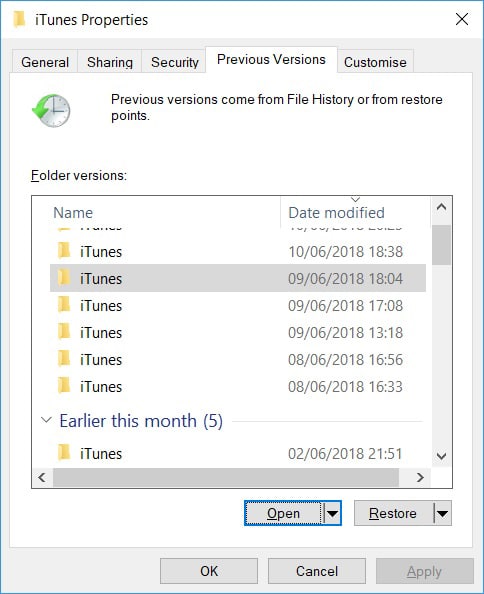
Step 1. Navigate to the folder where you had stored those files before deletion
Step 2. Right-click on the folder, then click on “Restore previous versions” from the drop-down options. Windows will list the previously available versions of the file and display them according to the dates they were modified.
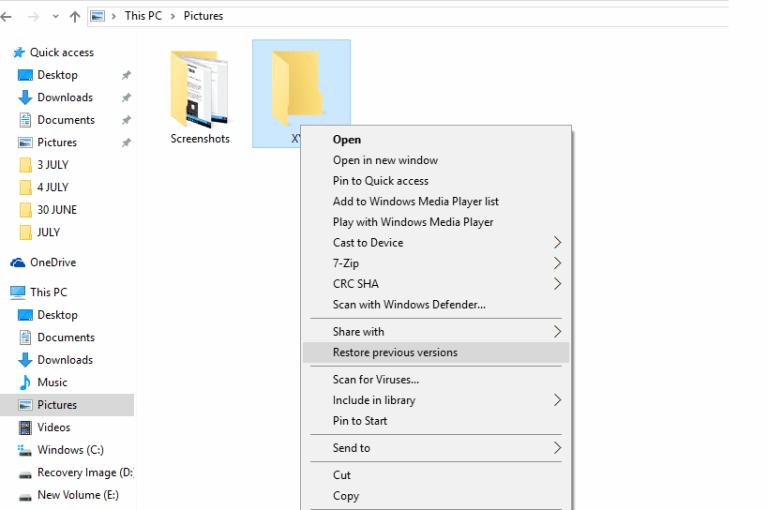
Step 3. Select the version you wish to restore, and click “Restore” to recover the permanently deleted file/folder.
This way, all the deleted files can be recovered easily using the Previous Versions method, provided the backups have been allowed to get created for each version.
Method 5. Recover Files from Emptied Trash Via File History Backup
Another method only available to Windows 8 and Windows 10 users is the File History Backup method. If you have created a backup of your deleted files, you can use the File History method to restore them. Otherwise, it is not possible to use this method. File History Backup method answers the question: How to recover deleted files from recycle bin after empty Windows 10? in a very simple way by restoring the system to a previous version. Let us see how.
Before using file history, you need to first select where your backups are going to get saved. An external drive (Eg: USB) or a drive on a network are generally the recommended options in case your system itself crashes or has other problems.
File History regularly backs up the versions of your files and, over time, creates a complete history of the files. It is worth mentioning that File History only creates backups of files that are present in the Documents, Pictures, Music, Videos, and Desktop folders and the One Drive files available on your PC. If your files are present at some other location and you want them backed up, they must be transferred to one of the folders mentioned above.
Below are the steps involved in restoring deleted files using File History:
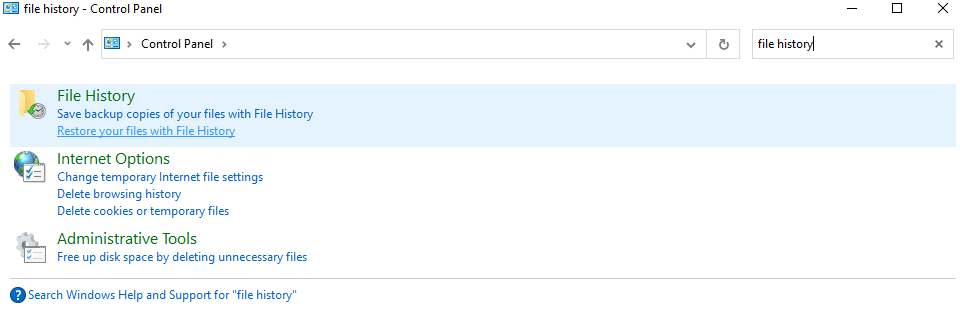
Step 1. Open the “Control Panel“, then search for “File History” in the search box
Step 2. Under “File History,” select/click on “Restore your files with File History” to open the backup of your files
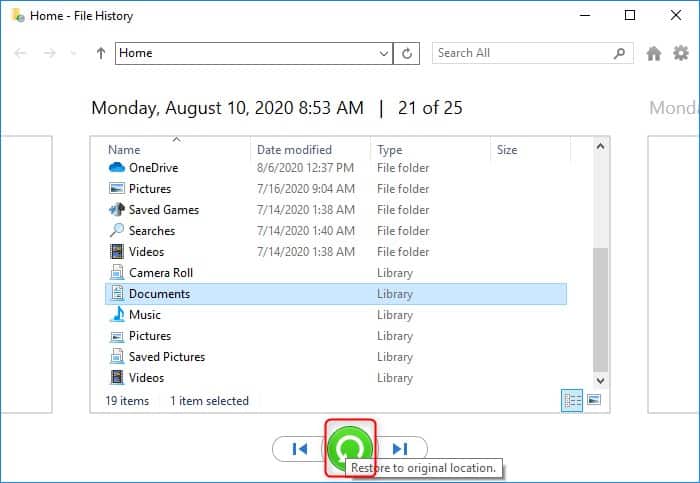
Step 3. Select the backup version you want to recover and click on the “Restore” button on the bottom
Method 6. Recover Files from Emptied Trash Via OneDrive
One drive is a file hosting service developed by Microsoft. It is a cloud storage service where you can store your files and other data and does not require memory on your hard drive. This online storage is more relied upon due to its security and safety features. You just need to have the auto backup feature enabled on your One Drive account.
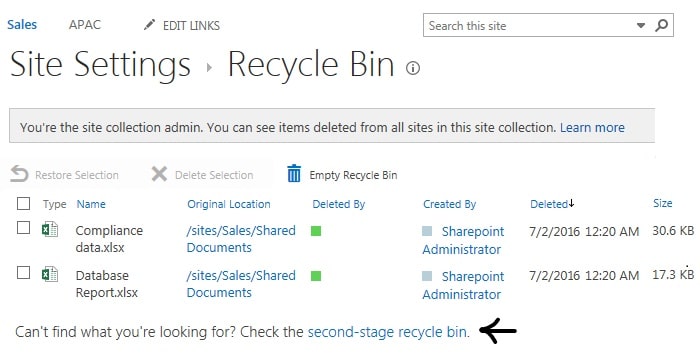
There is a Second Stage Recycle Bin that stores the files deleted from the recycle bin. In One drive online, the deleted files are stored for a period of 93 days from the date of deletion. This includes deletion from the recycle bin as well. If a file has been deleted from the second stage, there is no chance of recovery.
Let us see the steps involved in recovering files from emptied trash via One Drive Second stage Recycle Bin:
Step 1. Go to https://onedrive.live.com/ and login into your Microsoft account
Step 2. Open the Recycle Bin on the web interface and scroll down
Step 3. Click on “second-stage recycle bin.”
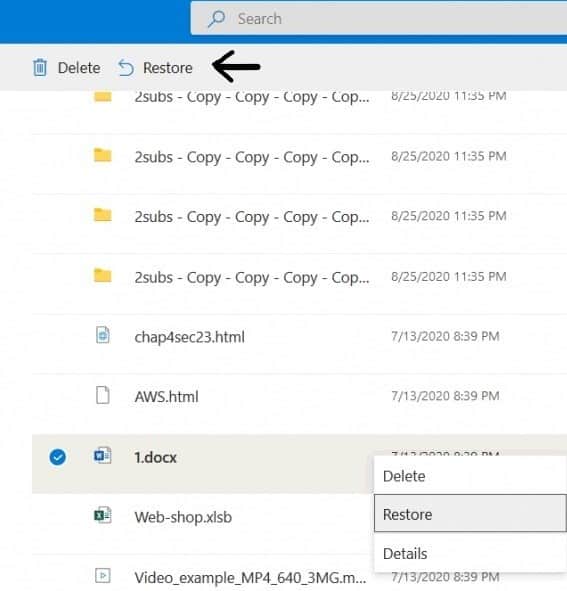
Step 4. Select the checkboxes of the file you want to recover and click on “Restore,” or you can right-click on the file and select “Restore” in the drop-down.
FAQs
Q1: Where do the deleted items go?
A: The deleted items are sent to the Recycle Bin, which can easily be recovered.
Q2: Where do the permanently deleted files go? How can they be recovered?
A: When a file is deleted from the recycle bin as well, the storage space/memory that the file used is still present in the computer’s hard drive. If you want to recover your file, you can do it using various methods like Windows Backup, Command prompt, tools, etc.
Q3: How much time do I have to recover permanently deleted files?
A: The files can only be restored until the memory allocated to those files is not overwritten by another application on your computer. After that, it is not possible to recover them. Hence, you should perform recovery as soon as possible.
Conclusion
Anybody can make a mistake and delete a file. Even though some files are permanently deleted, they might be needed by the user in the future. In the article above, we have shown 6 such methods to recover deleted files from Recycle Bin after they have been emptied.
These methods include downloading and using online tools like 4DDiG by Tenorshare, which are very easy to use. For people with some level of technical understanding, it is shown that the command prompt can also be used to recover your files. There are even simpler methods like Windows backup, File History, recovery via One-Drive, etc., which come with some basic limitations and prerequisites but can easily get the job done.
In case you ever want to recover permanently deleted files in the future, do not panic. Just follow the methods and their steps as shown, and you’ll be good to go.