Protecting important data on an external hard drive is paramount to its security. Most people don’t even realize that you can use a password to do so, and it is a far less complicated process than you’d think. From what we know, there are two solid solutions you can take to password protect an external hard drive on Windows.
Like a phone or computer that utilizes a PIN, password, or biometric authentication to secure it, protecting your external storage device is also good practice. This is even more true should your external hard drive contain confidential or private data.
You can prevent unauthorized access to your files with nothing more than a PC or laptop. Your Windows operating system has a built-in encryption tool called “BitLocker” that will allow you to set a password on your external hard drive.
Password Protect An External Hard Drive Using BitLocker
There are a few steps to take to encrypt an external storage device on a Windows 10 computer. You’ll need to select your encryption method, which for this tutorial will be BitLocker. Then, you’ll need to choose the encryption mode, make a backup recovery key, and finally create a secure password.
It’s a rather easy process from start to finish. Just plug the external hard drive into the computer, and we’ll begin with enabling BitLocker. Keep in mind that BitLocker is not available to Windows 10 Home edition and will require an upgrade to either Pro, Enterprise, or the Education version to use the tool.
Step 1. Enable BitLocker on your Windows by opening File Explorer, navigating to your external drive, right-clicking it, and selecting Turn on BitLocker.

Ensure that you do not unplug your external drive while Windows begins the BitLocker encryption.
Step 2. Next, you’ll need to Create a Password. So, place a check in the box that reads Use a password to unlock the drive. Then, enter the preferred password.

Prevent an easy breach by keeping the password strong with a combination of letters, numbers, and symbols. It will require at least 8 characters with at least one upper and lowercase letter, and at least one number, symbol, or space.
Step 3. Re-enter the password into the appropriate dialogue box followed by clicking Next.
Step 4. A recovery key for the external drive will be automatically generated for you by Windows. This is your backup should you ever forget the password you entered in the previous steps. Remember to Save the Recovery Key and store it somewhere safe.

You’ll receive three options when it comes to the recovery key –Save to your Microsoft account, Print the recovery key or, Save to a file. Printing it will allow you to print it out to paper for safe keeping while saving to a file will have Windows encode the recovery key to a text file. You can then save it to a preferred location on your PC. Depending on your choice, you might receive a prompt of either “Your recovery key has been saved” or “Your recovery key was printed.” Once received, click Next to continue.
Step 5. Now we can choose the Encryption Method via either Used Disk Space Encryption or Full Disk Encryption.
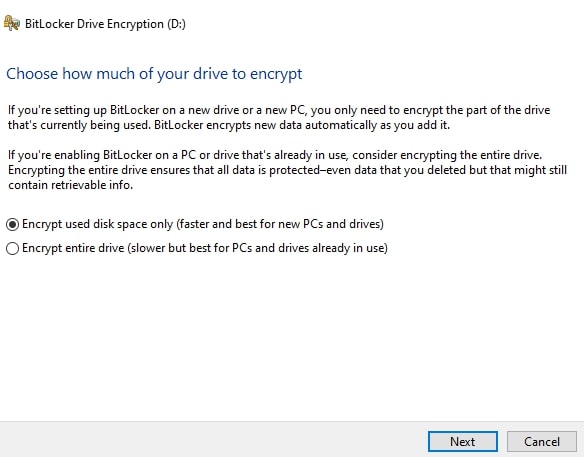
For a brand new, never before used on another computer external hard drive, select Encrypt used disk space only. This will have BitLocker encrypt a sector on the drive specifically for all newly acquired data to be encrypted automatically. This option is also the fastest and will usually only take a few seconds or minutes, depending on the size of the drive.
To encrypt an external hard drive that has been in use on various other computers, choose Encrypt entire drive instead. This prompts BitLocker to encrypt all sectors and data found on the drive, including files that have been deleted. This method could take hours to complete depending on how much data is found on the drive.
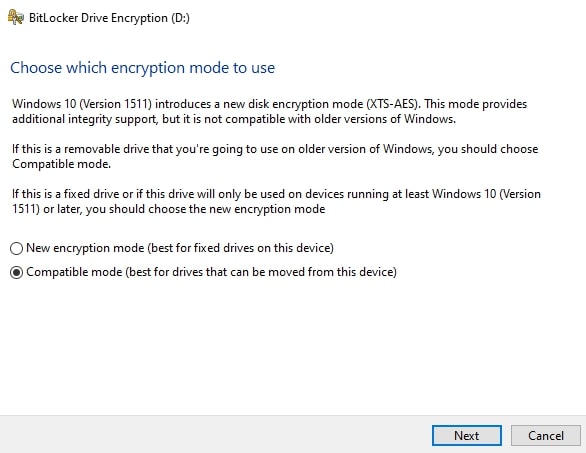
Step 6. It’s now time to choose the Encryption Mode. Select New encryption mode if the hard drive you’re using is going to be for a single computer or strictly on Windows 10 system devices. For any other reason that you may use the device on older versions of Windows, choose Compatible mode instead.
Step 7. We can now begin the Encryption Process.
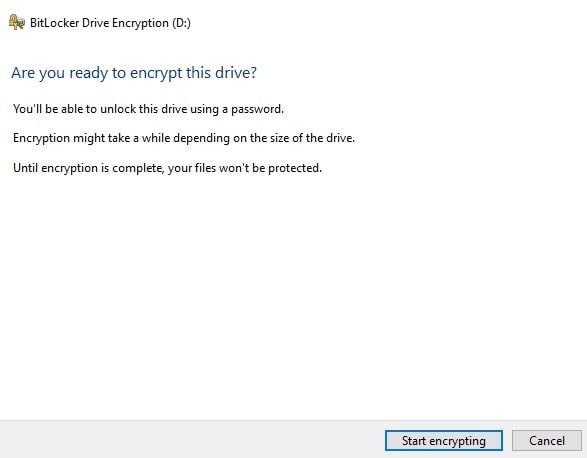
Select the Start encrypting button and BitLocker will begin. The amount of time you’ll need to wait will depend on which encryption method you selected previously.
Ensure that you do not remove the external hard drive from the computer without first pausing the process. Doing so could result in damage to the drive. Files are not protected until the entire process has completed. You’ll need to wait for the Encryption complete prompt before ejecting the drive.
Step 8. Once complete, BitLocker will prompt you for a password whenever you attempt to remove the drive, or access it using another computer.
Password Protect An External Hard Drive Using VeraCrypt
There are third-party external hard drive encryption programs currently on the market that can be just as reliable. Third-party encryption programs like VeraCrypt, TrueCrypt and AxCrypt can all be used to encrypt your entire external hard drive.
VeraCrypt allows you to create a virtual disk image to secure sensitive files with a password and can be a great alternative to BitLocker. It’s open-source software that encrypts in real-time and is available for Windows, Mac OS, and Linux. For this tutorial, we’ll learn how to password protect an external hard drive on Windows 10 using VeraCrypt.
Step 1. Navigate over to the website and download VeraCrypt Setup (about 34.5Mb). Follow through the installation wizard by clicking Next when available.
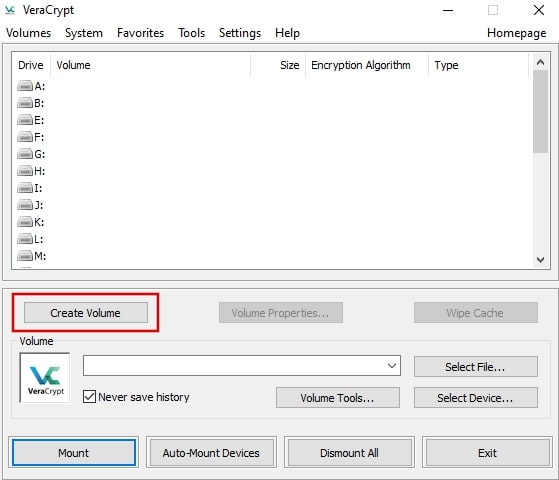
Step 2. Launch VeraCrypt, and you’ll see a list of unused drive letters that are available. You’ll need to create a protected virtual disk image. You can begin the process by clicking Create Volume.
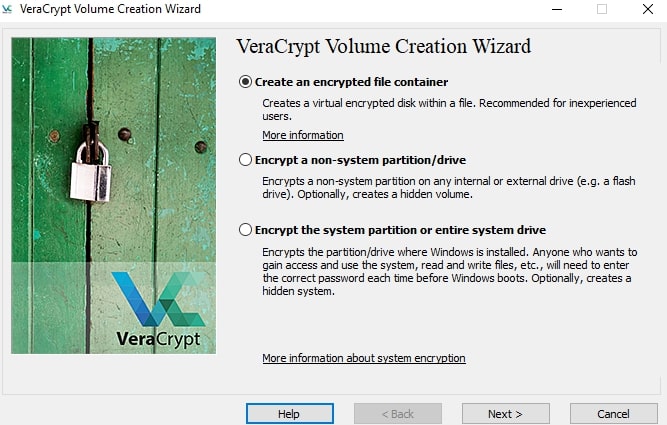
Step 3. At the new window, select “Create an encrypted file container” and click Next.
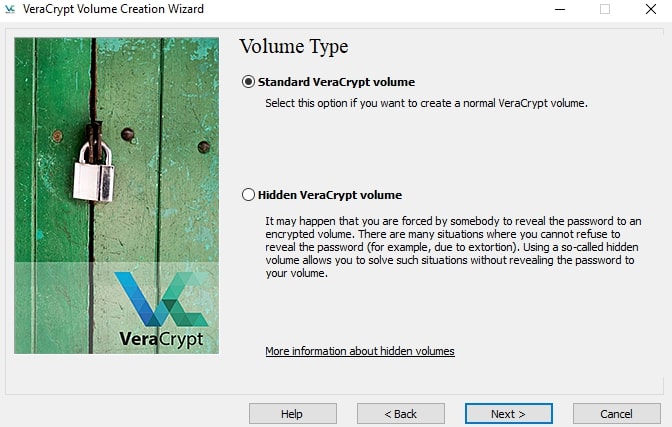
Step 4. Here you’ll have two types of encrypted volumes to choose from – Standard and Hidden. Select “Standard VeraCrypt volume” and click Next.
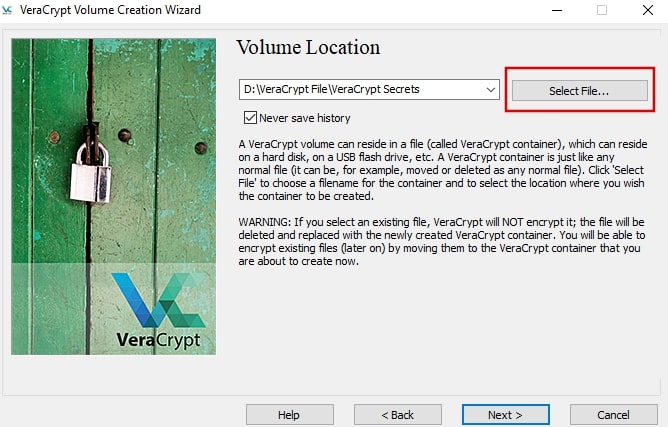
Step 5. Click Select File and choose a name and location for the virtual disk image on either a local drive or an external hard drive. Click Next.
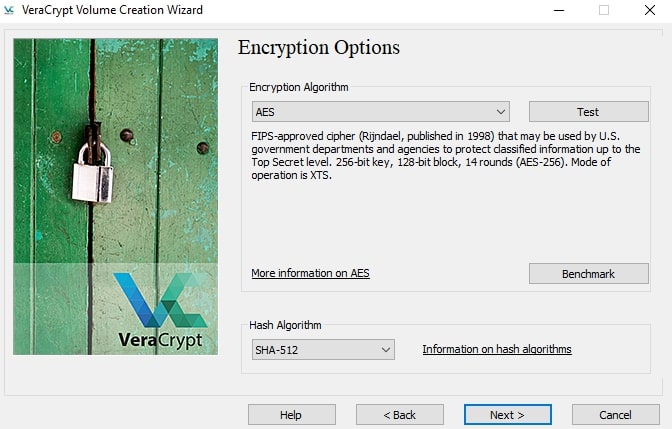
Step 6. Stick with the default settings of AES and SHA-512 in the next window, as they are generally good enough for most purposes. Click Next.
Step 7. Your volume size must be large enough to hold your sensitive files. Choose an appropriate volume of data storage and then click Next.

Step 8. We’ll be mounting the virtual disk image in later steps. This will require a password. Enter a secure volume password into the dialogue boxes presented and then click Next.

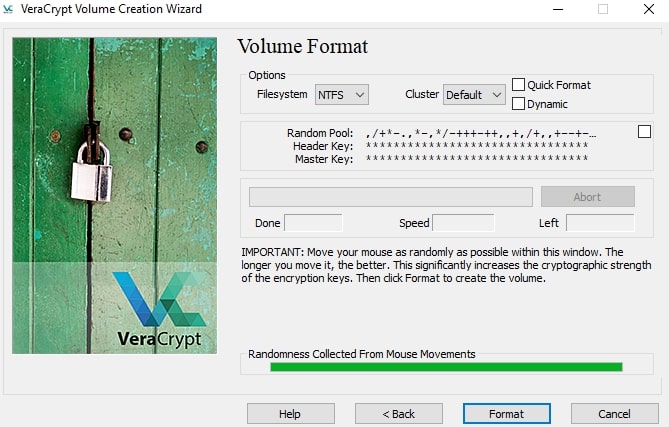
Step 9. For files larger than 4GB, you’ll want to select NTFS as your file system. For anything smaller, FAT should suffice. Move your mouse cursor around randomly to generate strong encryption keys. Do so until the green bar reaches the end, then click Format.
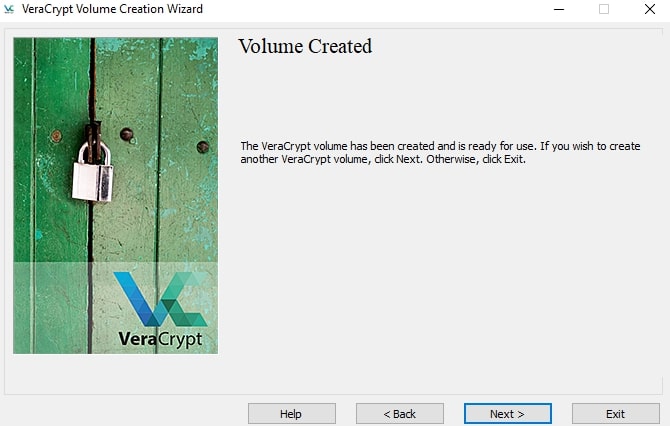
Step 10. After the volume has been created successfully, you can click Exit to complete the process.
Step 11. You’ll be able to view the disk image file using File Explorer.

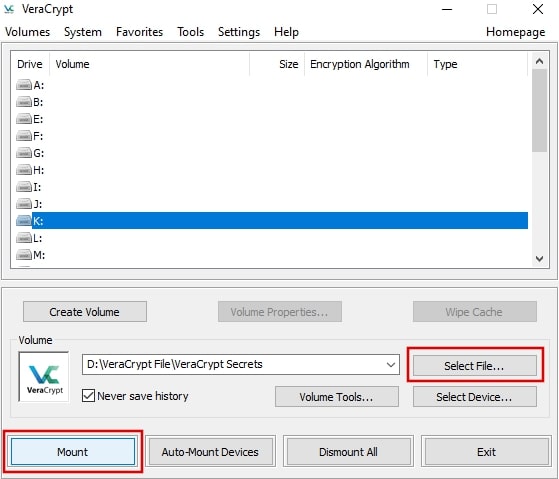
Step 12. Now you’ll want to mount the virtual disk image by launching VeraCrypt and selecting one of those unused drive letters. Click Select File to locate your virtual disk image and then click Mount.
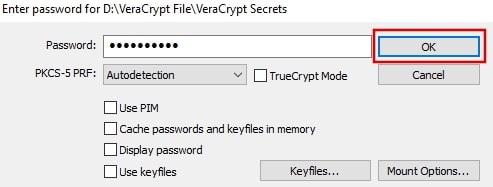
Step 13. Enter the password you created for the volume and click OK.
Step 14. You’ll now be able to see your protected virtual disk image as a new drive. You can then drag all sensitive files into that drive for safe keeping.
Step 15. Remember to dismount the VeraCrypt volume when it’s no longer needed in use. You can do this by going into VeraCrypt and selecting the drive letter of the mounted drive, and clicking Dismount.

Restarting or shutting down your computer will automatically dismount your VeraCrypt disk image, keeping all of your sensitive files protected.
FAQs About Protect External Hard Drive in Windows
How Can I Access My BitLocker Protected External Hard Drive When I’ve Forgotten The Encryption Password?
The inability to remember the password to your encrypted drive is more common than you’d think. Thankfully, Windows created a recovery key for BitLocker while you were enabling it. It’s all that is required should you forget the secure password you’ve created.
Hopefully, you remember where you stored it. If you chose to print it out, find the paper, and you can use the numbers found there. If you chose to save it to your PC, you’d need to navigate over to where the recovery file was saved, double-click to open it, and then copy the numbers found in the Recovery Key section.
Then, you can plug the external drive into your PC, and BitLocker will prompt you for the password. Once it appears, select More options and choose Enter recovery key.
Paste, or type, the recovery key into the dialog box and select Unlock. This should give you access to the drive via File Explorer.
How Can I Create A New Password For BitLocker If I Still Can’t Remember The Old One?
So long as you have your recovery key, you’ll be able to create a new password.
- You’ll need to navigate to This PC folder in Windows Explorer and double-click the BitLocker drive.
- When the pop-out box is pulled up, select More options and then select Enter recovery key.
- Type the recovery key into the dialog box provided and click Unlock.
- Right-click the BitLocker drive and select Manage BitLocker from the menu.
- While in the encryption window, click the small downward arrow and choose Change password.
- Click the Reset forgotten password link.
- Enter the new password into the dialog box, re-enter it into the second box, and click Finish.
- A BitLocker Drive Encryption window will pop up notifying you of the password change. Click OK.
What Can I Do If I Forget The BitLocker Recovery Key?
There are very few things you can do to retrieve your recovery key should you forget it. Hopefully, when selecting the options for the key, you decided to print it out and keep it in a safe place.
If you’ve forgotten the recovery key and do not have, or lost, the printed copy, you can log into your Microsoft account on another device to find your recovery key. When setting BitLocker up initially, Microsoft saves a copy of the key to your account.
There are alternative ways should none of the options above work for you. However, they require third-party software tools like WinImage and Password Kit to recover the BitLocker key. It is recommended that you keep the recovery key safe and secure when it’s created to avoid this situation.
Aside From BitLocker, Are There Other Options Out There For Encrypting An External Hard Drive on Windows 10?
There are a few third-party encryption programs to choose from, VeraCrypt, TrueCrypt and AxCrypt being some of the better ones. We’ve laid out a tutorial above for using VeraCrypt but if you prefer one of the others, we suggest checking out their official websites for more information.
Conclusion
Regardless of which option you choose to password protect an external hard drive on Windows, always ensure that the password you create is difficult and secure. Going through the trouble of encrypting your hard drive and choosing a weak password like “1234Abcd” seems counter-productive. Coming up with a solid password will keep your sensitive files protected and peace of mind secured.