Many software users are no doubt familiar with the PDF document file format. However, have you heard of XPS (XML Paper Specification) files? Most users probably haven’t heard of the XPS format, which is Microsoft’s alternative to PDF files. The XPS Viewer in Windows 10 is a handy app with which you can open XPS documents. However, you’ll need to open XPS Viewer before you can view XPS documents.
The XPS format isn’t something new. Microsoft originally introduced that file format with Windows Vista in the hope that it would become a PDF killer. XPS shares similar technologies to the PDF format. However, the XPS file format has never caught on.
Yet, Windows platforms still include built-in XPS tools. The Microsoft XPS Document Writer and XPS Viewer are two of Windows’ XPS tools. XPS Viewer is an XPS file opener in Windows 10
for opening documents saved with the XML Paper Specification. If you ever need to open an XPS document, you can launch the XPS Viewer in Windows 10 with one of the methods below.
Download and Install XPS Viewer in Windows 10
However, XPS Viewer is an optional Windows 10 feature. Therefore, it’s not installed by default in that platform. You’ll need to install that optional feature via Settings before you can open it. This is how you can install XPS Viewer in Windows 10.
Step 1: Open Settings by pressing the Windows + I key combination.
Step 2: Click “Apps” to open the Apps & features tab.

Step 3: Then click “Optional features” to open a list of installed Windows 10 features as in the snapshot directly below.
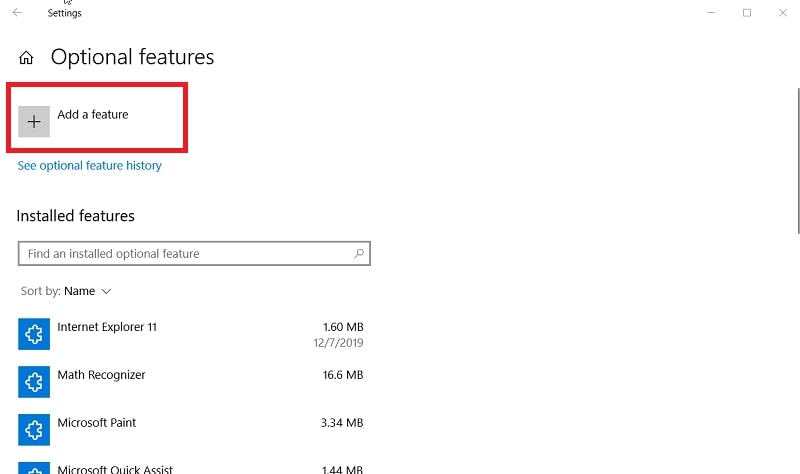
Step 4: Click the “Add a feature” button.
Step 5: Type XPS Viewer in the optional feature search box.

Step 6: Select the “XPS Viewer” checkbox.
Step 7: Press the “Install” button to add the selected XPS Viewer feature to Windows 10.
Method 1. Open XPS Viewer in Windows 10 by Searching
Step 1: To bring up Windows 10’s search tool, press the Windows key (left of Alt) and S at the same time.
Step 2: Type XPS Viewer in the search tool’s text box.
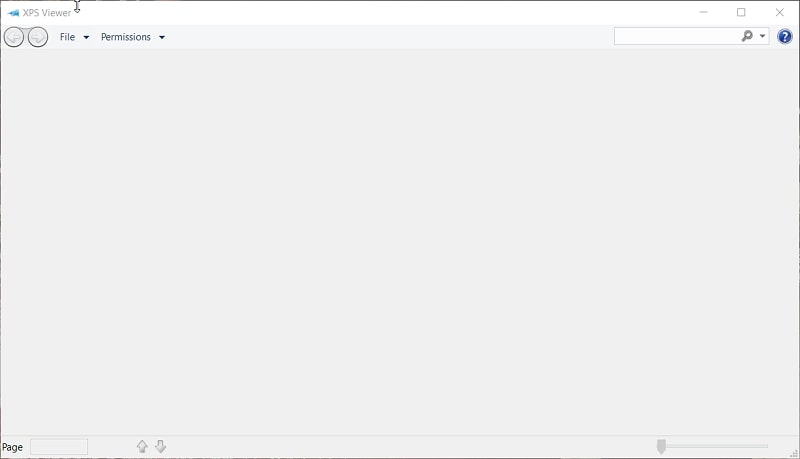
Step 3: Then click XPS Viewer within the search results to open the window shown directly below.
Method 2. Open XPS Viewer in Windows 10 From the Start Menu
Step 1: Click the “Start” button on the far left of the taskbar.
Step 2: Scroll down to the Windows Accessories folder on the Start menu.
Step 3: Click the Start menu’s Windows Accessories folder to expand it as shown directly below.

Step 4: Then select the XPS Viewer there to open its window.
Method 3. Open XPS Viewer in Windows 10 From Run
The Run accessory is a handy tool for opening all kinds of apps and programs with specific commands. You can also utilize that tool to open the XPS Viewer in Windows 10. This is how to launch Win 10’s XPS Viewer via Run.
Step 1: Right-click the “Start” taskbar button to bring up a Win + X menu.
Step 2: Select that menu’s “Run” shortcut.
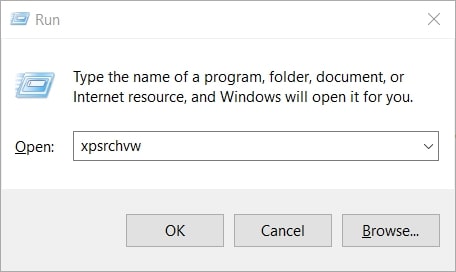
Step 3: Input xpsrchvw within the Open box.
Step 4: Then click “OK” to open XPS Viewer.
Method 4. Open XPS Viewer in Windows 10 via Command Prompt
The Command Prompt is a Windows 10 app that has many command-line tools. You can also open XPS Viewer, and other software, by entering commands in Command Prompt much the same as Run. To open Win 10’s XPS Viewer via the Command Prompt, follow the steps below.
Step 1: Click the magnifying glass button or search box on Windows 10’s taskbar.
Step 2: Next, type cmd within the search text box.
Step 3: Select Command Prompt in the search results to open it.
Read More: How to Open Command Prompt in Windows 10
Step 4: Now type in the xpsrchvw command as shown directly below.

Step 5: Press the Enter key after inputting the command.
Method 5. Open XPS Viewer in Windows 10 via Windows PowerShell
PowerShell is another command-line utility you can open apps and accessories in Windows 10 with. Although it’s more advanced than the Command Prompt, there’s little difference between them when it comes to opening apps. This is how you can open XPS viewer in Windows 10 with PowerShell.
Step 1: Bring up the search utility in Windows 10.
Step 2: Enter PowerShell in the search text box to find that command-line utility.
Step 3: Click Windows PowerShell in the search findings to open it.
Read More: How to Open PowerShell in Windows 10
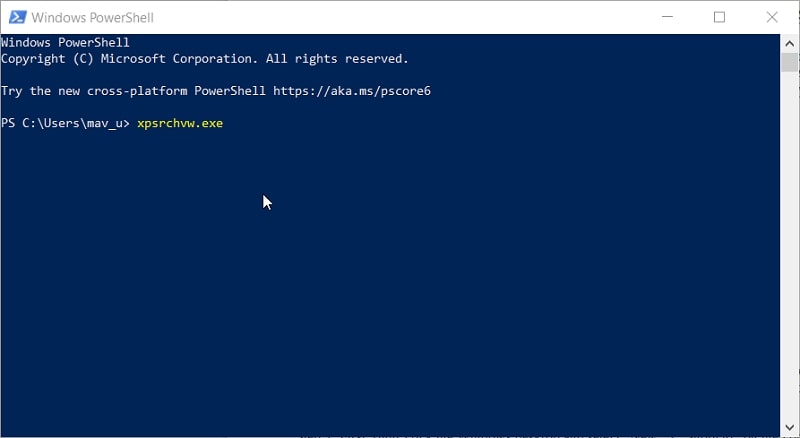
Step 4: Then type in the xpsrchvw.exe command in Windows PowerShell.
Step 5: Press Enter to initiate the entered command and launch XPS Viewer.
Method 6. Open XPS Viewer With a Desktop Shortcut
If you want to utilize XPS Viewer a lot, it’s better to have a shortcut for it on the Windows 10 desktop. Then you can open XPS Viewer directly from the desktop by clicking its shortcut. You can set up an XPS Viewer desktop shortcut as follows.
Step 1: First, right-click the Windows desktop and select “New” > “Shortcut” on the context menu to bring up the Create Shortcut window.
Step 2: Type %windir%\system32\xpsrchvw.exe within the Create Shortcut window’s text box as shown in the screenshot directly below.

Step 3: Click “Next” to continue.
Step 4: Type XPS Viewer within the shortcut name text box.
Step 5: Press the “Finish” button to add the shortcut to the desktop like in the snapshot directly below.

When you’ve done that, you can add an XPS Viewer shortcut to the taskbar or Start menu if you prefer. Simply right-click the XPS desktop shortcut and select the “Pin to Start” or “Pin to taskbar” options. When you pin it to the Start menu, you can click an XPS Viewer tile shortcut to open that accessory.
Read More: How to Pin Shortcuts to Taskbar in Windows 10
Method 7: Open XPS Viewer With a Hotkey
Step 1: As an extension to the sixth method, you can configure the desktop shortcut so that you can open XPS Viewer with a hotkey. To do that, right-click the XPS Viewer desktop shortcut and select the “Properties” option.
Step 2: Click in the Shortcut key text box on the Shortcut tab.
Step 3: Then press the X key to set up a Ctrl + Alt + X keyboard shortcut.
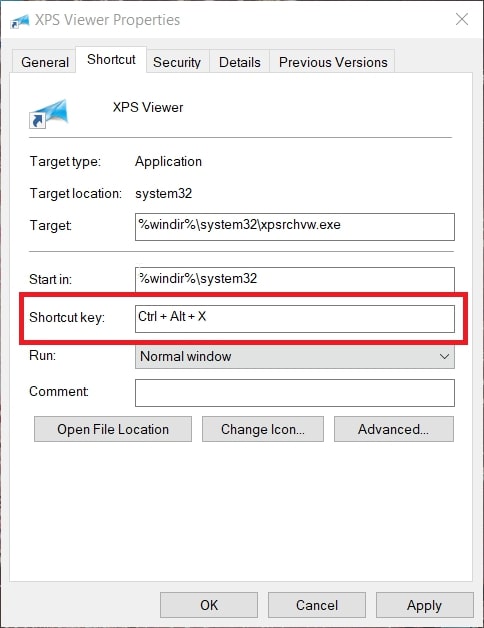
Step 4: Press the “Apply” button.
Step 5: Click “OK” to close the shortcut’s properties window.
Now try out your new hotkey by pressing the Ctrl + Alt + X keys simultaneously. The XPS Viewer will open whenever you press that key combination. Just make sure you don’t delete the XPS Viewer’s desktop shortcut because the hotkey won’t work without it.
FAQs About XPS Viewer in Windows 10
Are there any third-party software alternatives to XPS Viewer?
Yes, there are numerous freely available third-party XPS viewer software packages. Free XPS Viewer, XPS Annotator, and STDU Viewer are some of the more notable freeware XPS software packages. You can both open and edit XPS files with XPS Annotator.
Is XPS a better format than PDF?
Overall, there isn’t much difference between the two formats. However, Portable Document Format is by the far the most standardized format. As it’s a much more standardized format, many more users will likely have a better idea of what software they can open PDFs with. In that respect, PDF might be a better format for sharing documents with.
Nevertheless, you can always tell users you share XPS documents with that they only need to quickly install Windows 10’s optional XPS Viewer utility to open them. So, opening shared XPS documents in Windows 10 should never be an issue. There are also free online XPS viewer web apps, such as View XPS Online, other users can view shared XPS files on their Android or iOS mobile devices.
Where is XPS Viewer installed in Windows 10?
The XPS Viewer is included within the Windows Accessories folder. You can open that folder in File Explorer at this folder path: C:\ProgramData\Microsoft\Windows\Start Menu\Programs\Windows Accessories. Then you can click XPS Viewer in that folder to open it from there.
How can I convert PDF documents to XPS Viewer’s XPS format?
There are a few PDF to XPS web apps you can utilize for format conversion. This is how you can convert PDF files to XPS format with the PDF to XPS Convertio converter.
Step 1: Open the PDF to XPS Convertio app in a web browser.
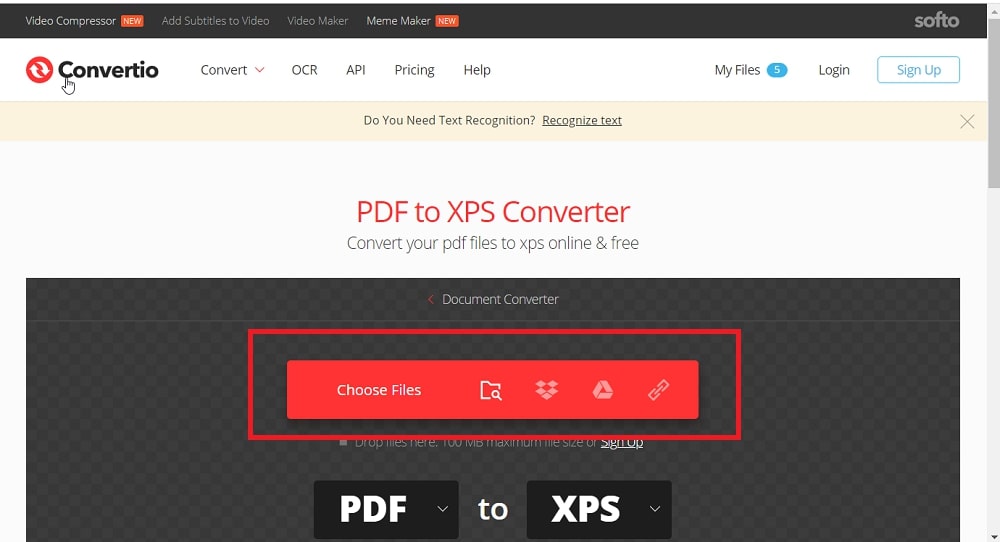
Step 2: Click the “Choose Files” button there.
Step 3: Then select a PDF file to convert, and press the “Open” button.
Step 4: Press the “Convert” button.
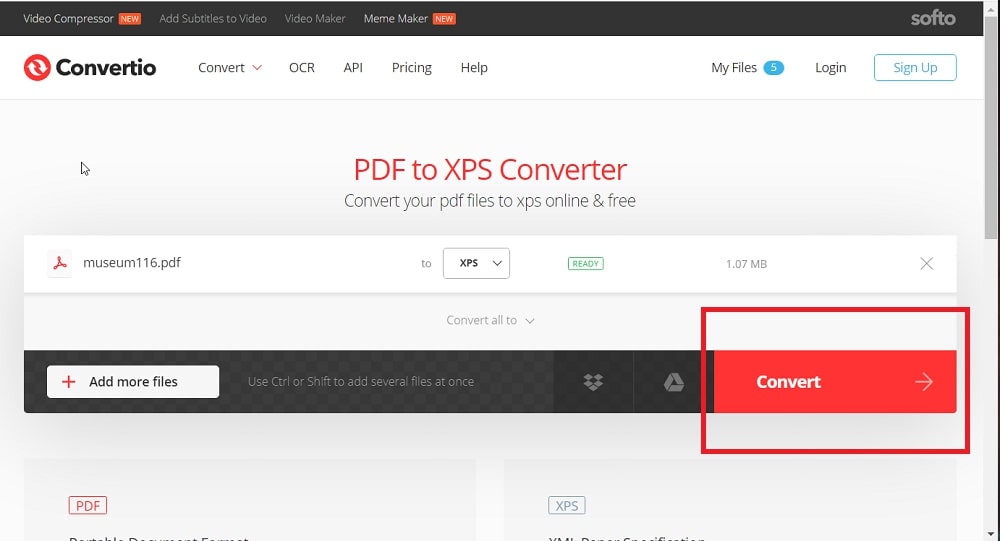
Step 5: Thereafter, click “Download” to save the converted XPS file in a folder.
What Windows platforms include the XPS Viewer?
Windows Vista, 7, 8, 8.1, and 10 are the platforms that include the XPS Viewer. Note, however, that XPS Viewer needs to be enabled via Windows Features in earlier Windows platforms. You can turn on the XPS Viewer feature in Windows 8, 7, and Vista as follows.
Step 1: Press the Windows and S key combination to bring up Run.
Step 2: To open Programs and Features, type appwiz.cpl in Run and click “OK.”
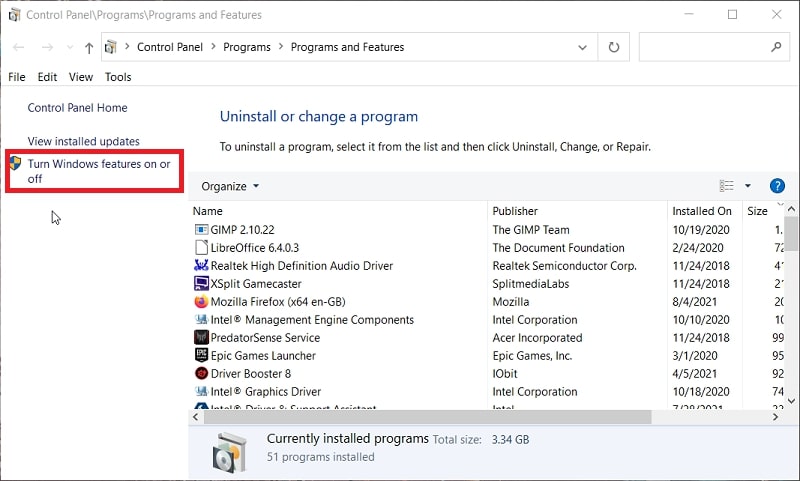
Step 3: Click “Turn Windows features on or off” to open Windows Features.
Step 4: If it’s not already checked, click the XPS Viewer checkbox to select it.
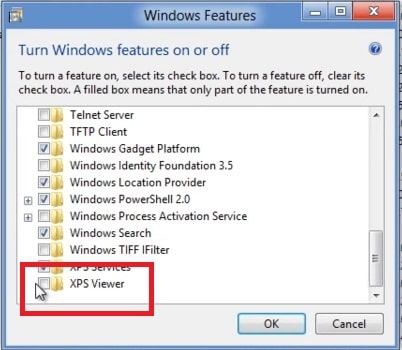
Step 5: Press the “OK” button to enable the XPS Viewer feature.
Conclusion
So, who needs PDF documents? XPS is a perfectly good alternative file format for sharing documents with. Windows 10’s optional XPS Viewer feature is readily available and easy to install for users to open and view shared XPS files with. Choose whatever method you prefer for opening XPS Viewer in Windows 10.