The Snipping Tool in Windows 10 is a handy tool. It was available on the previous version of Windows and continues with the latest iteration as well. While Microsoft now offers an improved Sniping and Sketch app, nothing beats the simplicity and convenience of the Snipping Tool in Windows 10. After the recent update, if you have issues opening the app, here’s how to open the Snipping tool in Windows 10.
In Windows 10, there are multiple ways to open almost all the system and pre-installed apps. Similar is the case with the Snipping tool as well. You can launch the tool from the Start menu, performing a search or running a command. We have listed all the different ways to open the screenshot capturing tool in Windows 10 below.
Method 1. Open Snipping Tool in Windows 10 from the Start Menu
The Start menu in Windows 10 houses all the apps installed on your computer. This also includes applets and pre-installed programs like the Snipping tool. Here’s how you can access the Snipping Tool from the Start menu.
Click on Start to open the menu. From the Start menu, scroll down and locate the Windows Accessories folder.
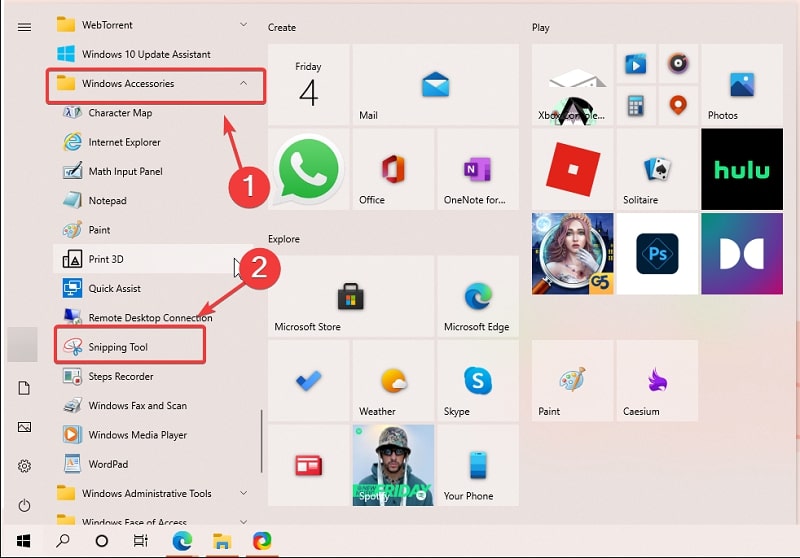
Expand the folder by clicking the small arrow icon to show all the apps. Then, click on the Snipping Tool to launch the app.
Method 2. Open Snipping Tool in Windows 10 by Searching
Microsoft has a Windows search option for those of us who detest going through multiple folders to find an app or file. You can use it to find and open apps, files and folders on your computer.
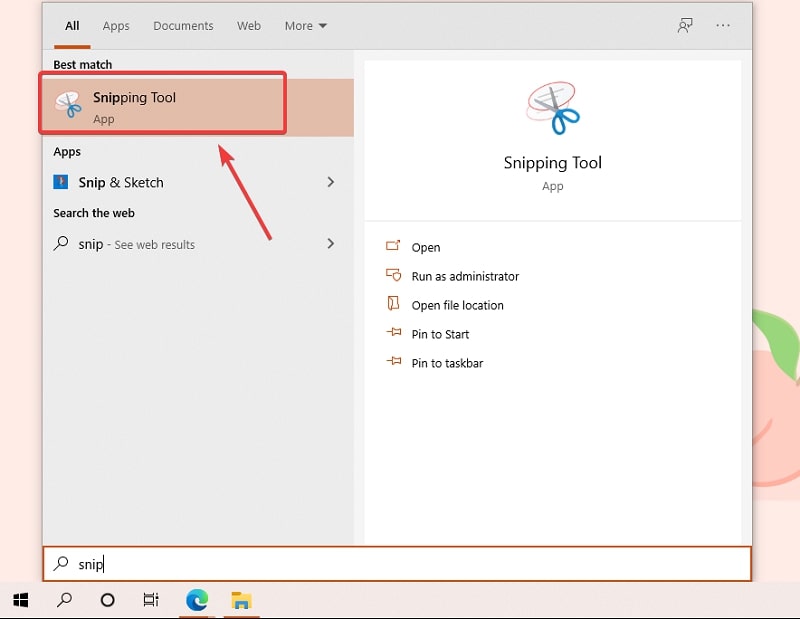
To open the Snipping Tool on Windows 10 using search, press the Windows key to bring up the search. In the search bar, type Snipping Tool. Next, click on the app name to launch the screenshot tool.
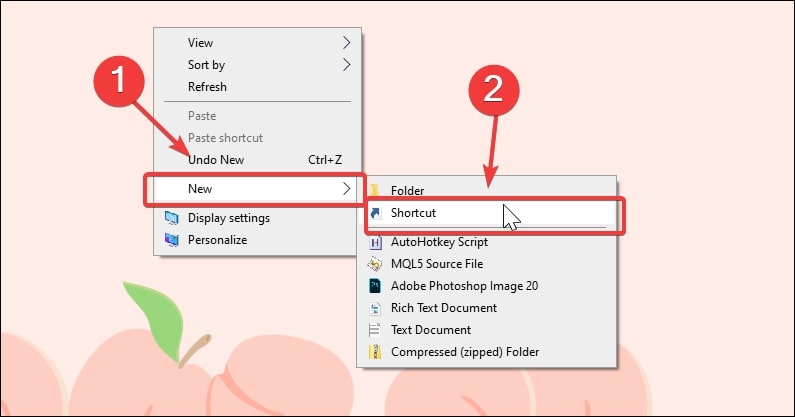
Method 3. Create A Shortcut for Snipping Tool in Windows 10
If you prefer to keep things a little old school and access apps via the desktop shortcut, you can create a short for Snipping Tool on Windows 10. Follow the steps below to learn how to create a desktop and keyboard shortcut for the Snipping Tool in a few steps.
Desktop Shortcut:
Right-click on an empty area on your desktop. Choose New and then select Shortcut.
In the Create Shortcut window, enter the following path and click Next.
C:\Windows\System32\SnippingTool.exe

Type a name when you are prompted to enter a new name for the shortcut. You can also leave it as default if you want. Finally, click the Finish button, and that should create a desktop shortcut.
Keyboard Shortcut:
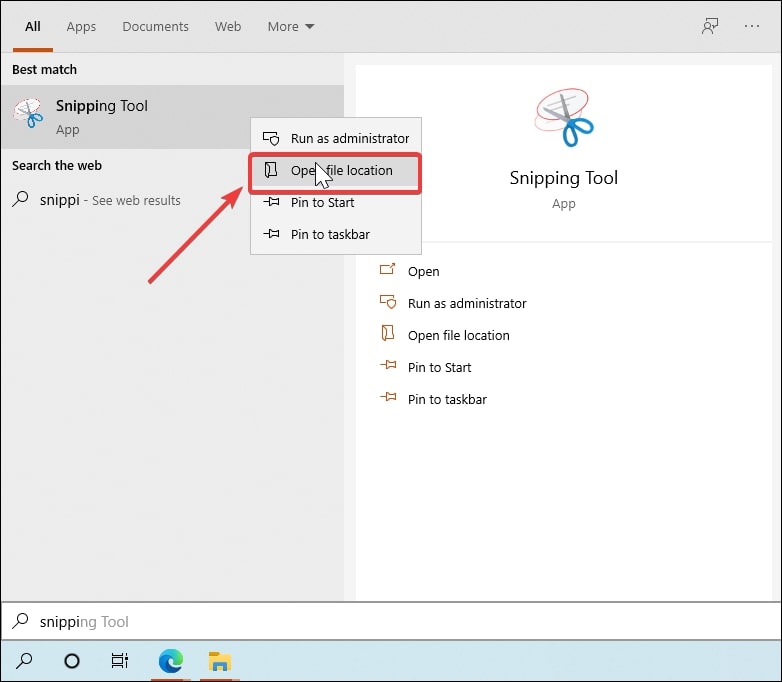
There is no predefined keyboard shortcut to open the Snipping Tool. But, you can create one by following the steps below.
Press the Windows key, and type Snipping Tool. Next, Right-click on the Snipping Tool and choose Open File Location.
When the Folder Opens, right-click on the Snipping Tool shortcut, choose Properties.

In the Properties Window, open the Shortcut tab and click the Shortcut key field. Now press the letter that you want to assign to the shortcut.
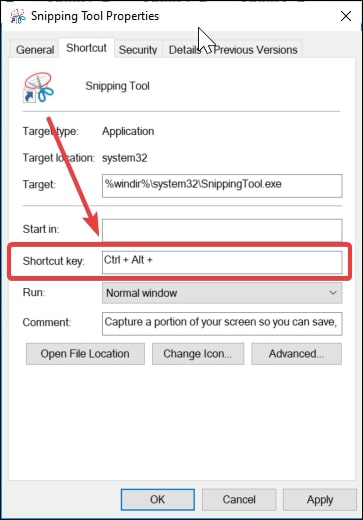
So, if you want to use Ctrl + Alt + S to open the Snipping Tool, then press the S key on your keyboard.
Click Apply and OK to save the changes. Press your assigned keyboard shortcut to launch the Snipping Tool from hereon.
Method 4. Open Snipping Tool in Windows 10 using the Run Command Window
Run command box in Windows 10 is a handy utility that allows you to open some system apps by entering a single command. If you access the Snipping Tool frequently, opening it via the Run box makes it easier and faster.
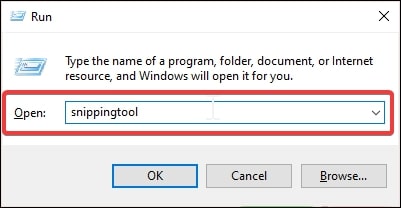
To do this, press the Windows key + R to open the Run box. Type snippingtool and click OK to open the app.
Method 5. Open Snipping Tool in Windows 10 via Command Prompt
The built-in command processor is another way you can open system apps in Windows 10. This is ideal for power users who use the Command Prompt frequently.
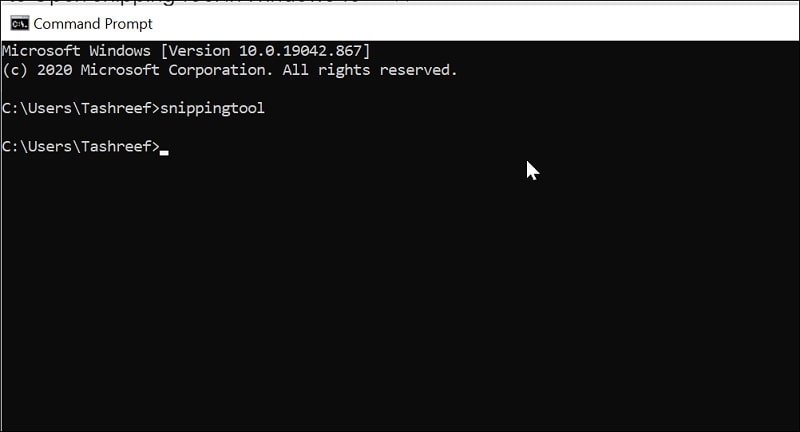
Right-click on the Start menu and click on Command Prompt to open the command processor.
In the Command Prompt window, enter snippingtool and hit enter. Command Prompt will open the Snipping Tool instantly.
Method 6. Open Snipping Tool in Windows 10 via Windows PowerShell
If you prefer PowerShell over the Command Prompt for its advanced features, you can still use it to open system apps with similar commands as Command Prompt.
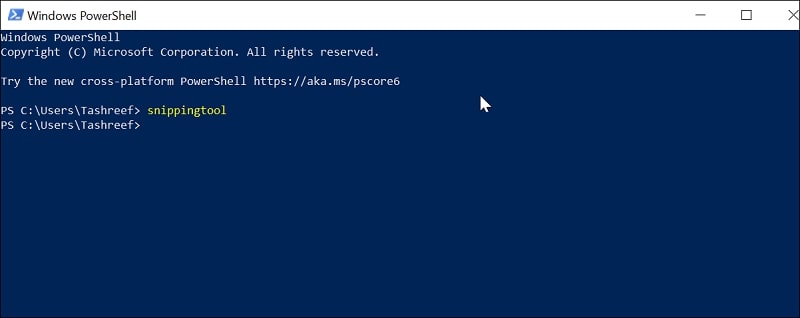
Press the Windows key, and type PowerShell. Then, open the PowerShell app from the search result.
In the PowerShell window, type snippingtool and hit Enter. It should launch the screenshot tool in Windows 10.
FAQs: How to Open Snipping Tool in Windows 10
Where do my snips go on Windows 10?
Snips captured from the Snipping Tool by default are saved in the Pictures folder. However, you need to save the snip first by pressing Ctrl + S to access it from the folder.
How to use the Snipping Tool in Windows 10?
Open the Snipping Tool and click on the New button. Select the area that you want to save, and that will capture a snip. You can also capture the full screen, window or free-from snip by changing the Snip Mode.
How do you copy and paste with the Snipping Tool?
Once you have snipped a screenshot, it will be automatically copied to the clipboard. Next, open an editing app such as Microsoft Paint. Press Ctrl + V on a new canvas to paste the captured screenshot.
How to delay screen capture in Windows 10’s Snipping Tool?
To capture a delayed screenshot, open the Snipping Tool and click the Delay button. You can choose between 0-5 seconds of delay. Once set, click the New button, and the snipping tool will activate after the specified time.
Conclusion
Snipping Tool in Windows 10 is a handy utility to capture quick screenshots of web pages, social media, and everything else that is on your screen. It also has some advanced features such as delay and different modes.
To make it easy for you to access this useful tool, we have listed all the different ways that you can use to open the Snipping Tool in Windows 10 easily.