Locking your screen is the best way to ensure security when you are away from the computer. Locking the screen is particularly useful in an office environment. It is also suitable when you have kids in the house and do not want them to interrupt something you’re doing on the computer.
Scroll down to find how to lock the Windows 10/11 computer.
Method 1: How to Lock Windows 10 via Keyboard Shortcut
A keyboard shortcut is the easiest way to lock your computer. And understanding the importance of security, Microsoft has pre-included a dedicated key to lock your screen. Here’s the keyboard shortcut to lock the screen conveniently:
Press Win+L (Windows logo key plus L) to lock your screen easily.
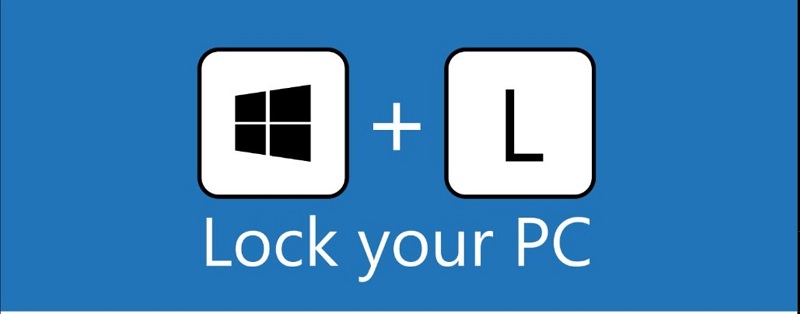
Remember the keyboard shortcut to lock your screen instantly, regardless of what you’re doing on the computer. You can use this method, even when your physical keyboard isn’t working, by accessing the OSK.
Method 2: How to Lock Screen on Windows 10 with Three-Finger Salute (Ctrl+Alt+Del)
Ctrl+Alt+Del, also known as the three-finger salute, is widely used to interrupt the ongoing process and perform tasks like Switch user. But it can also be used to lock the screen on the Windows computer. Here’s how to lock screen on Windows 10 via Ctrl+Alt+Del:
Press Ctrl+Alt+Del to access the options list.
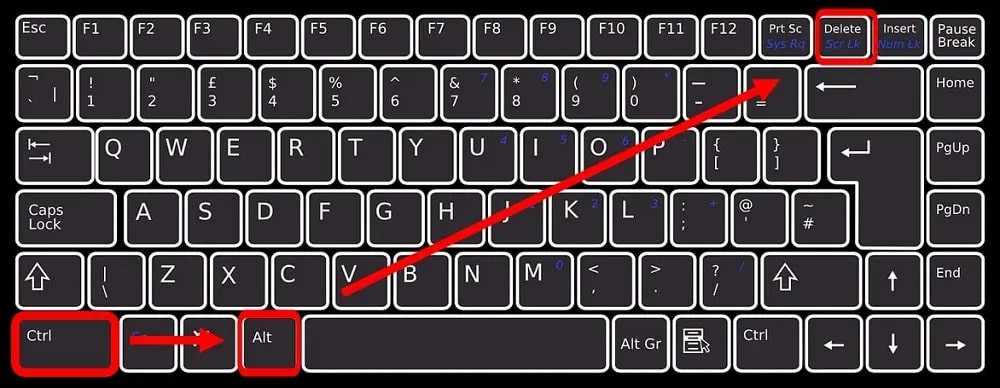
Choose Lock (the first choice from the options list).
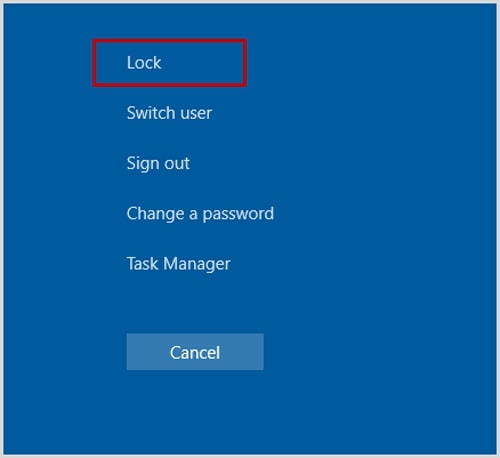
That’s another keyboard shortcut. Unlike the before method, this is a two-step process. But it will be useful when Windows 10 becomes unresponsive.
Method 3: Lock Windows 10 Screen via a Created Shortcut
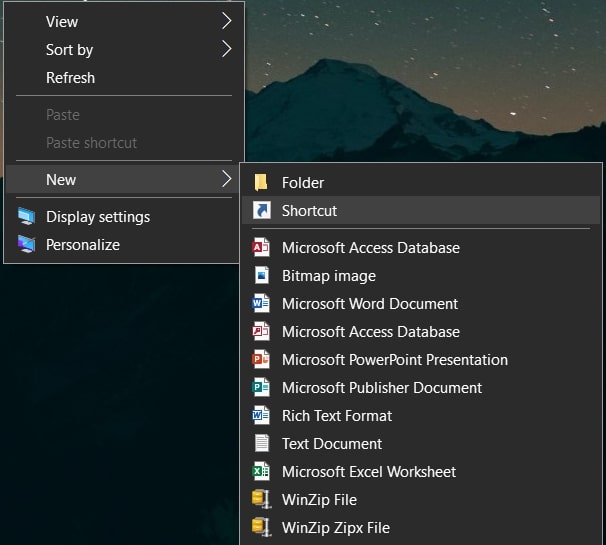
You can also create a desktop shortcut and lock the Windows 10 screen with a single click on the shortcut. Here’s how to create a desktop shortcut to lock your PC:
- Access the Windows 10 desktop, and right-click on an empty section on your screen.
- Choose New from the context menu.
- Then choose Shortcut from the drop-down list.
- In the Type the location of the item box, enter the following command:
| C:\Windows\System32\rundll32.exe user32.dll,LockWorkStation |
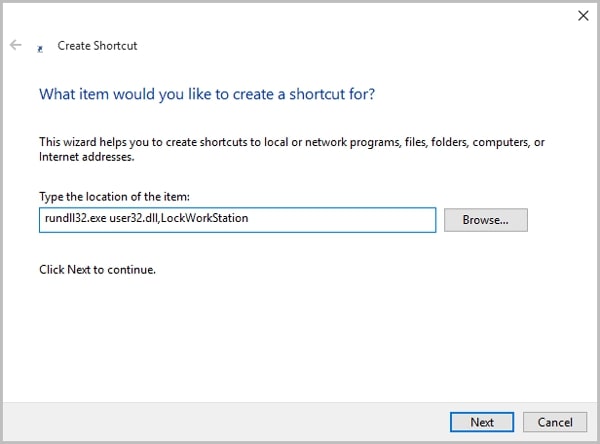
- On the next page, enter a preferred name like ‘Lock Screen.’
- Click Finish.
Now you can click on the created shortcut and lock the screen. For convenience, you can also pin the shortcut to Taskbar and lock by clicking on the pin.
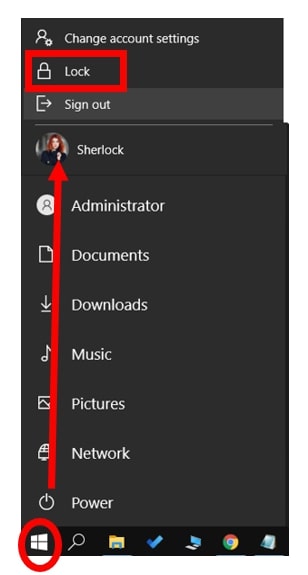
Method 4: How to Lock Screen on Windows 10 via Start Menu
User Account icon is another quick method that requires you to navigate to the Start menu and lock the screen. Follow these simple steps to learn how to lock screen on Windows 10 via the User Account icon:
- Press the Win (Windows logo) key or navigate to the Start icon.
- Click on the User Account icon (image).
- And select Lock.
Another quick way to lock the screen. Follow along to learn more ways to lock the screen on Windows 10 computers.
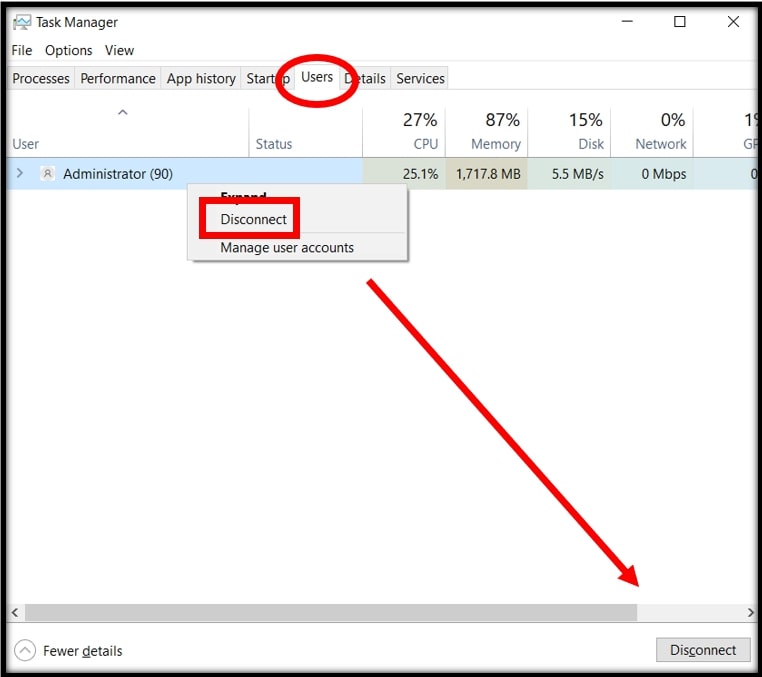
Method 5: How to Lock Screen on Windows 10 from Task Manager
The Task Manager shows you all the running programs and background processes on a Windows computer. Useful for many things, the Task Manager can also help you lock the screen on Windows 10. Here’s how to lock screen via Task Manager:
- Press Ctrl+Shift+Del to open the Task Manager on Windows 10.
- Click on the Users tab.
- Right-click on the User Account.
- And choose Disconnect.
Method 6: How to Lock Screen on Windows 10 via Command Prompt
The versatile Command Prompt can also help you lock the screen on your PC. Here’s the command and steps to lock Windows 10 screen:
- Open Command Prompt on Windows 10.
- Type in the following command:
| rundll32.exe user32.dll,LockWorkStation |
- And press Enter.
As soon as you press Enter, Windows 10 will lock the user.
Method 7: How to Lock Screen on Windows 10 via the Run Window
The same command (used in the above method, i.e., CMD) can also help you lock the Windows 10 computer via the Run Window. All you have to do is:
- Press Win+R keys to open the Run window.
- Type in the following command:
| rundll32.exe user32.dll,LockWorkStation |
- And press Enter.
Of course, these two methods (the CMD and Run window) are not handy and require you to learn a command. But it can be fun to try out!
And while these are the direct ways to lock the screen on Windows 10, some other methods discussed below can be useful when you leave the computer unattended. Scroll down to find out:
Method 8: How to Enable Auto-Lock on Windows 10 computer
Microsoft has included the auto-lock screen feature in the Settings that locks out the user when the computer is left idle (flexible periods available). Follow these simple steps to enable the auto-lock feature via the Screen Saver Settings on Windows 10:
- Press Win+I keys to access the Settings on Windows 10.
- Choose Personalization.
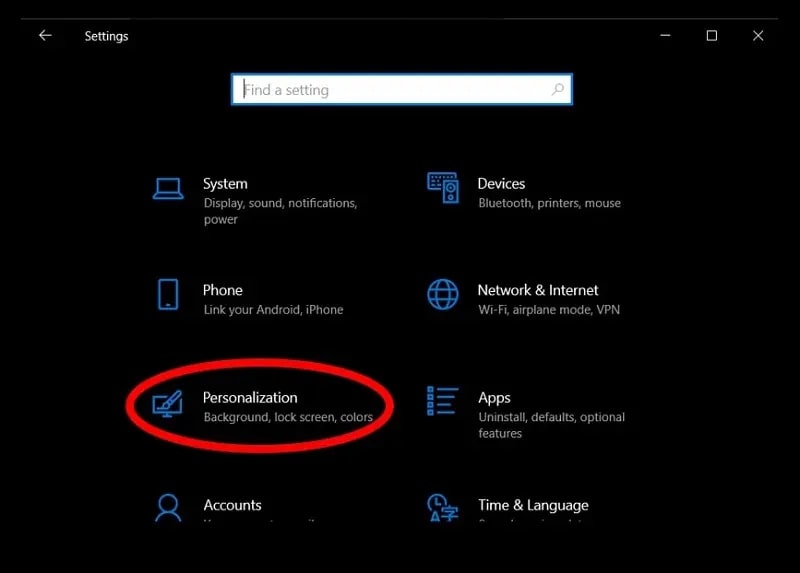
- From the left pane, choose Lock Screen.
- Scroll down the Lock Screen options on the right pane and choose Screen Saver Settings.
- On the Screen Saver Settings box, set the timer (in the Wait: box) to direct Windows to lock the computer when left idle.
- Check the On resume, display logon screen box.
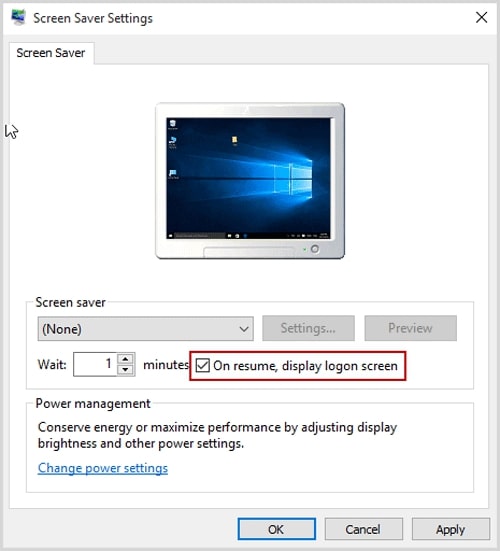
- Click OK.
- Hit Apply to save the changes.
There you go! Windows will auto-lock the device when your computer becomes unresponsive for the chosen wait period.
Method 9: How to Enable Dynamic Lock on Windows 10
Enabling Dynamic Lock is the most complex of all the methods discussed here. But given the fact that it lets you lock the screen remotely, it is also the most useful of all methods mentioned here:
Step 1. Pair Your Phone: dynamic lock can only work if you pair your phone with the Windows 10 computer. If you have already done that, skip to the next steps. If not, follow along to pair your smartphone with the computer:
- Go to Settings.
- Select Devices and choose Bluetooth & other devices.
- Make sure your phone’s Bluetooth is turned on. And then enable the toggle assigned to Bluetooth.
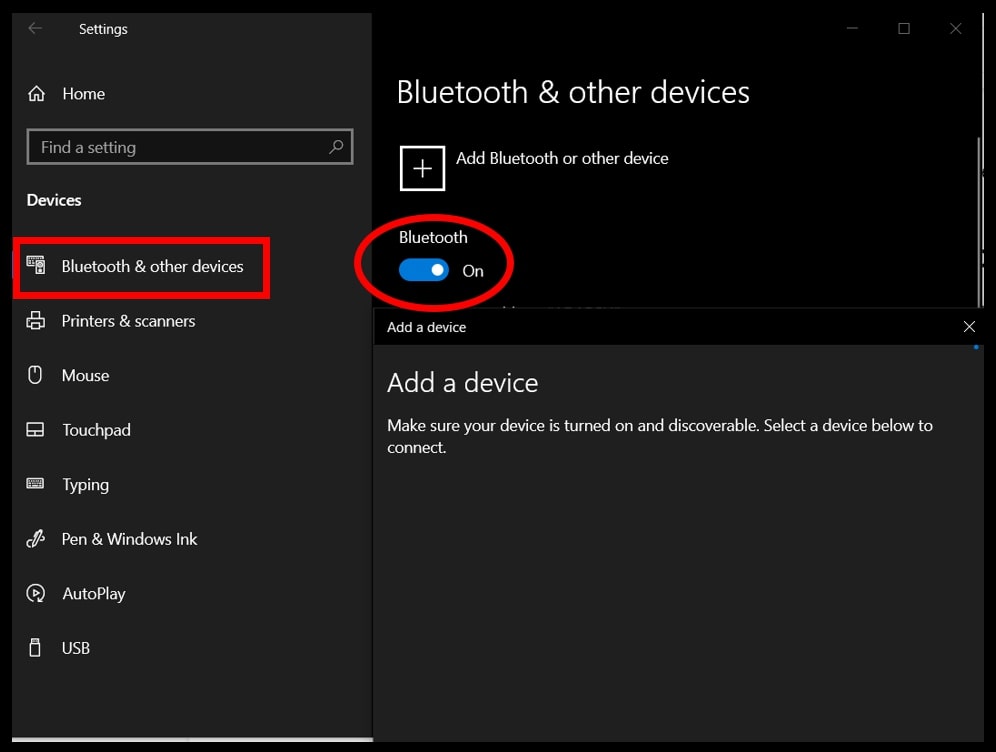
- Tap on the “+” icon to add a device that has not been paired before with the computer.
- In the Add a device pop-up, choose Bluetooth.
- Choose your phone from the scanned devices. And click on the prompts on the computer and phone to pair them successfully.
Step 2. Enable Dynamic Lock (make sure the devices are paired).
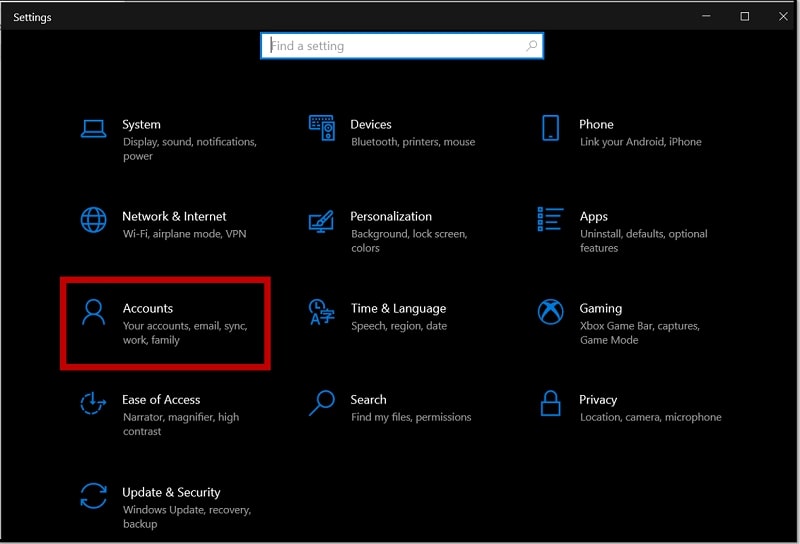
- Open Settings.
- Choose Accounts.
- Within Account, choose Sign-in options from the left pane.
- Navigate to the Dynamic Lock section and check the boxassigned to Allow Windows to detect when you’re away and automatically lock the device.
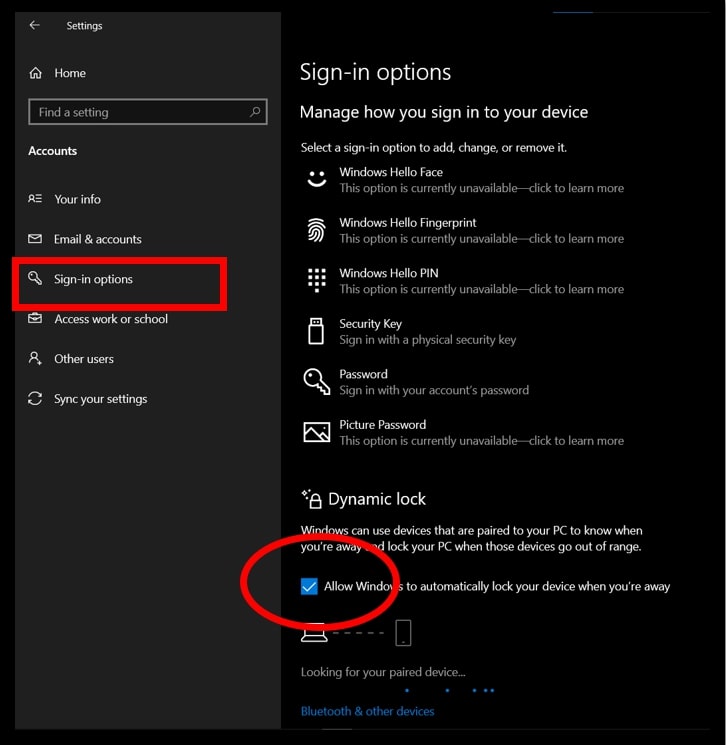
There you go! Once you enable the Dynamic Lock options, Windows will lock the screen when your phone isn’t in the Bluetooth range (after 30 seconds). And if your phone stays within the Bluetooth range (meaning the devices should remain paired) — the device will not get locked.
FAQs
1. How to unlock a PC from the Lock screen?
If you have been locked out of the computer and see the screen — type in the password to log in to the computer. If you do not have a set password, all you have to do is press Enter.
In case the display is off (due to inactivity, by default Settings) — you can press any key on the keyboard and log in by entering the password.
2. How to disable the lock screen on Windows 10?
Windows 10 Pro (including Enterprise and Education) users can follow these simple steps and disable the lock screen on Windows 10:
- Type gpedit in the search menu.
- Press Enter to open the Group Policy Editor.
- Double-click on the Administrative Templates.
- Then double-click on the Control Panel.
- Choose Personalization.
- From the list of options on the right pane, double-click on the Do not display the lock screen option.
- Click Enabled.
- Choose Apply.
- Then choose OK to disable the lock screen.
Due to the absence of the Group Policy Editor feature on Windows Home edition, users cannot disable the lock screen using the above method. Yes, there is a method to disable the lock screen via Registry but let’s discuss that in a later guide.
3. How to Switch users from the lock screen?
Access the lock screen from any of the methods mentioned above. Press a key to access the Sign-in screen and then:
- Navigate to the bottom-left corner of the sign-in screen.
- You will see all the users registered on the PC (Admin, Standard, and Guest).
- Choose the desired user account.
- Type in the password (if prompted).
There you go! You can learn more about Switch User from here.
4. How to change the background image on the lock screen?
Follow these simple steps to change the background image on the lock screen:
- Open Settings.
- Click on Personalization.
- Click on the Lock screen options.
- Use the Background drop-down menu.
- And select the Picture option.
- Click the Browse button to use an image saved on the computer.
Conclusion
Of course, there are a bunch of other methods to lock the screen on Windows 10. But like Command Prompt and Run Window, they are not practical. Locking the screen should not be challenging, which is why the keyboard shortcuts were listed first. Just remember the Win+L shortcut to lock the screen instantly. On the other hand, if you want to get creative — enable the dynamic lock. Of course, given the fact that you are in a trusted environment because Windows will not lock the screen if someone hops onto your computer within those thirty-second wait period.