Being able to smoothly utilize your mouse cursor is paramount in performing actions quickly and easily within Windows 10/11. So it comes as no surprise that when the mouse isn’t working as intended, you find yourself questioning, “Why is my mouse lagging?”
Depending on the situation it occurs in, your first thought could be that you’d like to throw your mouse across the room. Please refrain from doing so, as there are many common scenarios where this behavior becomes noticeable. However, the fault may not lie with the mouse at all.
Windows 10/11 users may notice their mouse lag, stutter, become slow, or even freeze when performing various things. The response time while gaming could slow or stop completely. While scrolling through documents, you may notice a pause. Clicking on webpage links or any other interactables could take more than one click. But what could be causing it?
Though you may notice it only happening to the mouse and contemplate how to fix it, you could actually just be dealing with computer lag. First things first, before diving too deep into solutions, you should educate yourself on the different types of mouse lag you can find in Windows 10.
Why Is My Mouse Lagging?
Lag is nothing more than a time delay between the action and reaction of a triggered computer task. This causes a delayed response from the computer to the action you take with your mouse clicks or when you simply move the cursor.
Gaming lag can result when playing a very high-demanding game that your computer can’t keep up with, resulting in poor performance. Mouse stutters are both common and frequent in this regard making gaming, or even graphic design, a real pain. This sort of mouse lag can cause a severe dip in productivity.
A frozen mouse cursor is the worst culprit. It’s hard to understand what the next course of action is when you can’t even move the cursor at all. Your first thought might be that the entire system is unresponsive, but it could simply be the mouse itself.
Lag due to the use of a wireless mouse may simply be the result of poor connectivity. A failing mouse may also produce Windows 10 mouse lag, stutters, and freezing. This occurs more often in shoddy products or a mouse that has been used for a substantial length of time.
There is not a single definitive reason for Windows 10 mouse lag. It’s just an incredibly common problem that Windows 10 users face. Seeing as it’s almost impossible to pinpoint exactly where the problem lies, knowing where to start will help to resolve the issue faster.
Method 1: Fix Mouse Lag by Tending To The Hardware
This is the first thing that should be looked into before doing anything else. The mouse hardware is by far the easiest thing to test to ensure that the problem doesn’t lie elsewhere within your system.
The first test should be to unplug the current mouse from the USB port and replug it back in. If the lag persists, unplug it and replace it with a new working mouse into the exact same port. This will help to confirm if it’s a single mouse problem, or if both lag, it may be something deeper.
For a wireless mouse, replace the current batteries with fresh ones. You should also clean the IR sensor found on the bottom side of the mouse, clearing it of possible dirt and debris. Do the same for the scrolling wheel, especially if your mouse is having lag issues while scrolling.
If you have another computer, you can test the mouse on it to see if lag is apparent. Once you plug the mouse in, move the cursor and click a few links or programs. If lag occurs, it’s probably the mouse. If not, then the issue is more likely with your Windows 10 computer.
Method 2: Swap To A USB 2.0 Port To Fix Mouse Lag
The USB port the mouse is connected to, rather than the mouse itself, could be causing the lag. Newer USB 3.0 ports are almost standard among newer PC case manufacturers. Not every computer component is yet compatible with a USB 3.0 port. It’s possible that your mouse may not be compatible with a USB 3.0 port either.
If this is the case, you could try plugging your mouse into a USB 2.0 port instead to see if that fixes your lagging problem. Another possibility is that the USB port has been damaged, so ensure you test other accessories using the same port to cancel out this possibility.
Method 3: Fix Mouse Lag by Updating Drivers
Outdated or corrupted drivers can cause a multitude of problems on your Windows 10 computer. Without updated drivers, it wouldn’t be possible to use some accessories and core components of your device. Yes, this extends to the mouse.
To see if your mouse driver has already been updated to the latest version:
Step 1. Pull up the Run dialog (Win + R), type devmgmt.msc into the box, and click OK.

Step 2. Locate the “Mice and other pointing devices” drop-down and expand the category by clicking the arrowhead found to the left.
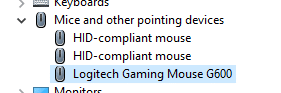
Step 3. Highlight your mouse and right-click it to open a separate menu. Select Update driver from the options.
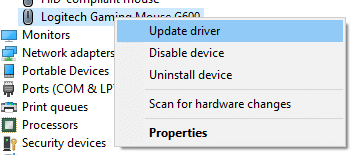
Step 4. Ensure you’re currently connected to the internet and select “Search automatically for updated driver software.” Windows 10 will locate the most recent driver for your mouse and install it for you.

Follow the on-screen instructions if your mouse needs to be updated. If your mouse driver is already up-to-date, we can move on to the next method.
Driver Roll Back
Something else that might be causing issues for the mouse is the driver itself. Sometimes a new driver update can roll out with bugs or other issues unforeseen by the manufacturer. Had you recently updated the driver and found lagging issues that followed, you may be able to fix it by reverting the update.
To roll back the mouse driver to a previous version:
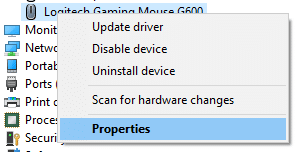
Step 1. Locate your mouse in Device Manager again, right-click it, and this time select Properties.
Step 2. Click the Driver tab and select Roll Back Driver.
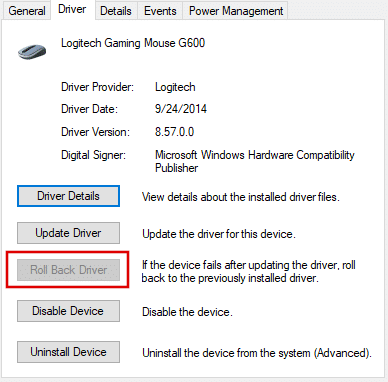
If the Roll Back Driver button is grayed out, it means that Windows doesn’t have the previous driver saved. Unfortunately, this means you won’t be able to complete the process. Instead, you’ll need to head to your mouse’s manufacturer website, and download the previous version directly.
After drivers are updated, it’s good practice to restart your computer to allow changes to take effect.
Mouse Sensitivity Settings
Windows updates can sometimes reset mouse settings to their default settings. This could cause things to appear slow because you’re used to customized settings. If this happens to be the case with your situation, you may need to go back and tweak the mouse sensitivity settings to fix your mouse lag in Windows 10.
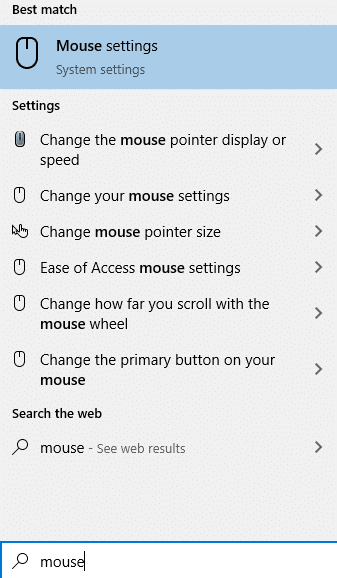
Step 1. Type mouse into the Windows search bar and select Mouse Settings from the results.
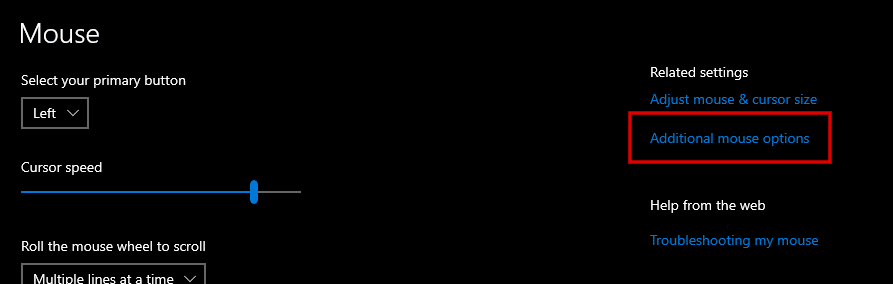
Step 2. While in the Mouse settings window, click Additional mouse options.
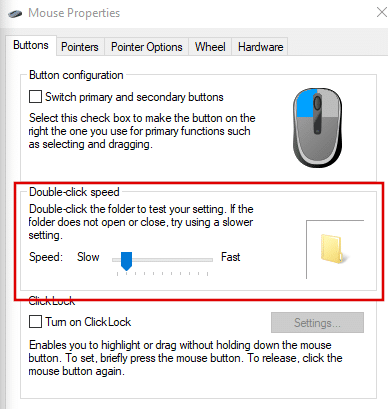
Step 3. In the Buttons tab of the Mouse Properties window, you can change the double-click speed via a slider.
Step 4. Navigate to the Pointer Options tab, and you can change the speed at which the cursor moves across the screen.

You can also turn off mouse acceleration by deselecting the Enhance pointer precision box. Mouse Acceleration can sometimes cause erratic behavior in your mouse pointer and could be the cause for your current frustrations.
Step 5. Make sure that after changes are made you hit Apply.
Method 4: Enable “Scroll Inactive Windows” To Fix Windows 10 Mouse Lag
The ability to scroll inactive windows is a feature that came with Windows 10. It allows you to move your mouse cursor over an inactive window and scroll without having to click on it first. It’s very useful when having multiple browser tabs, programs, or apps up simultaneously. Most notably when using more than one monitor.
However, multiple users have reported that this feature has caused them issues with their mouse. Others have claimed that it actually helps in the reduction or outright fixing of mouse stuttering in Windows 10.
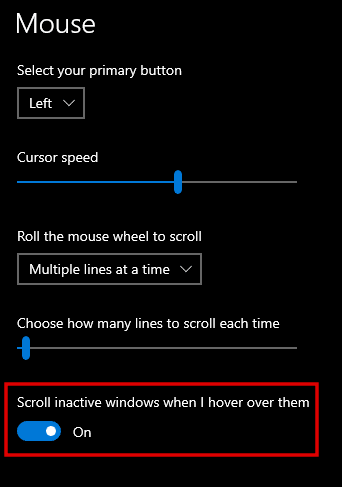
Step 1. Head into the Mouse settings via Windows search.
Step 2. In the main window panel, toggle the button for “Scroll inactive windows when I hover over them” to On (or Off if it’s currently on and causing issues.)
If lag persists, restart your computer. Once rebooted and logged back in to Windows 10, test for mouse lag. If still noticeable, continue with the next method.
Method 5: How To Fix Mouse Lag in Windows 10 by Disabling Audio Components
One thing you might not think of when it comes to how to fix mouse lag in Windows 10 is that it could be an audio processing issue. Depending on if you use Realtek Audio or NVIDIA, we have a solution that could help.
Terminate RealTek Audio Process
To terminate the Realtek Audio process:
Step 1. Pull up the Task Manager and make sure you’re in the Processes tab.

It launches in this tab by default, so everything should be fine as is.
Step 2. In the Background Processes section, scroll to find Realtek HD Audio Manager.

Step 3. Right-click the process and select End task, or click the End task button found at the lower-right corner of the Task Manager window.

Check to see if your mouse is still experiencing lag issues.
Disable NVIDIA High Definition Audio Device
Users have reported seeing mouse lag issues caused by their high-definition audio device. A solution to this would be to disable the device altogether.
To disable High Definition Audio Device:
Step 1. Head into the Device Manager and expand the “Sound, video, and game controllers” category.
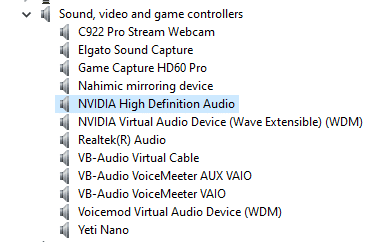
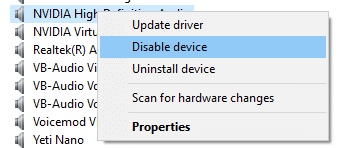
Step 2. Locate NVIDIA High Definition Audio, right-click it, and select Disable device.
Reboot your computer, and check to see if your mouse is still experiencing lag issues. If the issue is resolved, you might want to think about updating the driver for your High Definition device or replacing the component itself.
Method 6: Turn Off Cortana To Fix Windows 10 Mouse Lag
Microsoft’s virtual assistant could, in fact, be what is causing your mouse lag. Though seemingly unrelated, disabling this feature could be the solution you’ve been looking for. If at any point, you’d like to re-enable Cortana, you can do so easily any time.
To disable Cortana temporarily:
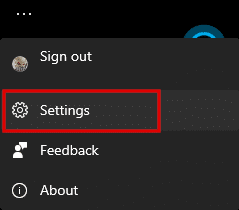
Step 1. Open Cortana by voice command or by clicking the Cortana icon.
![]()
Step 2. Click the three dots at the top-left portion of the window and click Settings.
Step 3. Under “This Device,” you’ll find Keyboard shortcut, Microphone, and Voice activation.
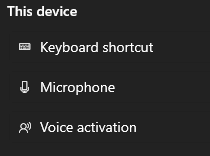
You’ll need to go into each of these and disable everything. Heading into the Keyboard shortcut, you can easily disable this by toggling the button Off.

This will require a PC restart to apply changes.
For Microphone, click the Microphone Permissions link.
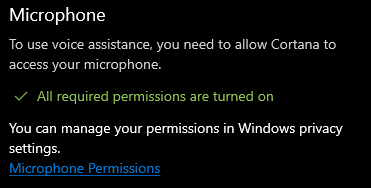
In the main panel, scroll to “Choose which Microsoft Store apps can access your microphone”. Locate Cortana and toggle it Off.

For Voice activation, click the Voice activation privacy settings link.
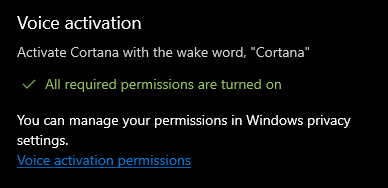
Generally speaking, by disabling the Microphone permissions for Cortana, this step isn’t absolutely necessary. However, it may benefit you to learn how to complete the process.
In the main panel, scroll to “Choose which apps can use voice activation”. Locate Cortana, and toggle “Let Cortana respond to “Cortana” keyword” to Off.

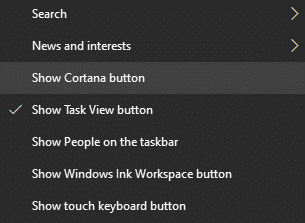
This will disable Cortana until you choose to turn it back on. If you’d like to remove the Cortana icon from your taskbar, just right-click the taskbar and deselect the “Show Cortana button” option.
Once Cortana has been disabled, test for mouse lag. If everything seems to be working as normal, you may want to troubleshoot Cortana at some point. At the very least, just to discover the root of the issue causing mouse lag in Windows 10.
Method 7: Fix Mouse Lag in Windows 10 via Power Management
Poorly configured power settings can also cause Windows 10 mouse lag. This is another super simple fix that just might answer the question, “Why is my mouse lagging?”
Step 1. Navigate to the device Manager via Run dialog (Win + R) by typing in devmgmt.msc.
Step 2. Scroll to and expand the “Universal Serial Bus controllers” category.

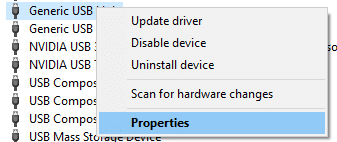
Step 3. Right-click on one of the USB Hub options, either Generic USB Hub or USB Root Hub (USB 3.0), and select Properties.
Step 4. Swap over to the Power Management tab and uncheck the option labeled “Allow the computer to turn off this device to save power.”
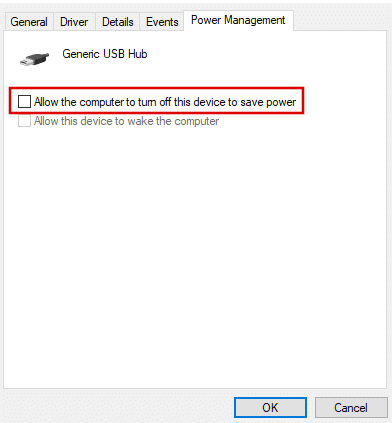
If you’re uncertain about which USB hub belongs to which option, you might want to do this method for all of them.
Step 5. Click OK to save changes.
Step 6. Test to see if your mouse now works properly.
If you happen to be using a laptop, Windows Power Saving mode could cause mouse issues. Windows will attempt to turn off USB ports in order to save power. You can resolve this by disabling Power Saving mode.
Method 8: Disabling Fast Startup Could Help Fix Mouse Stuttering in Windows 10
A useful feature in its own right, Fast Startup allows your computer to quickly get back to business immediately after a shutdown. This Windows feature added by Microsoft can also cause mouse lag issues, according to several users.
Many users enjoy this feature in an attempt to improve Windows 10 startup time. By simply disabling this feature, you’re risking overall PC performance, but it could also fix your erratic mouse behavior problems.
To disable the Windows 10 Fast Startup feature:
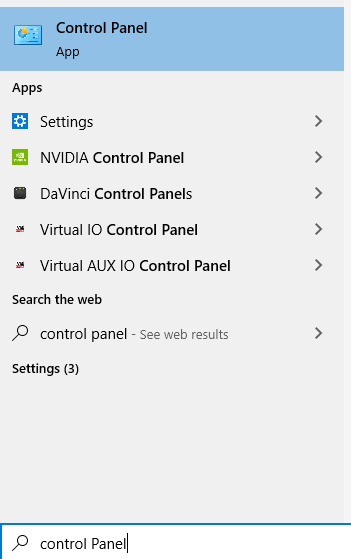
Step 1. Navigate to the Control Panel by performing a Windows search (Win + S) and selecting the appropriate result.
Step 2. For easier discovery, swap the “View by” to Large icons.

Step 3. From here, locate Power Options, and select it.

Step 4. On the left side of the Power Options window, click the “Choose what the power button does” link.

Step 5. Now click the “Change settings that are currently unavailable” link.

Step 6. This will “unlock” the grayed-out Shutdown settings. You can now uncheck the “Turn on fast startup” option.

Step 7. Click Save changes.
If the “Turn on fast startup” option is not available to you, it means that it’s already disabled. For the option to appear, your computer must have the Hibernation feature enabled.
FAQs About Mouse Lag in Windows 10
Are There Any Tips On How To Prevent Mouse Lag in Windows 10?
With a plethora of knowledge on how to fix mouse lag, it might be a good time to learn how to prevent it from happening at all. A few good practices and tips that could be useful now and in the future to avoid complications with mouse-related lag, are as follows.
- Perform a pre-use check of your mouse and other external devices. By keeping your mouse clean, you can often lengthen the life of the device.
- Keep all mouse drivers up-to-date. It can even be beneficial to remove all older mouse drivers manually after a new update. This will keep lag issues to a minimum.
- Refrain from allowing your PC to take on too much stress. A high performance load can quickly cause the PC to malfunction, which in turn can cause a lot of issues with external device connectivity. Maintain a proper performance load that your PC can handle in order to avoid these complications.
- Proper PC maintenance, in general, could reduce performance issues and therefore alleviate mouse lag due to an overwhelmed computer. Keep your PC clean, aired-out through proper ventilation, and cool at all times.
- All USB devices that are not currently in use should be unplugged from your PC or USB hub. More power can then be redistributed to your computer and other USB ports in this way, helping to avoid performance issues.
- Always choose USB 3.0 ports over USB 2.0 ports only so long as the mouse is compatible. USB 3.0 has a significant connectivity rate over a USB 2.0 port and should help you avoid unwanted mouse lag.
Does PC Performance Cause Mouse Lag?
It’s possible that a computer under high stress and demand can cause your computer to stutter, freeze, or have delayed input that might be associated with the mouse.
Can Disabling Cortana Really Fix Mouse Lag?
According to many users who have used the method above to fix their mouse lag issues in Windows 10, yes. Though it might sound strange and unrelated to your issue, it does work and is definitely worth trying if you run into a mouse lag issue.
Do Any of These Methods Help With a Laptop TrackPad?
Most of the above methods will help you with TrackPad lag as well. With the exception of the USB hub method, making an adjustment to method 3’s sensitivity settings toward the TrackPad instead of the mouse, and method 7 focused more on Power Saving mode, all of the methods in this article should be able to help you when dealing with lag in a TrackPad.
Do USB Hubs Cause Mouse Lag?
A hub can often feel like it creates connectivity or lag issues. This is especially true when you have multiple accessories plugged into a single hub. The truth of the matter is that it doesn’t make a difference. As USB hubs generally require very little power to work, it doesn’t slow down transfer rates for connected devices. If you feel that this is occurring, it’s more than likely the USB 2.0 or 3.0 port in your computer case and not the hub itself.
Better For Reducing Mouse Lag: Wired or Wireless?
For any gamer or graphic designer, this should be a no brainer. Even with all of the advancements in technology bringing a wireless mouse closer to that of a wired one, the wired mouse is still likely to receive far less connectivity issues and lag than that of a wireless mouse. Using a wired mouse removes the interference that is associated with Bluetooth technology by being connected directly into your computer. If you want to avoid lag more often than not, stick with a wired mouse.
Conclusion
Mouse lag in Windows 10 can be a real annoyance, especially at inopportune times. Delayed input during intense gaming sessions, freezing and stuttering while giving a PowerPoint presentation, or not scrolling while reading an ebook can greatly reduce performance and increase stress.
Thanks to the above methods and preventative tips, you no longer have to wonder, “Why is my mouse lagging?” We’ve provided you with enough answers to that very specific question that you should feel comfortable in discovering a solution.