If you have forgotten your Wi-Fi password, creating a new password is one option. However, it is a cumbersome process and something you should avoid unless necessary. Fortunately, there are multiple ways to find Wi-Fi password on Windows 10 computers.
You can see the WiFi password in Windows 10 if your computer has saved the Wi-Fi details previously, and you can do it in multiple ways. You can do it from the Control Panel, WiFi settings, using the PowerShell command or use a password viewer software.
Once you have retracted the password, you can use it to connect your PC or other WiFi devices to your Wi-Fi network again. So, here’s how to find a Wi-Fi password on Windows 10 computer.
Method 1. Find Wi-Fi Password in Windows 10 from Settings
If you have an administrator account and can access your PC, you can view the Wi-Fi password from the network settings. Here’s how to do it.
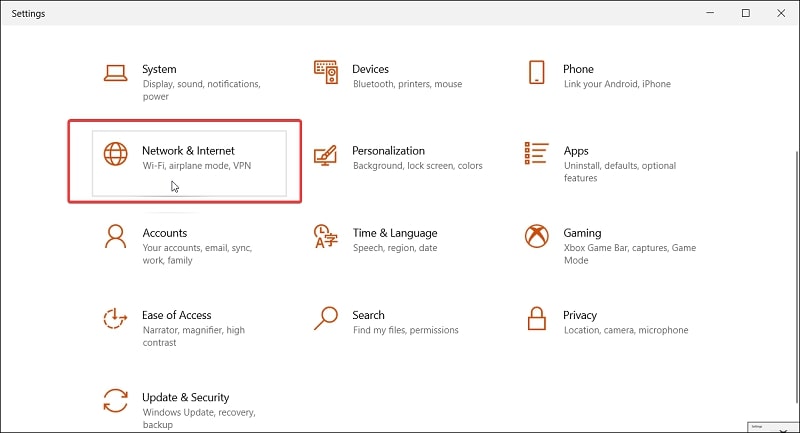
Step 1. Click on Start and choose Settings.
Read More: How to Open Settings in Windows 10
Step 2: In the Settings window, open the Network & Internet option.
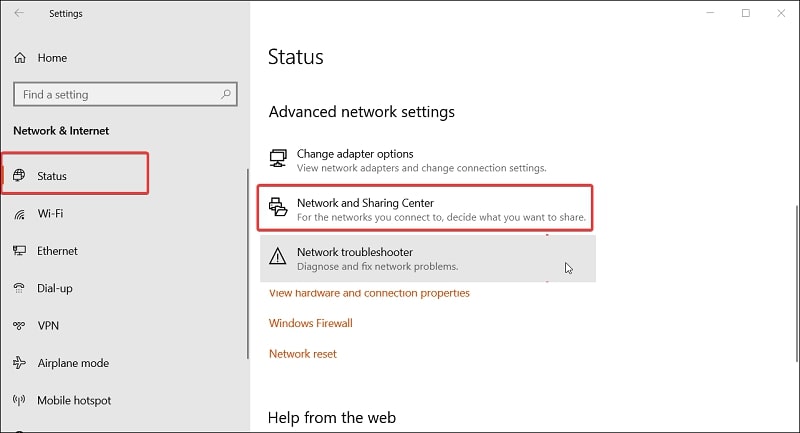
Step 3: Open the Status tab in the left pane. Next, on the right pane, scroll down to Network and Sharing Center.
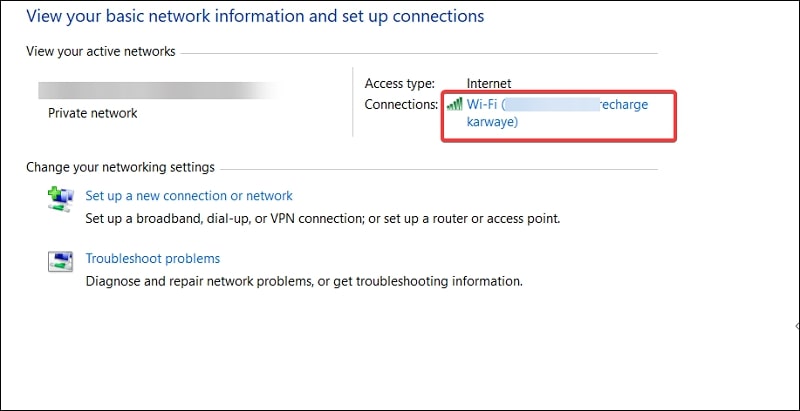
Step 4: In the Network and Sharing Center window, click on your Wi-Fi network name under active networks and open Status.
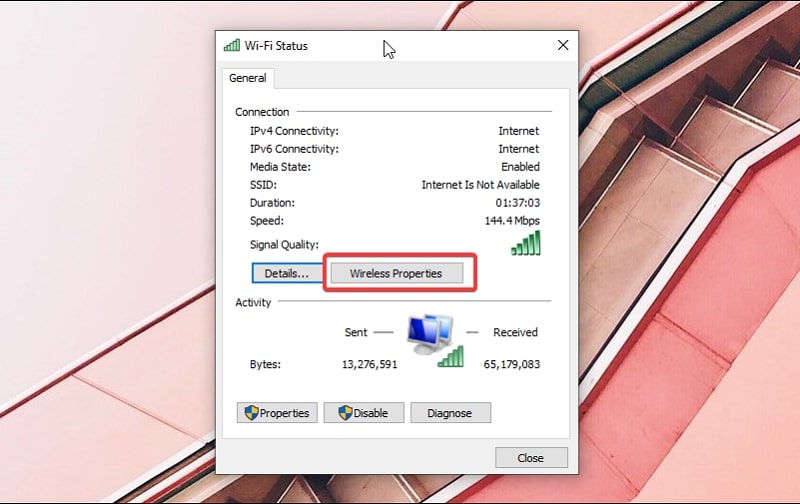
Step 5: In the Status window, click the Wireless Properties button.
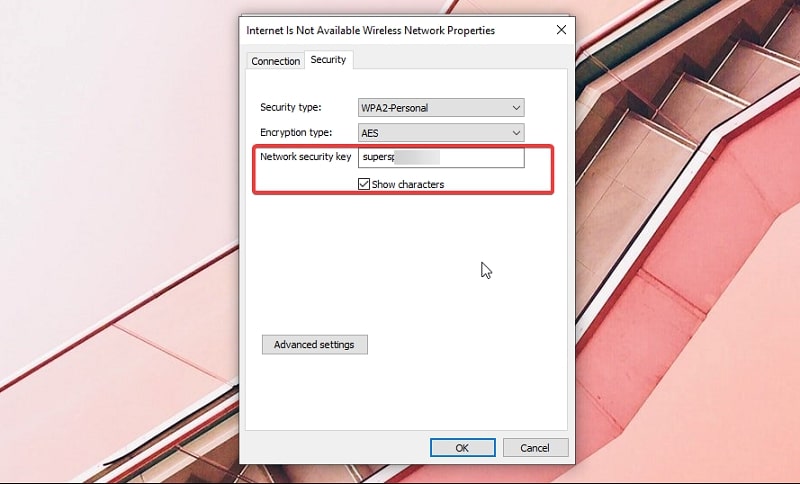
Step 6: In the Wireless Network Properties window, open the Security tab.
Step 7: Next, check the Show characters box to view your password.
Note down the password and enter it on the device that you want to connect to your Wi-Fi network.
Method 2. Find Wi-Fi Password in Windows 10 from Control Panel
The old Control Panel can help you customize several properties of your computer. Finding Wi-Fi passwords is one of them. If you cannot access your Windows 10 Settings panel, you can find the Wi-Fi password from the Control Panel.
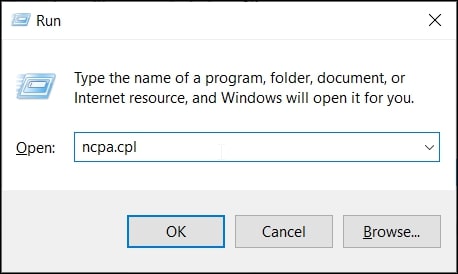
Step 1: Press the Windows key + R to open the Run box on your keyboard.
Type control in the Run box and click OK to open the Control Panel.
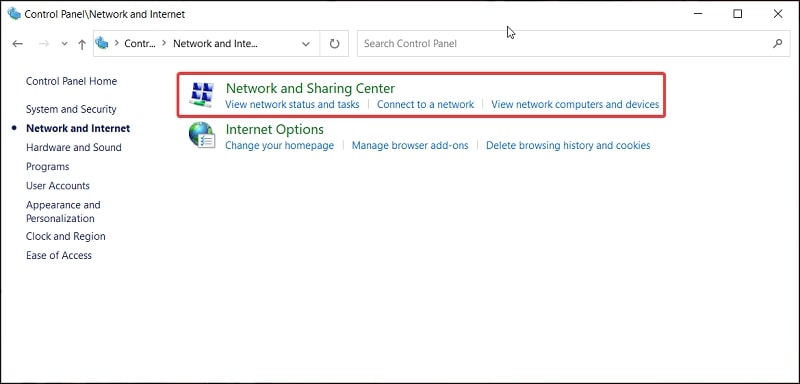
Step 2: In the Control Panel, go to Network and Internet.
Step 3: Next, click on Network and Sharing Center.
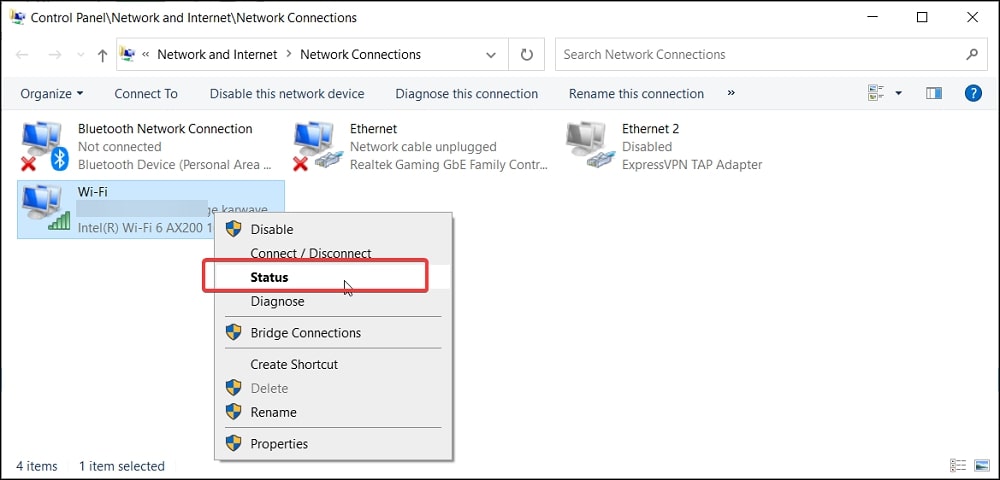
Step 3: Next, right-click on your active network and choose Status.
Step 4: In the Wi-Fi Status window, click the Wireless Properties button.
Step 5: Open the Security tab in the Wireless Properties window.
To view the WiFi password in Windows 10, check the Show characters box.
Method 3. Find Wi-Fi Password in Windows 10 via Command Prompt
Command Prompt is a useful little utility that you can use to view a bunch of details about your network using the netsh (Network Shell) command. You can use Command Prompt or PowerShell to see WiFi password in Windows 10.
Apart from viewing saved password, you can use the netsh command to view other details related to your network, such as the password for previously connected networks.
To find the WiFi password via Command Prompt, you need the network name. Fortunately, you can find the network name using the command prompt as well. Here’s how to do it.
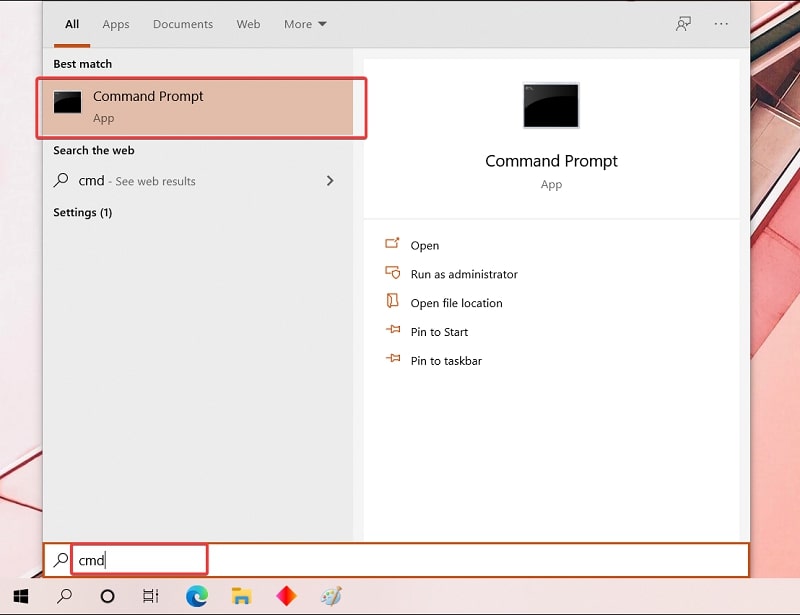
Step 1: Open the Command Prompt. To do this, press the Windows key, type cmd and then click on Command Prompt.
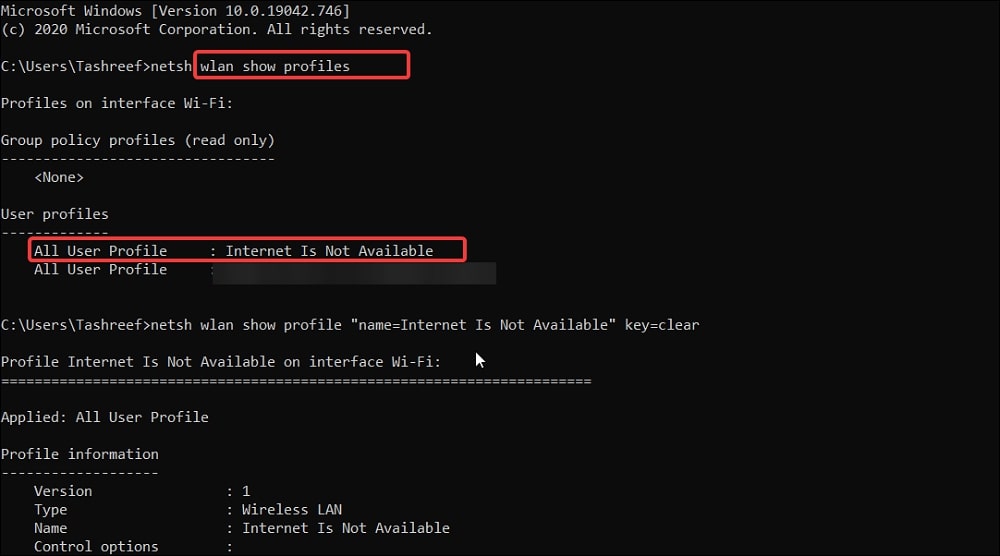
Step 2. In the Command Prompt, enter the following command to view your network name.
netsh wlan show profiles
The network name is listed under the User Profile section. Once you have the network name, you can find the password for it.
Step 3: Enter the following command to view the password for your wireless network. Make sure you change the wifiname in the below command with your profile name.
netsh wlan show profile “name=wifiname” key=clear
For example, my network name is “Internet Is Not Available”. So the complete command will look something like this after making the changes.
netsh wlan show profile “name=Internet Is Not Available” key=clear
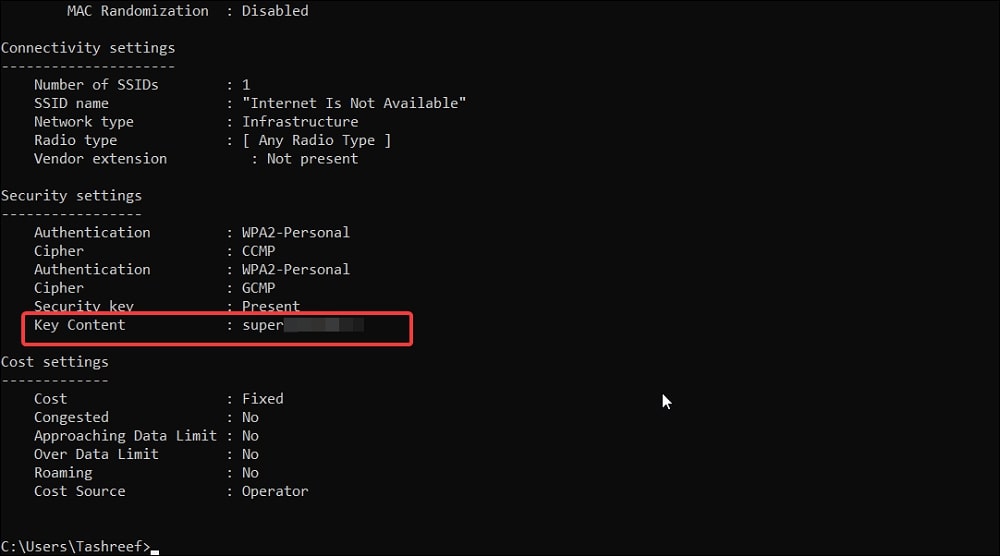
Step 4: To view the password, scroll down to the Security Settings section and locate Key Content. Here you can see the Wi-Fi password in Windows 10.
Method 4. Find Wi-Fi Password in Windows 10 Using A Wi-Fi Password Viewer
There is a third-party app for almost everything on Windows 10, including a Wi-Fi password viewer. If you don’t want to fiddle through all the settings to find the Wi-Fi password, a third-party software like PassFab Wifi Key can help.
PassFab Wifi Key is a Windows utility that offers one-click Wi-Fi password recovery for forgotten or lost network security keys. It works on Windows 10 and older OS versions and supports all wireless protocols, including WEP, WPA, WPA2, WPA3 and more.
Here’s how to find a Wi-Fi password using PassFab Wifi Key.
Step 1: Download PassFab Wifi Key from the official website. Once downloaded, run the installer and proceed with the installation.
Step 2: Launch the PassFab Wifi Key app on your PC and click Yes when prompted by UAC.
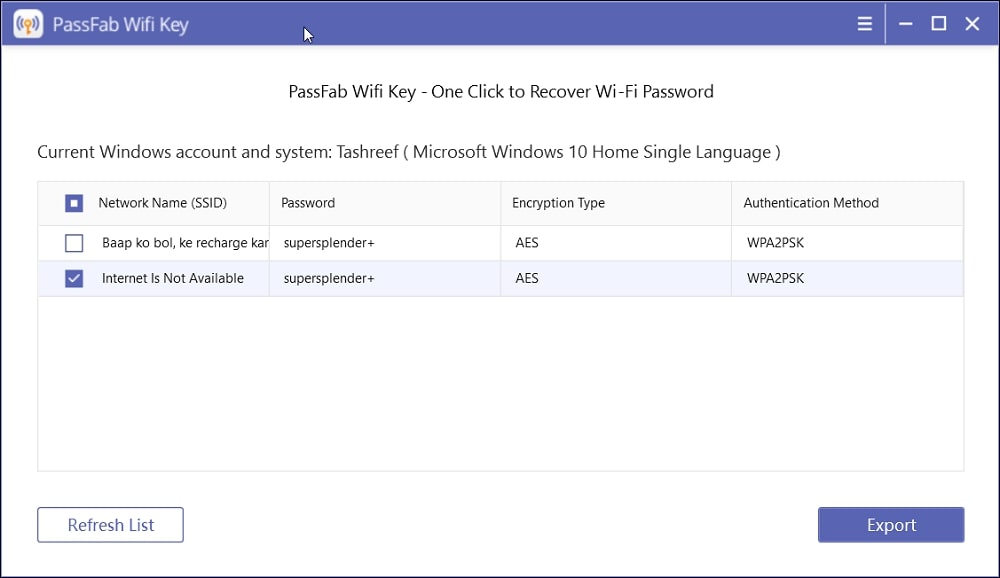
It will take a few seconds to scan your PC for all the saved networks for the current user account.
As the scan completes, it will populate your screen with the network name, password, inception type and authentication method information.
You can either select and copy the password or export it to a CSV document. To export, select the network detail you want to export and click the Export button.
Enter a name for the document and save it on your local drive.
Frequently Asked Question: How to Find Wi-Fi Password in Windows 10
How do I remember my WiFi password?
Using a common password that is strong for your local devices and wireless network is the best way to remember the Wi-Fi password. You can also use third-party software like PassFab Wifi Key to view saved password.
How do you change your Wi-Fi password?
To change the Wi-Fi password:
- Open your browser and log in to your router admin panel.
- Open the wireless section of the configuration page, such as Wireless or Wireless Settings/Setup.
- Look for the Password or Security key field.
- Enter your new password and save the changes.
How do I find the username and password for my router?
Your router’s instruction manual generally has the default username and password printed. If not, search the internet or manufacturer’s website with your router’s model number to find the default username and password.
How to Change WiFi Password in Windows 10?
To change the WiFi password on your Windows 10 computer, click on Start and open Setting. Then, Go to Network & Internet and open the WiFi tab. Next, click on Manage Known Networks. Select your WiFi network and click on Forget.
After that, search for available WiFi networks. Select the wireless network you want to connect to and enter the new password when prompted.
Conclusion
Windows 10 saves the network details when you first connect to the wireless network. Since you don’t need to enter the Wi-Fi password repeatedly, it is common to forget network credentials.
Fortunately, Windows 10 offers multiple ways to view saved Wi-Fi passwords through the Settings panel, Control Panel and Command Prompt. However, the best way to find Wi-Fi password is to use a third-party tool like PassFab Wifi Key.
