Microsoft Windows presents a distinctive feature that allows you to disable USB storage access; this is particularly beneficial for organizations that want to maintain privacy and restrict other users’ access to their systems. It also hinders the passage of viruses and malicious content that can wreak havoc, not only to an individual computer but also to all the systems, corrupting the whole network. Besides, disabling USB access also serves individuals who, at times, have to share their computers with others.
Read on to find more on how to block/disable USB access in Windows 10.
Method 1. Disable USB Storage on Windows 10 Using Group Policy Editor
Initially, you have to configure Group Policy Editor to disable USB storage access in Windows 10. To programmatically configure GPO and block only specific USB devices—to continue using mouse, keyword, and other devices— apply the setting for an entire domain or choose an active directory container (OU) where you want to deny access.
Note: Group Policy Editor is only accessible to users handling Windows 10 Professional or Enterprise editions. If you are using a Windows 10 Home edition user, skip to method 2.
To apply the policy— restricting access— to a certain OU, follow the steps as stated below:
Step 1. Hover to the Search menu and type GPEDIT. Msc.
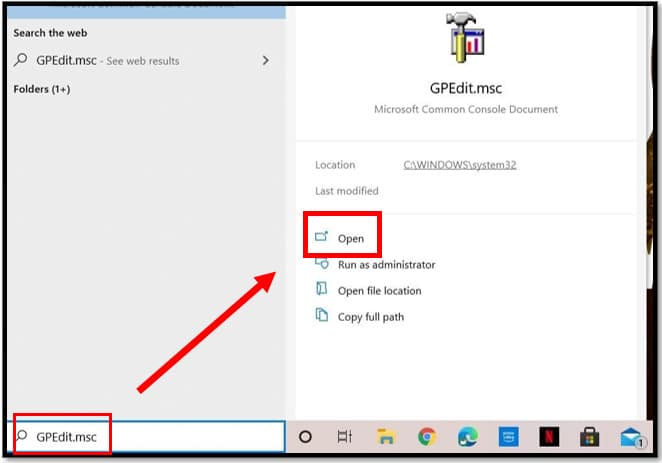
Step 2. Click on the OK button to open the local group policy editor.
Step 3. You will have to locate this specified path:
In the left pane, select the Computer Configuration option.
On the right menu, choose Administrative Templates.
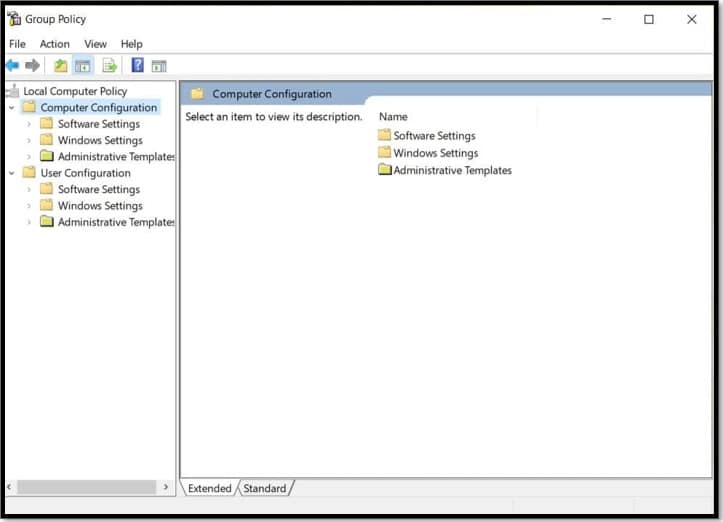
Now, select the Systems option.
Then choose Removable Storage Access.
Step 4. On the right menu of Removable Storage Access, highlight All Removable Storage classes: Deny all access.
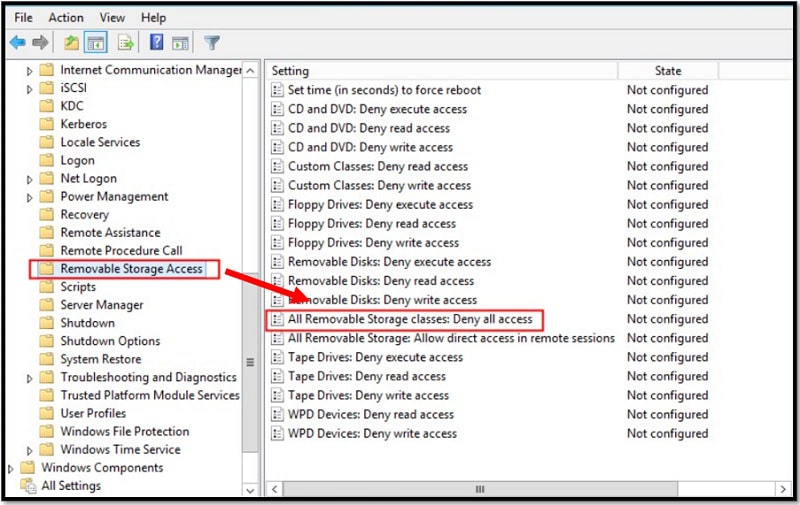
Right-click on the option and choose the Edit option.
Step 5. On the new window, you will see three options:
Select Enabled (the second option).
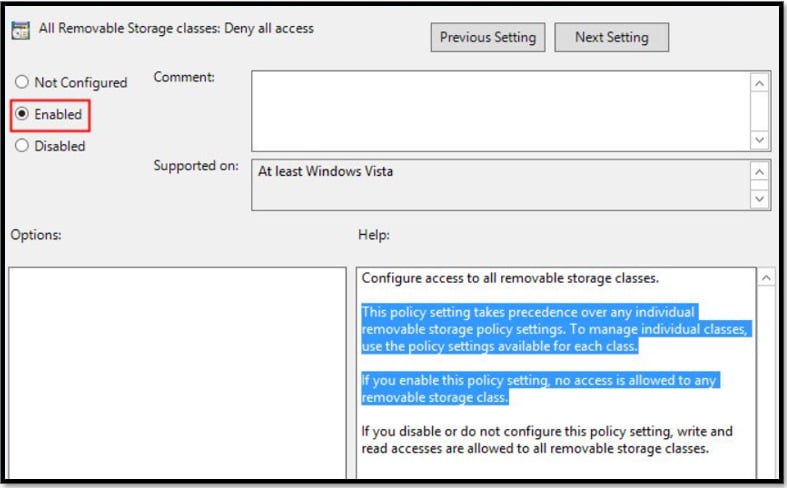
Step 6. And, click on Apply and then OK.
Step 7. Now Restart your computer.
After you successfully initiate these steps, Windows 10 will reject access to all the USB storage devices, including the external hard drives, flash drives, physical discs, and other devices.
You can also review whether you have disabled USB storage in Windows 10 or not:
- Insert a USB Storage device in the computer.
- If Windows 10 displays a message saying: Access is denied —it means the process was successful.
Method 2. Disable USB Access in Windows 10 Using Registry Editor
You can also disable USB storage using the Registry Editor; this method is convenient to users who use Windows 10 Home Edition.
Note: Be mindful when using the Registry Editor to disable USB storage access in Windows 10. If you do not follow the measures accurately, it might lead to invariable settings that you cannot change later; without reinstalling the source copy.
To restrict access of all removable devices using Registry Editor, follow these simple steps:
Step 1: Press Win+R (Windows logo plus R keys) at once to open the Run box.
In the run box, type regedit and click on OK.
Windows will flash a warning messaging displaying: Do you want to allow this app to make changes to your devices?
Select OK.
Step 2: After opening the Registry Editor, you need to browse the path from the address bar—copy and paste to open the path quickly:
HKEY_LOCAL_MACHINE\SOFTWARE\Policies\Microsoft\Windows
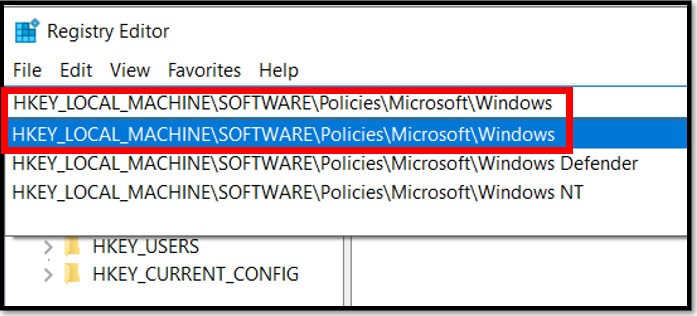
Alternatively, you can expand HKEY_LOCAL_MACHINE and then locate Software. Under Software, choose Policies, then Microsoft, and finally, from the drop-down options, highlight the Windows folder.
Step 3: Right-click on the Windows folder option.
Under the submenu options, choose New. From the drop-down menu, select Key.
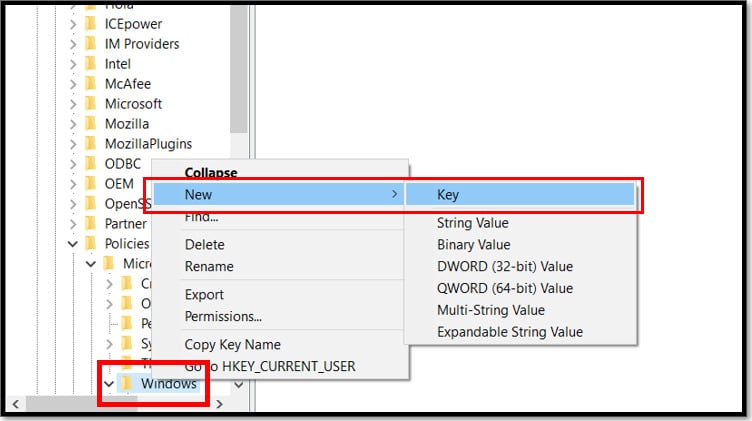
Step 5: Type RemovableStorageDevices as the name.
Then, press the Enter option.
Step 6: Select the New submenu by right-clicking on the newly created key.
Choose DWord value 32 bits from the options.
Step 7: Name this key as “Deny_All.”
After that, press Enter.
Step 8: Open the DWORD that you have created and change the value from 0 to 1.
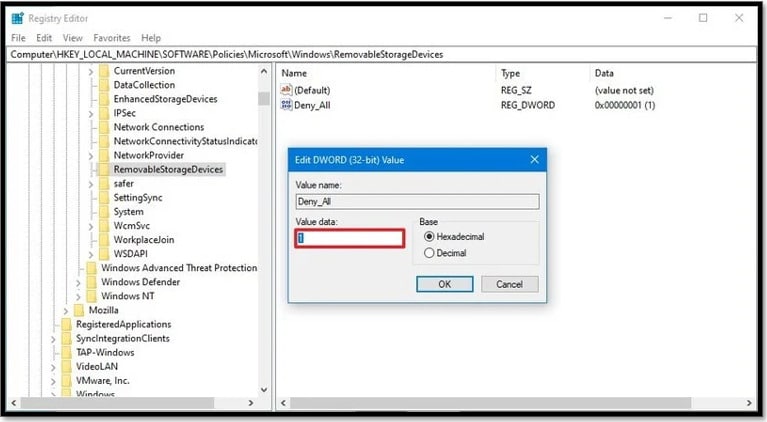
Step 9: After changing the value data, select OK.
Step 10: To execute the changes you have made, restart your computer.
Users, now, will not have the authority to connect any external removable devices; Windows 10 will continue to block access to the USB storage device from now on.
Conclusion
Be it for any reason, follow any of the two mentioned methods to disable USB storage in Windows 10. If you use Windows 10 Professional or Enterprise editions, utilize the first method to disable USB access. Whereas, if you are using a Windows 10 Home edition user, use method 2—Disable USB Access in Windows 10 Using Registry Editor—instead.