Windows 10, like any current operating system, gets regularly updated. Microsoft often releases many updates for Windows 10, 8.1, and 8 on a day known as Patch Tuesday every month. That day is the second Tuesday of each month when Microsoft releases new security updates. Although patch updates are important for Windows 10, some users might still prefer to disable them for at least a while.
Patch updates are necessary to keep your Windows 10 OS secure and bug-free. Microsoft rolls out myriad patch updates to address potential security vulnerabilities and reported bugs in Windows 10. Windows 10 includes a built-in antivirus utility, and its Windows Security app needs regular updates. An antiquated antivirus utility would be of little use for combating the latest malware.
However, patches don’t usually add new features to Windows 10. Microsoft adds the vast majority of new features to its flagship OS with its biannual Windows 10 build version updates, such as the upcoming Sun Valley one. Those build updates are now optional up to a point, but the big M automatically rolls out Windows 10 patches to all users by default.
Despite the relative necessity of patches, they do have some drawbacks. Patch updates are supposed to fix bugs. However, it’s not entirely uncommon for users to post on support forums about software issues arising after they’ve received certain Windows 10 updates. Sometimes users fix software errors by deleting updates.
The other drawback is that patch updates can have a notable impact on the Windows 10 startup when applied. A blue updating Windows 10 screen always delays your PC starting when updates are being applied. The worst update screens for larger patch updates might leave you waiting more than 10 minutes. Such delays can be a genuine annoyance.
Those drawbacks are good reasons to completely disable Windows 10 updates. Windows 10 doesn’t include a clear and specific option for disabling its patch updates indefinitely. However, you can still turn off that platform’s updates with a few alternative methods. This is how to deactivate updates on Windows 10 with five methods.
Method 1. Completely Disable Windows 10 Updates in Service
Windows 10 gets updated by a Windows 10 Update service. You can disable that service, and many others, via a Services window. This is how to shut off updates in Windows 10 by disabling the update service.
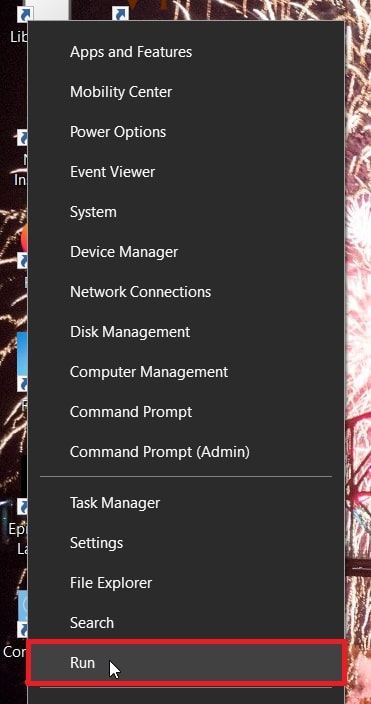
Step 1: First, right-click the “Start” button to open Windows 10’s Win + X menu.
Step 2: Select the “Run” shortcut on the Win + X menu.
Read More: How to Open Run Command Window in Windows 10
Step 3: Enter services.msc in the Open box within Run as in the screenshot directly below.
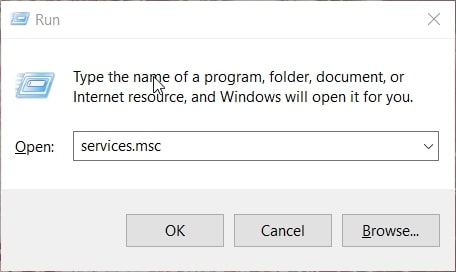
Step 4: Click “OK” to open the Services window shown directly below.
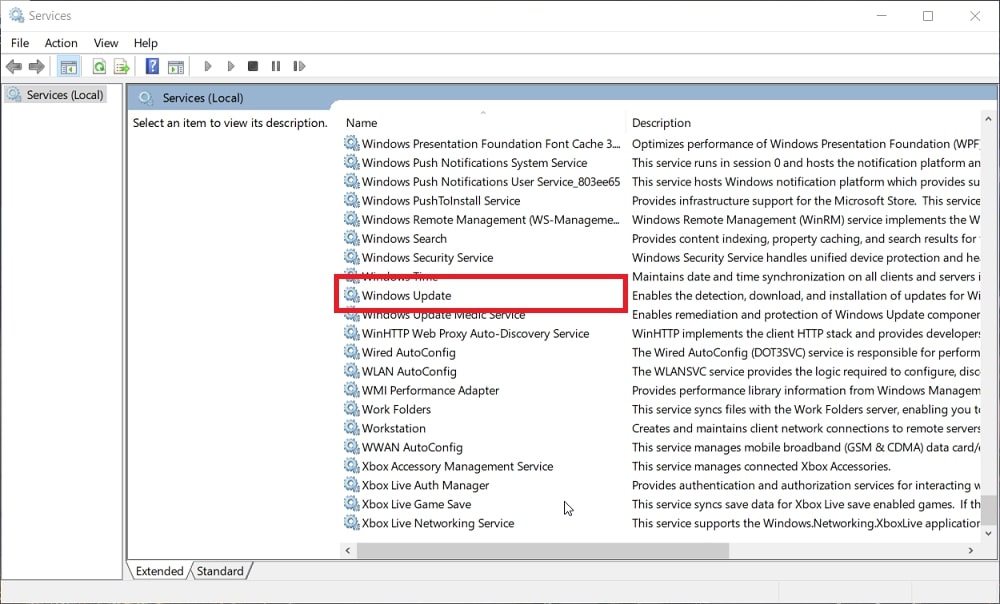
Step 5: Next, scroll to and double-click the listed Windows Update service to open the window in the snapshot directly below.
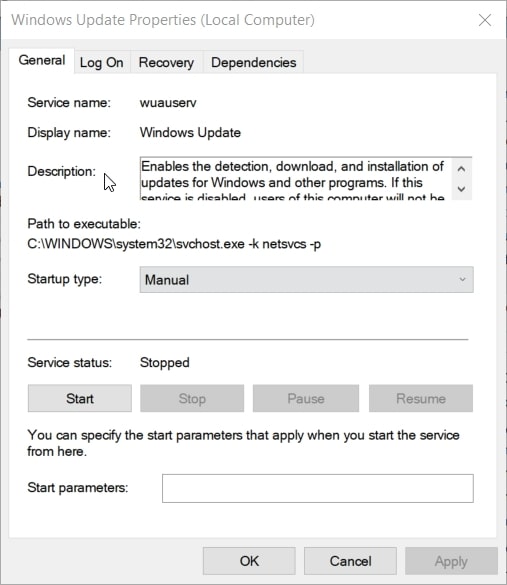
Step 6: Click the “Startup type” drop-down menu to open its options.
Step 7: Then select the “Disabled” option shown directly below.
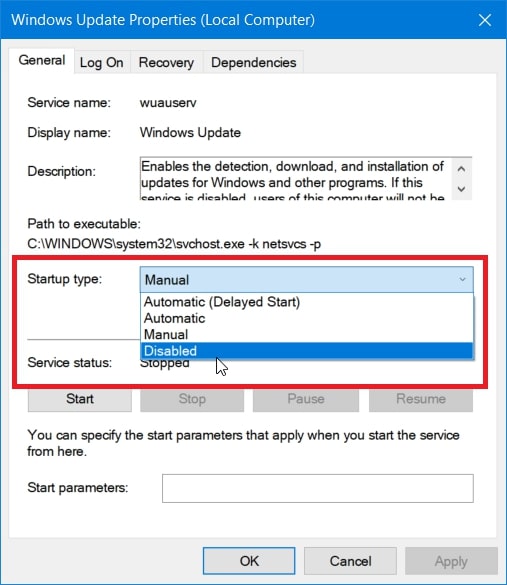
Step 8: Click “Apply” to save the new Windows Update service settings.
Step 9: Press the “Close” button to exit the properties window.
Step 10: Finally, restart your PC after disabling Windows Update.
Method 2. Completely Disable Windows 10 Updates Using the Group Policy Editor
If you have Windows 10 Pro, Ultimate, or Enterprise, you can disable platform updates with Group Policy Editor. The Group Policy Editor is a feature that packs in a plethora of advanced settings, many of which aren’t available for Home edition users. This is how to deactivate updates on Windows 10 with Group Policy Editor.
Step 1: Open Run as outlined within the first couple of steps for the previous method.
Step 2: Next, type gpedit.msc in Run’s Open box as shown in the screenshot directly below
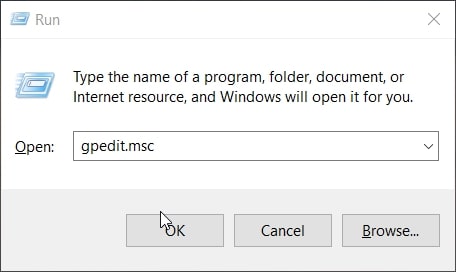
Step 3: Click “OK” or press Enter to open the Group Policy Editor.
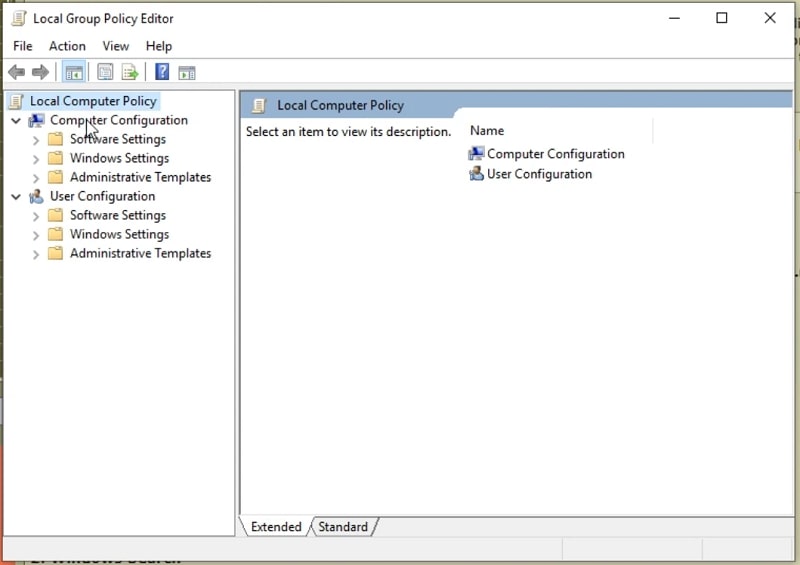
Step 4: Select “Computer Configuration” on the left of Group Policy Editor.
Step 5: Next, click “Administrative Templates” and “Windows Components” within Group Policy’s left sidebar.
Step 6: Select the “Windows Update” component.
Step 7: Double-click the “Configure Automatic Updates” policy to open the window shown directly below.
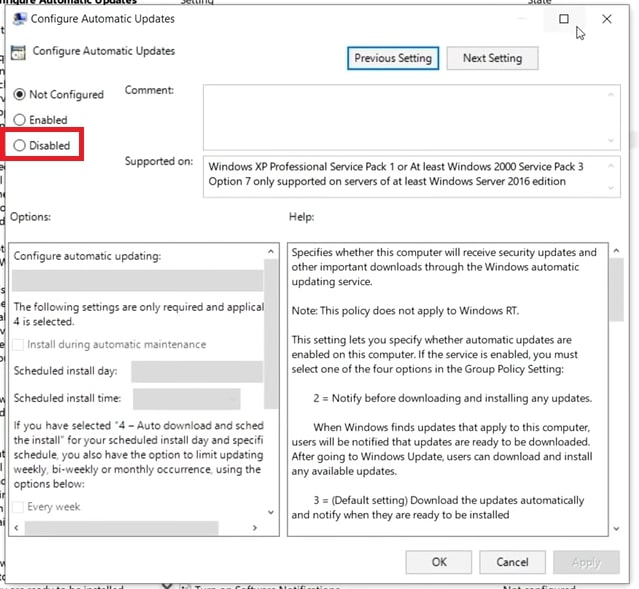
Step 8: Click the “Disabled” radio button.
Step 9: Select the “Apply” option.
Step 10: Press the “OK” button on the Configure Automatic Updates window.
Note that you can also configure Windows 10’s updating from the Automatic Updates window in Group Policy Editor. Click the “Configure automatic updating” drop-down menu there. Then you can select a “Notify for download and auto install” option instead of completely disabling automatic updates.
Method 3. Completely Disable Windows 10 Updates by Setting the Connection to Metered
The “Set as metered connection” option might not sound like one for disabling Windows updates. However, Windows 10 doesn’t usually automatically download updates for metered connections with data limits. So, having a metered connection enabled will usually block the vast majority of updates. If you’re wondering how to deactivate Windows update in Windows 10 by enabling a metered connection, follow the steps directly below.
Step 1: Click the Windows 10 “Start” button.
Step 2: Press the “Settings” cog button on the Start menu.
Step 3: Select the “Network & Internet” within Settings to open the tab in the screenshot directly below.
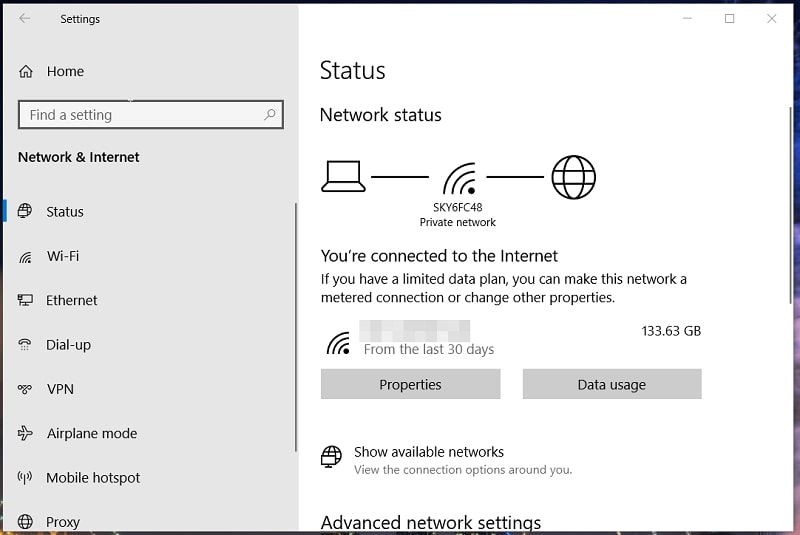
Step 4: Click the Wi-Fi or Ethernet tab on the left of Settings depending on what type of connection you have.

Step 5: Select the “Manage known networks” option to bring up your network list.
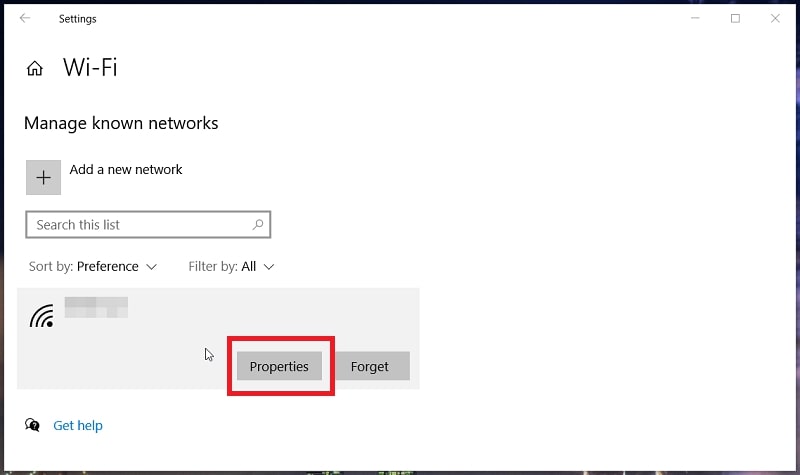
Step 6: Next, select your listed active network; and press its “Properties” button.
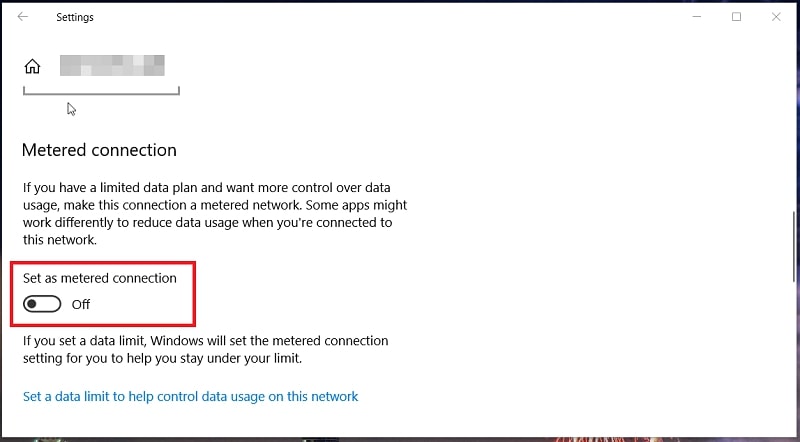
Step 7: Finally, toggle on the “Set as metered connection” option.
Method 4. Completely Disable Windows 10 Updates With Registry
Editing the registry can be considered a more advanced way to disable Windows 10 automatic updates. As a precaution, it’s recommended that you back up the registry or create a new System Restore point before disabling updates with this method. This is how to completely turn off Windows 10 updates by editing the registry.
Step 1: Press the magnifying glass button on the left side of your Windows 10 taskbar.
Step 2: Input the keyword Registry Editor to find that app.
Step 3: Click the “Run as administrator” option for the Registry Editor search result.
Step 4: Open this registry key in the Registry Editor: HKEY_LOCAL_MACHINE\SOFTWARE\Policies\Microsoft\Windows.

Step 5: Next, right-click the Windows key on the left of the Registry Editor and select the “New” option.
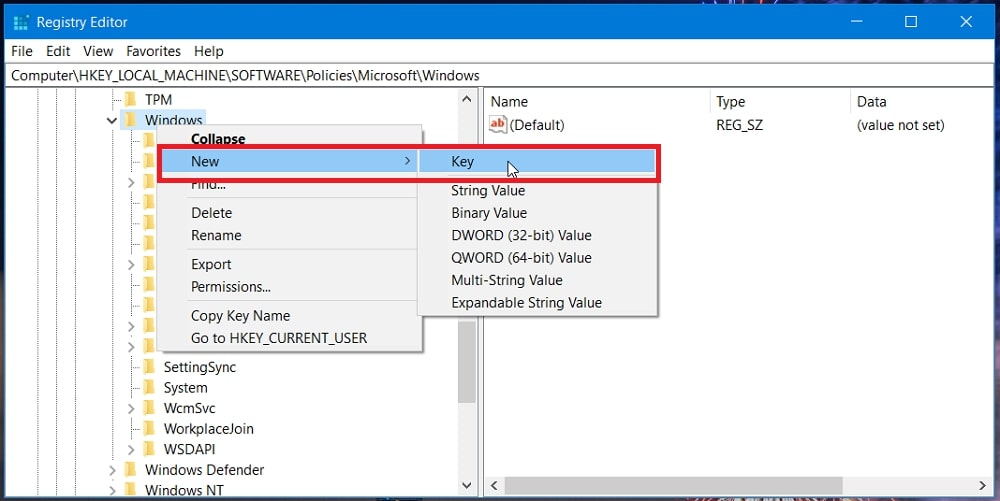
Step 6: Click “Key” on the context menu submenu.
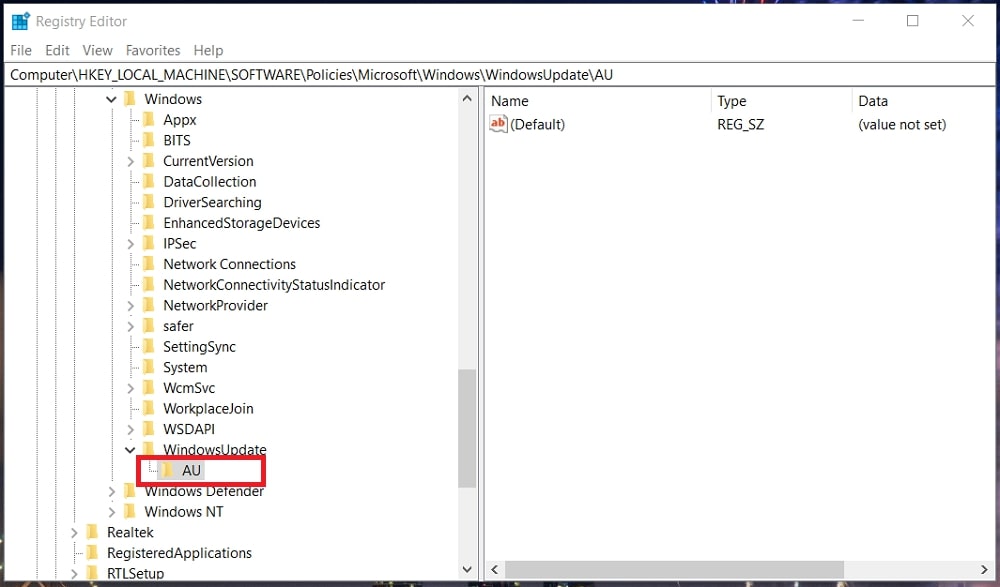
Step 7: Enter WindowsUpdate as the title for the new key.
Step 8: Right-click the new WindowsUpdate key to select the “New” and “Key” options.
Step 9: Now input AU as the new key’s name. Then you should have new WindowsUpdate and AU keys in your registry as in the snapshot directly below.
Step 10: Select the AU key, and right-click a space within the right half of the Registry Editor to select the “New” option.
Step 11: Next, click “DWORD (32-bit) Value” on the context menu’s submenu.
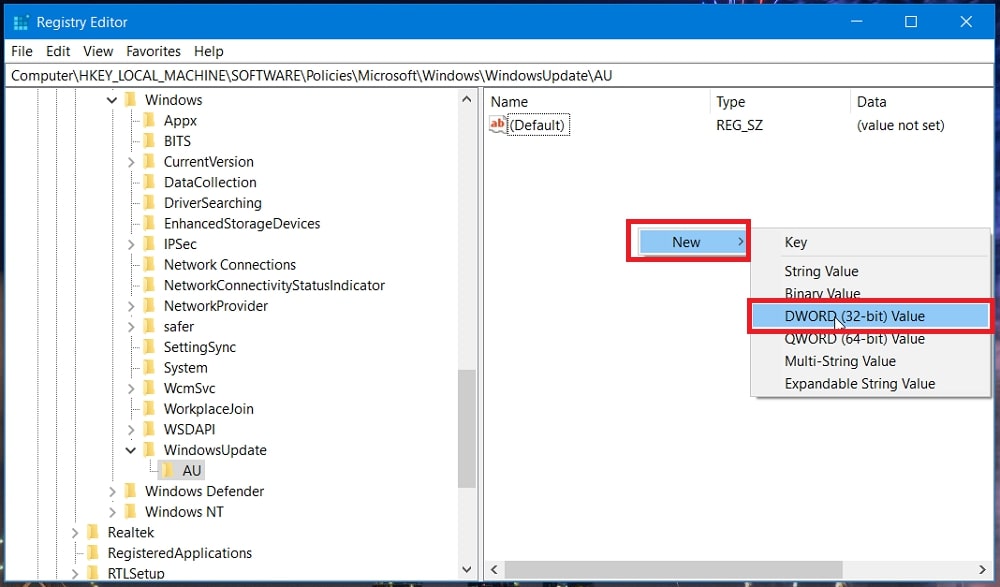
Step 12: Enter NoAutoUpdate to be the name for the new DWORD.
Step 13: Double-click the NoAutoUpdate DWORD to open the window shown directly below.
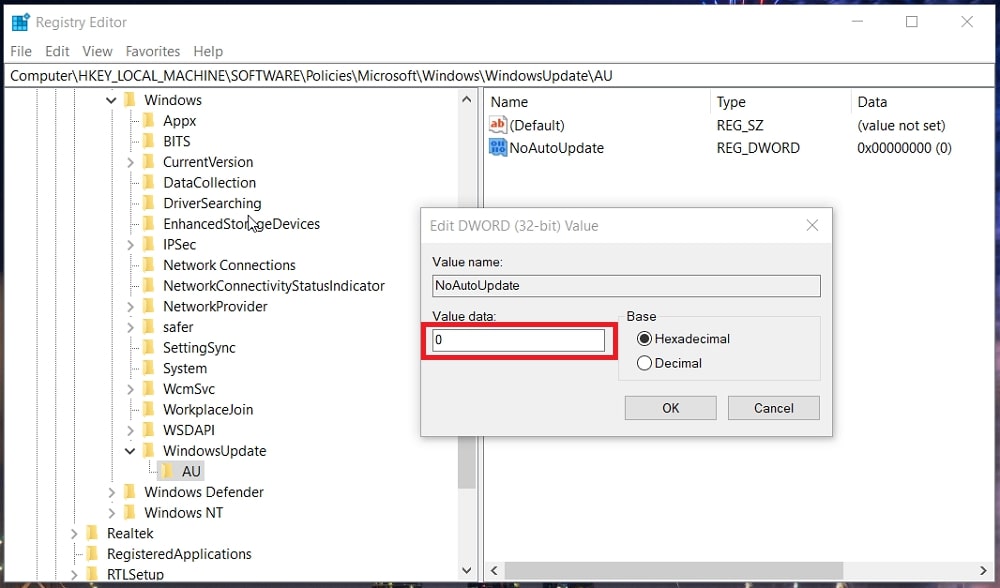
Step 14: Delete the 0 number, and enter 1 within the Value data box to replace it.
Step 15: Select the “OK” option on the Edit DWORD (32-bit) Value window.
Step 16: Restart Windows when you’ve edited the registry as outlined above.
The above registry method will disable automatic updates. However, you will still be able to manually update Windows 10 by clicking the “Check for updates” button in Settings.
If you ever wish to undo this registry change, simply right-click the WindowsUpdate key and select the “Delete” option. Then restart Windows after deleting the key. Alternatively, you could roll Windows 10 back to a restore point that predates the day you edited the registry.
Method 5. Disable Windows Updates With Task Scheduler
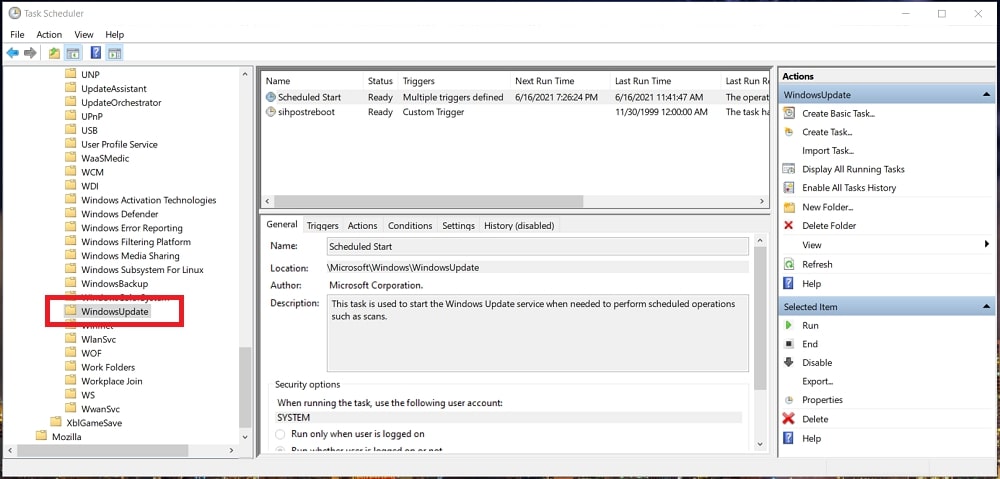
The Task Scheduler includes a task that starts the Windows Update service for scheduled scan operations. Disabling that task is another way to deactivate automatic updates. You can disable automatic updates within the Task Scheduler as follows.
Step 1: Press and hold the Windows key and then S at the same time to open the search tool.
Step 2: Type Task Scheduler within the search box.
Step 3: Right-click Task Scheduler within the search tool and select its “Run as administrator” option to open the window in the snapshot directly below.
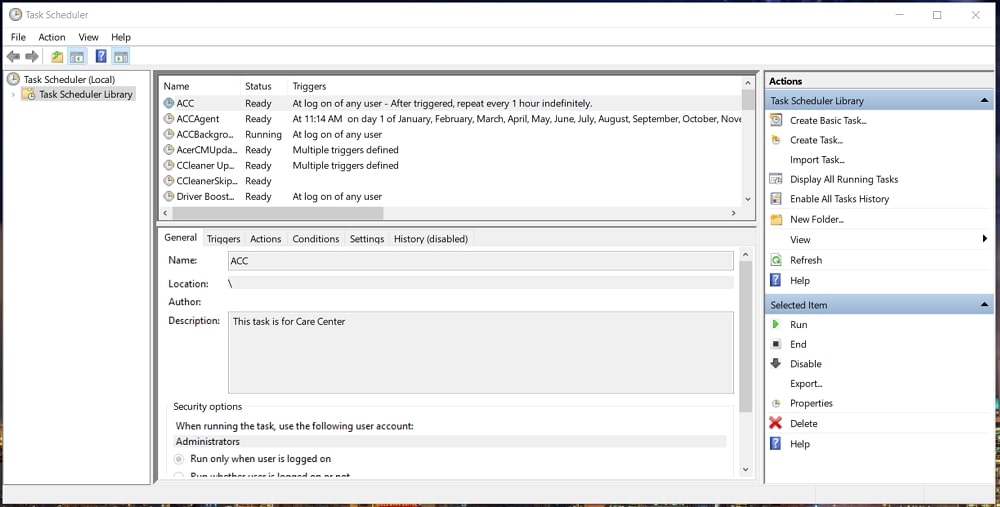
Step 4: Click Task Scheduler Library > Microsoft > Windows > Windows Update to open the update tasks shown directly below.
Step 5: Right-click Scheduled Start and select the “Disable” option for it.
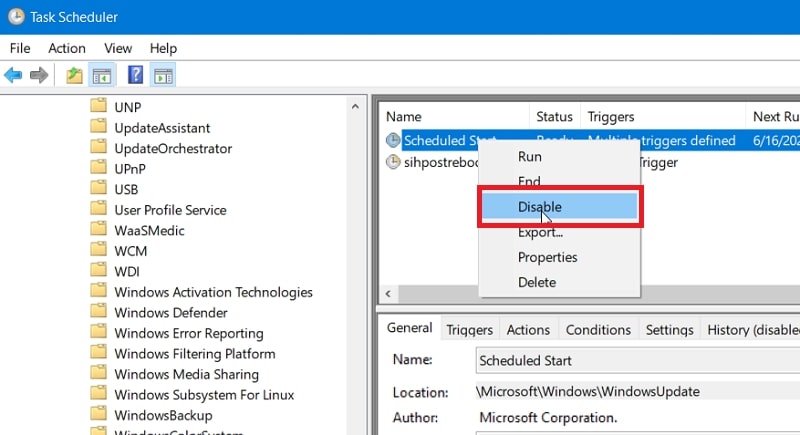
Step 6: Finally, right-click the sihpostreboot task just below Scheduled Start and select “Disable.”
Step 7: Then close Task Scheduler, and restart Windows.
FAQs About Windows 10 Patch Updates
Is there a way to delete installed Windows patch updates?
Yes, you can uninstall recent updates via Programs and Features in the Control Panel. Restoring Windows to an earlier time will also delete patch updates installed after a restore point’s date. To remove updates via the Control Panel, follow these steps:
Step 1: Open the Run accessory (it has a Windows + R hotkey).
Step 2: Type appwiz.cpl in Run’s Open box, and click the OK button.
Step 3: Then click “View installed updates” within the Control Panel to open the installed updates list.

Step 4: Select an installed update, and click the “Uninstall” option.
Do you recommend I disable Windows 10’s updates?
Not really, because patch updates are very important for Windows 10’s built-in antivirus utility. Having said that, millions of Windows 7 and XP users continue to utilize those unsupported platforms quite happily. If you replace Windows 10’s built-in Windows Security app with a third-party antivirus utility, patch updates aren’t so essential.
Can I disable updates in Windows 8.1 and 7?
You don’t need to disable updates for Windows 7 because Microsoft no longer rolls out patches for that platform. In Windows 8.1 and 8, you can select a “Never check for updates” option within the Windows Update Control Panel applet.
Is there any software I can disable or block Windows 10 updates with?
You can select to block and disable updates with the StopWinUpdates and Windows Update Blocker software.
Is there a way I can temporarily turn off automatic Windows updates without completely disabling them?
Yes, Windows 10 includes built-in options with which you can turn off automatic updates for up to 35 days. When the updates have been disabled for your chosen period, you must install the latest patches before you can deactivate updates again with the same settings. This is how you can select to temporarily postpone automatic updates.
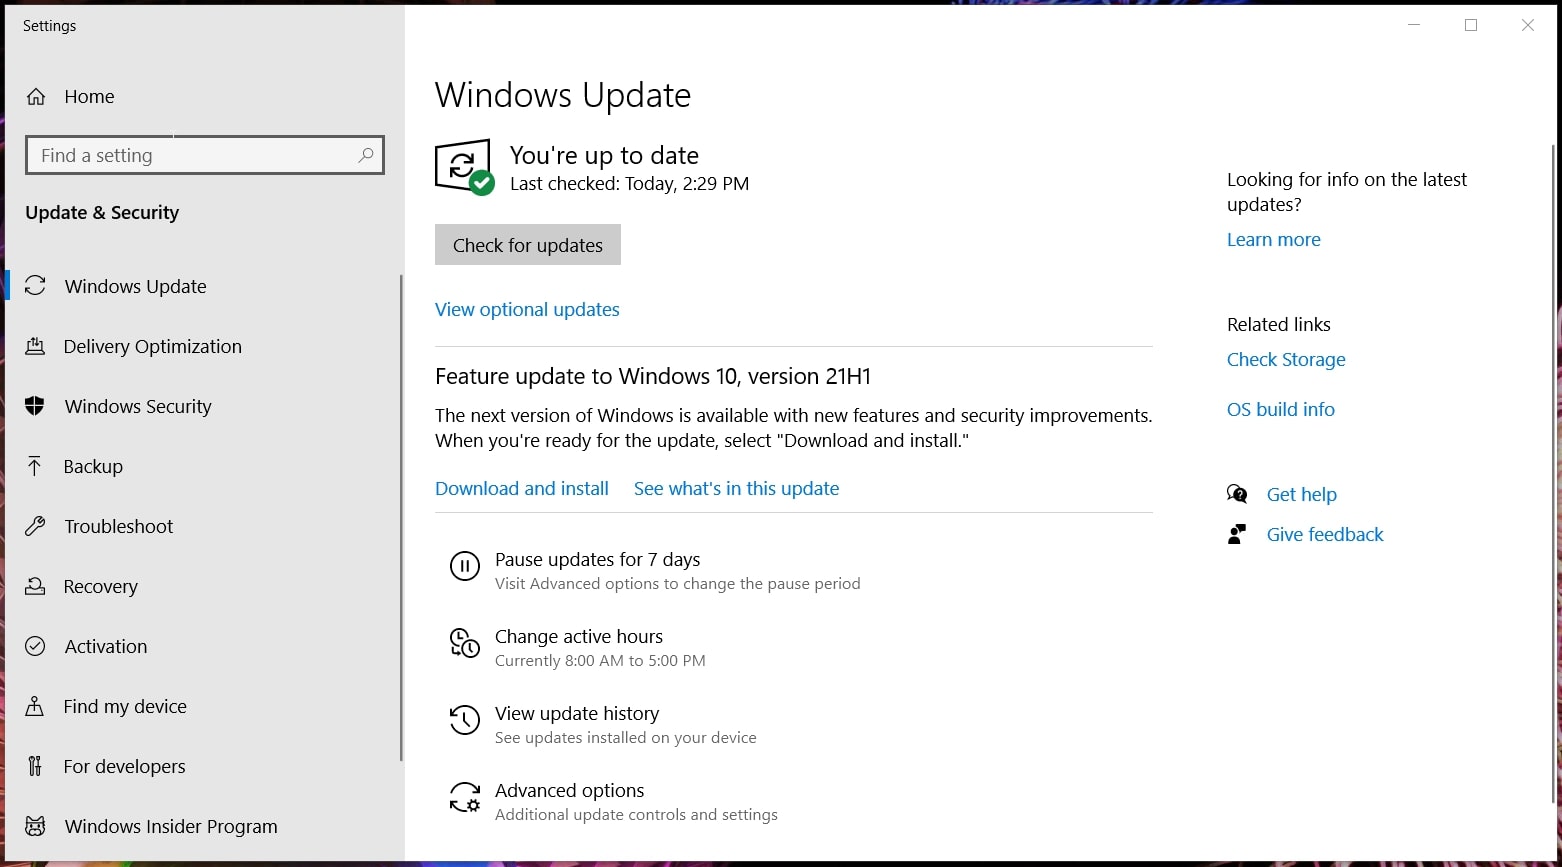
Step 1: Open Settings (there’s a Windows + I keyboard shortcut for it).
Step 2: Select “Update & Security” > “Windows Update” to open the settings in the screenshot directly below. That tab includes the “Pause updates” button.
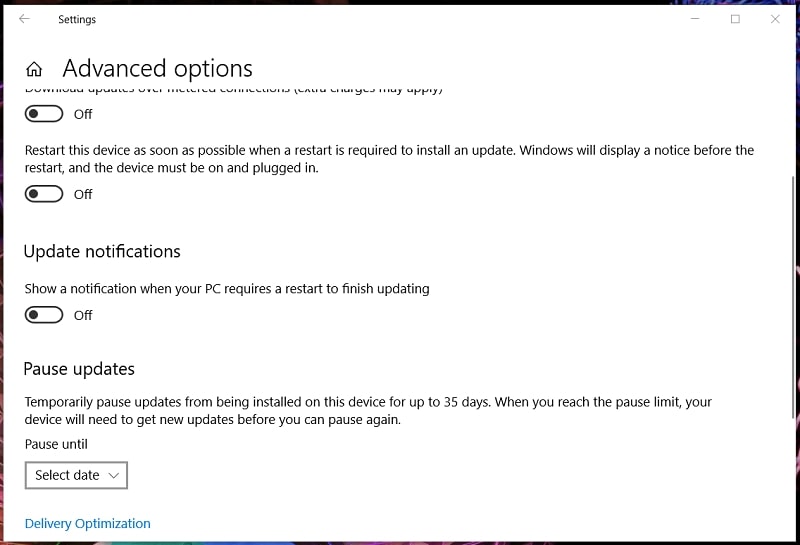
Step 3: Before pausing updates, click “Advanced options” there.
Step 4: Next, click the “Pause until” drop-down menu and choose the future date there that’s 35 days away.
Step 5: Click the back arrow at the top left corner of the Settings window.
Step 6: Then click the “Pause updates” button.
Conclusion
Given the fact that some patches can generate third-party software and Windows issues, it’s tempting to disable them with the above methods. Furthermore, installing a third-party antivirus utility will make updates for Windows 10’s antivirus app redundant. However, some patches can still include important critical updates for fixing Windows 10 vulnerabilities. Although the methods above will disable Windows 10 automatically downloading and installing updates, it’s still recommended that you occasionally manually check for and install some patches should you choose to disable regular automatic updates. You can manually download Windows 10 patches from the Microsoft Update Catalog.