Windows 10 displays the date and time in the bottom-left corner of the taskbar. It is a convenient little feature but has a major impact on the functionality of your computer. For example, incorrect time and date can trigger false alarm issues with your browser and more. So, how do you change the date and time on a Windows 10 computer if there is a discrepancy?
Windows 10, in most cases, automatically determines the date and time sets them accordingly. However, at times, hardware issues or virus infestation can cause the date and time in the OS to be incorrect or reset. Fortunately, you can manually change the date and time on Windows 10 computer with a few clicks.
In this article, we show all the ways to change the clock on Windows 10.
Method 1. Change Date and Time on Windows 10 via Taskbar
The easiest method to change the date and time on Windows 10 is to access the clock setting from the Taskbar. Here’s how to do it.
On the Taskbar, right-click on the Date and Time icon. Next, choose the Adjust Date/Time option from the context menu. This will open the Time and Language window.

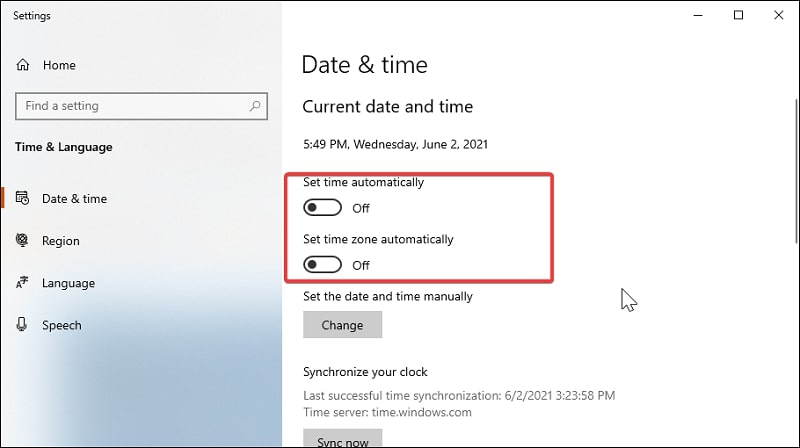
To change the time, first, disable Set time automatically and Set time zone automatically options by toggling the switch.
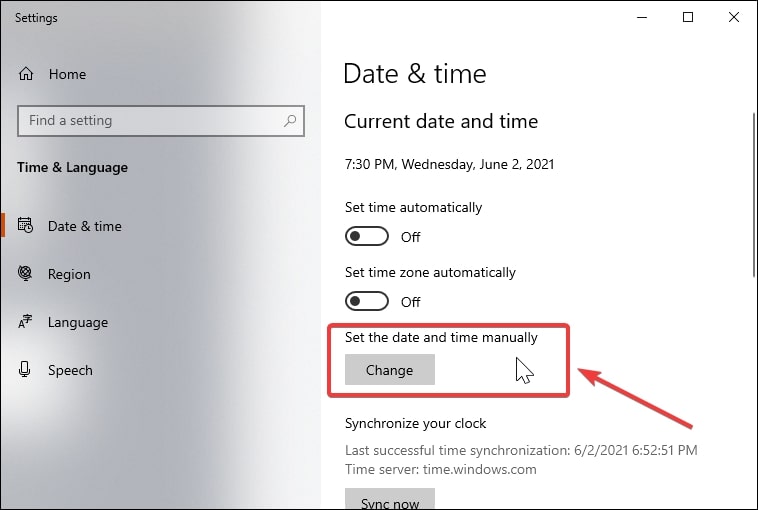
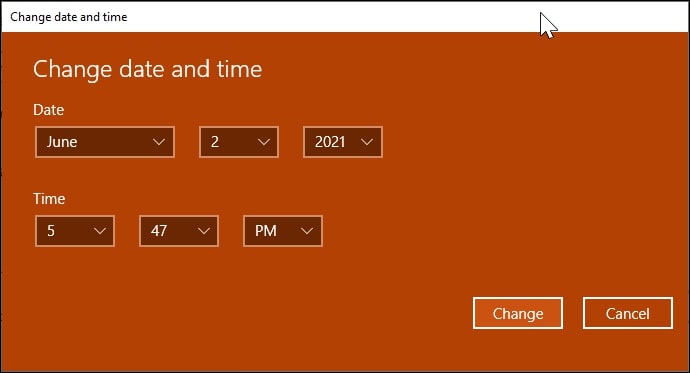
Next, click the Change button under the Set the date and time manually section. In the Change date and time window, set the correct date and time. Then, click the Change button and apply the changes.
Once you modify the date and time setting, toggle the switches Set time automatically and Set time zone automatically. This will ensure Windows automatically sets the time depending on the region.
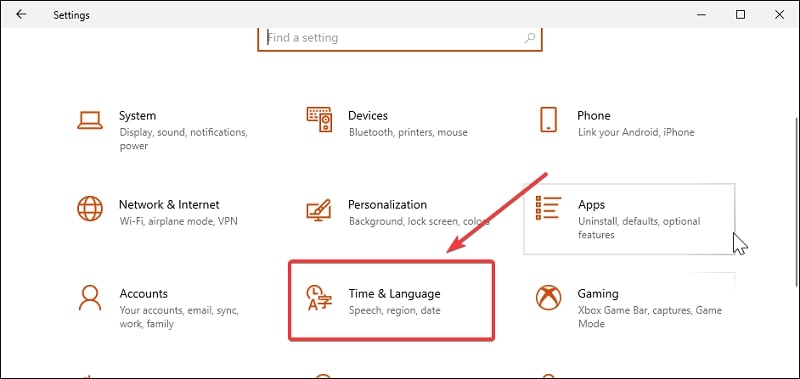
Method 2. Change Date and Time on Windows 10 via Settings
Another way to modify the date and time setting is to access it via Settings. Follow these steps below to learn how to change the clock on Windows 10.
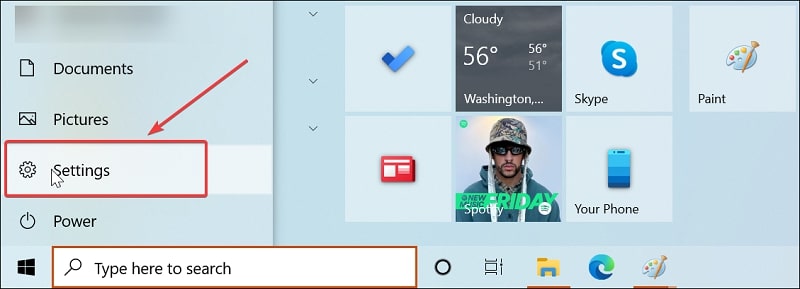
Click on Start and choose Settings. In the settings window, click on the Time & Language option.
Read More: How to Open Settings in Windows 10
Next, open the Date & Time tab from the left pane. To change the date and time, disable the automatic date and time and time zone feature.
Click the Change button and set the correct date and time. Click on Change to apply to save the changes. Make sure to enable the automatic time zone and date synchronization feature.
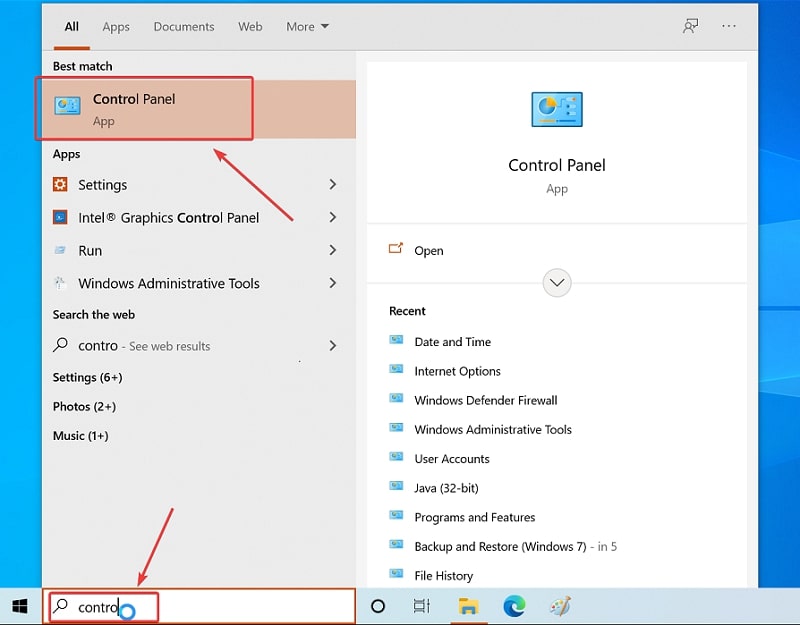
Method 3. Change Date and Time on Windows 10 via Control Panel
The Control Panel on Windows 10 still allows you to modify many system settings on your computer. You can use this to change time on a computer running Windows 10. Here’s how to do it.
Press the Windows key to bring up the search. Type control in the search and then click on the Control Panel to open it. In the Control Panel, open Clock and Region.
Read More: How to Open Control Panel in Windows 10
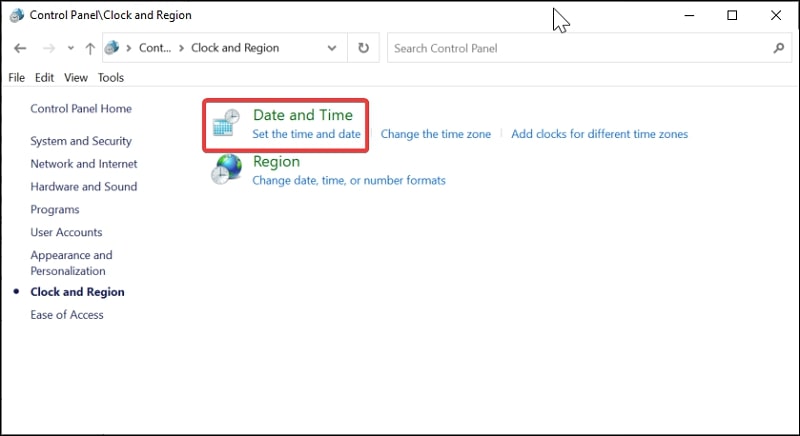
Next, click the open Date and Time option. This will open the Date and Time window. Next, click the Change date and time button and click Yes when prompted by User Account Control.

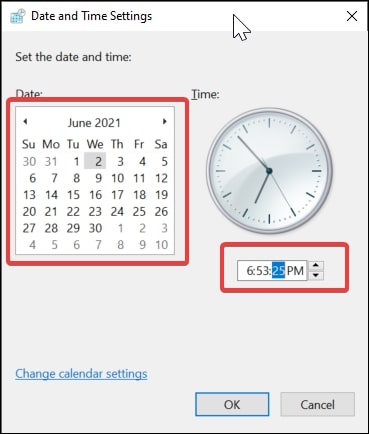
Use the old-styled calendar menu to set the correct date. Next, modify the time and click OK to save the changes. You can also change the Time Zone if any modification is required.
Clicking on the Change calendar setting will bring the Region window. Here you can change the language and date, and format as per your preference.
If you want more customization, click the Additional Settings button. Customize Format allows you to customize almost every aspect of the date and time format. Click Apply to save the changes.
FAQs About Data and Time in Windows 10
Why is my Windows 10 time incorrect?
Reasons for the incorrect time on your Windows 10 computer can be many. Malware issues, hardware failure such as a faulty battery or dead CMOS battery, and incorrect time zone configuration.
How to set a new clock for a different time zone?
To set a new clock for a different time zone, go to Start > Settings > Time and Language. Open the Date and Time tab and scroll down to the Related settings section.
Click on Add clocks for different time zones. Next, check the Show this clock option, and choose the time zone you want to show. Enter a name for the clock and click Apply.
How to change the time zone in Windows 10?
To change the time zone, go to Start > Settings > Time and Language. In the Date and time tab, turn off the Set time zone automatically option. Next, click the drop-down menu under Time Zone and set it according to your preference, like changing UTC to GMT, etc. Enable the Set time zone automatically option again if required.
How to sync time and date in Windows 10?
To sync time and date in Windows 10, click on Start and open Settings. Next, click on Time and Language. Scroll down and click the Sync now button under Synchronize your clock section. You can view the last successful time synchronization and time-server information as well.
How can I set my computer time automatically?
To set your computer time automatically, go to Start > Settings and open Time and Language. Scroll down and turn on the Set time automatically option.
Conclusion
Knowing how to change time and date on your Windows 10 computer comes in handy if your computer resets the clock and calendar due to a glitch or external issue. Incorrect time and date configuration will also trigger a false alarm with your browser’s security settings. To make it easy, we have listed three methods to help you change the date and time on Windows 10 computer.