The boot order turns your computer’s cold hardware into a functional system by assigning an operating system; so, changing it, in some cases, is not a preference; instead becomes a necessity.

Read on to find how to change the boot order in Windows 10.
In this guide, you will find the steps to change the boot sequence with the BIOS. Plus, you will also learn to change the boot priority without BIOS, i.e., from within Windows 10.
But before that, you will briefly understand what boot sequence is and why changing it becomes critical in some scenarios.
Read More: How to Boot from USB Flash Drive on Windows 10
What is Boot Sequence in Windows 10?
Boot Sequence, otherwise known as boot order or boot priority, is the order of storage devices that a computer checks for the operating system’s boot files.
The storage devices (the OS) can be any bootable media connected to the motherboard BIOS, i.e., hard drive, flash drive, optical drive, or even network resources.
These devices in the firmware exist in a hierarchy that decides the order the device gets checked. BIOS considers the first device as the primary device and attempts to boot via it. If the BIOS could not boot from the first device, it moves to the second and keeps attempting until it finds a bootable device on the list.
Simply put, the boot sequence tells the computer which device should boot first, second, third, and so on.
Why Change the Boot Order in Windows 10?
As mentioned, by default, the configuration of BIOS is to boot via the first device in the list. Usually, the hard drive (with OS) tops the list, and the computer, as configured, boots via it.
But, in some specific circumstances, like when you want to install a new operating system, launch a bootable antivirus software, or forget the Windows 10 password — you have to rearrange the order of the storage devices in the boot order menu and make the new device a priority.
Steps to Change Boot Order in Windows 10 from the BIOS Setup Utility
Follow these simple steps to learn how to change the boot order in the BIOS setup utility (on Windows 10):
Note: The BIOS is OS-independent. So, irrespective of the operating system you are using — Windows 10, Windows 8, Windows 7, macOS, or Linux — the method to change boot order remains the same, i.e., the following steps.
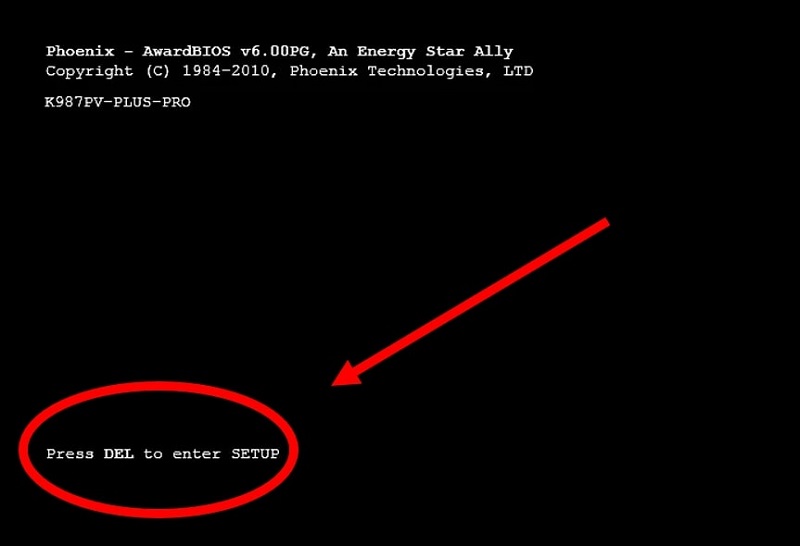
Step 1. Turn on or Restart Windows 10 to access the BIOS Boot order menu.
To enter the BIOS firmware, you have to press a (specific) key when you see the Entering Setup screen. Not before, nor after.
The key is ambiguous as it is manufacturer-dependent. Usually, it should be Esc, Del, F2, F10, but as mentioned, yours might differ. Sometimes, you may also find the specific key on the setup screen.
Here’s a list of some hotkeys to enter the BIOS setup on Windows 10:
| Manufacturer | Laptop | Desktop |
| Acer | F12 | F12 |
| Asus | ESC | F8/F12 |
| Compaq | F10 | F1, F2, F10, or Del |
| Dell | F12 | ESC |
| Gateaway | F12 | — |
| HP | F9 | F12 |
| Lenovo | F12 | F12 |
| Samsung | F12s | — |
| Sony | ESC | — |
| Toshiba | F12 | — |
| Founder | F12 | F12 |
| THTF | F12 | F12 |
| BenQ | F9 | F8 |
| IBM | F12 | F1/F2 |
| ThinkPad | F12 |
If you cannot access the BIOS setup for some reason, repeat the process, but be sure that the key entered is correct (depending on the manufacturer).
Also, retain that the hotkey changes depending on the machine type — computer or Laptop — though, of the same brand.
Step 2. Hover to the Boot option within the BIOS utility after entering it.
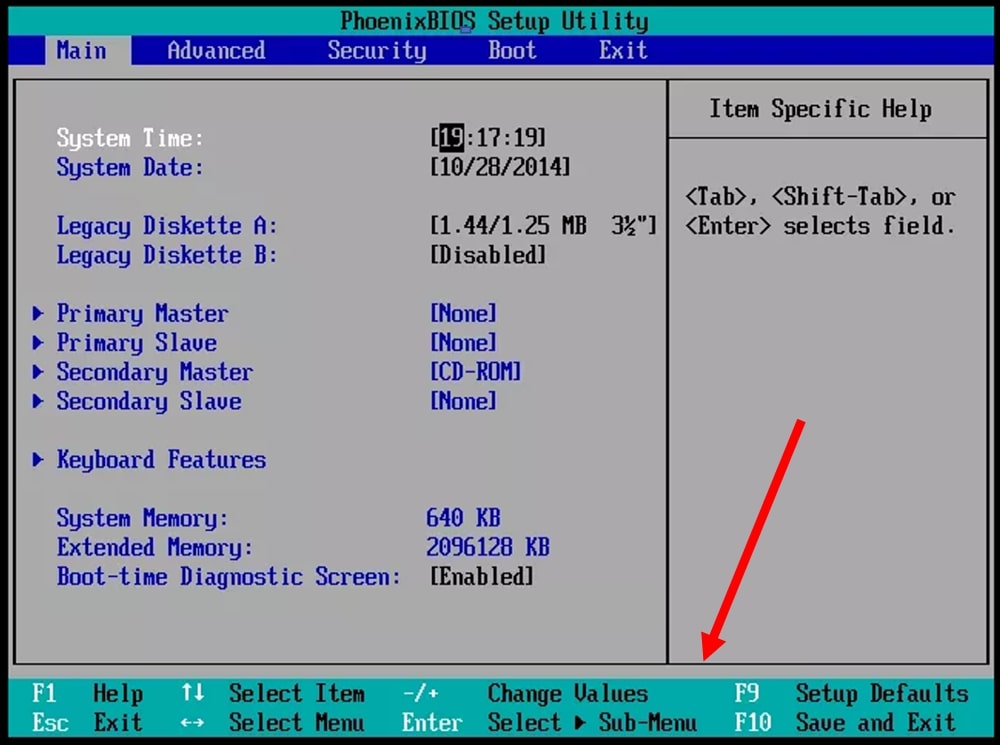
Since not all BIOS utilities have the same look and feel, there isn’t a universal pre-defined way to navigate within it. Plus, your BIOS may even look totally distinct from the one above.
Nonetheless, you will find instructions on the bottom part of the BIOS setup irrespective of the BIOS make.
Moreover, the BIOS utilities also have different names. So, for you, the Boot option might be Boot Order, Boot Sequence, or Boot Priority. If you still cannot locate it, look under the Advanced or Other options.
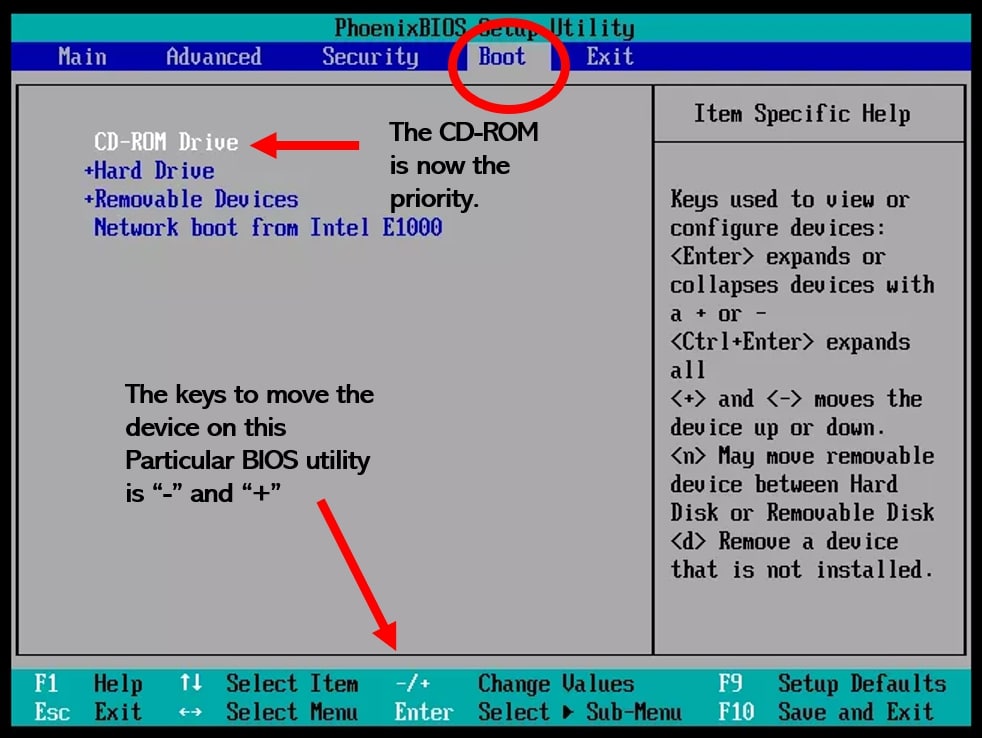
Step 3. Change the Boot order.

As stated, you will find the list of all hardware connected to the computer in a particular sequence, aka the Boot order. By default, the hard drive (with the OS installed) shall be at the top, and then the other external drives.
To adjust the boot sequence, follow the instructions of your BIOS utility, and move the desired hardware to the top or down.
Again, the instructions, i.e., keys to move the boot series, differ extensively. For instance, in the above image, “+” is responsible for moving the boot order up and “-” for down, but it might vary.
Step 4. Save and Exit the settings to change the boot sequence in Windows 10.
To Save the changes, navigate to the Exit menu.
And, choose Exit. Or, it could also be Save and Exit or something else. In the below screenshot, Exit Saving Changes is the option instead of Exit or Save and Exit.
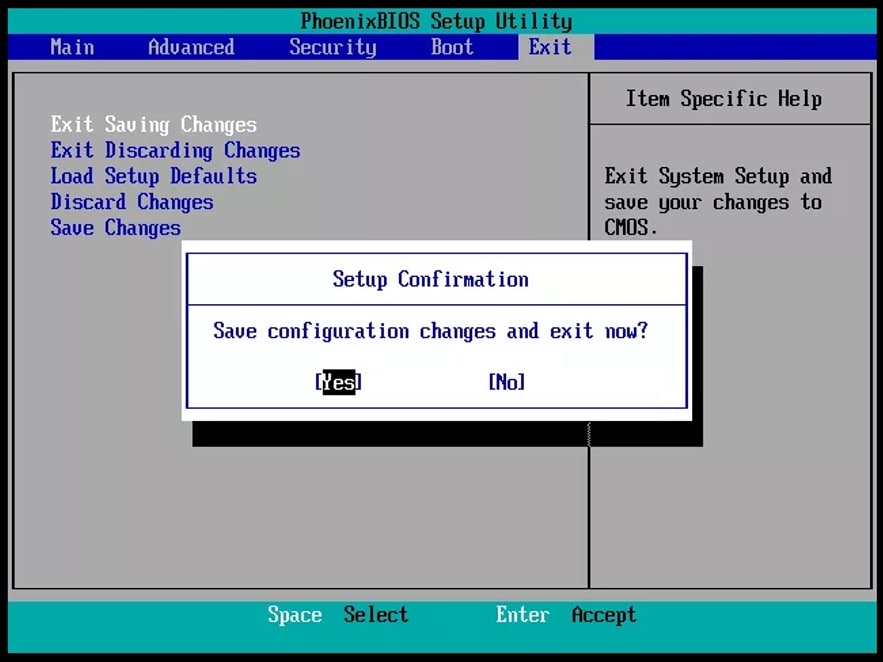
Moreover, to select the option, utilize the keys mentioned in the BIOS setup utility instructions.
Step 5. As soon as you exit the BIOS setup utility, the computer will restart automatically.
And upon restarting, the BIOS will boot in accordance with the changed boot order, giving preference to the first device on the list.
Note: In the above screenshots, CD-ROM (an external device) is just an example. You can move any other devices, including a second operating system (on different hard disks).
Follow up to find alternatives to BIOS and change boot order without it.
Change the Boot Order in Windows 10 without BIOS
Though not easy, the BIOS is the most useful method to change the Boot order on Windows 10. However, it is not the only method.
Third-party tools and Windows 10 native settings can also be valuable assistance to change the boot sequence.
Follow any of the listed methods to learn how to change the boot priority in Windows 10 without accessing the BIOS utility.
Note: The upcoming methods, unlike the legacy BIOS, are OS-dependent. Thus, these will find use only on a Windows (10) computer.
How to Change Boot Order in Windows 10 from System Configuration Tool
System configuration, like BIOS firmware, is a Windows native tool to manage Startup and Boot orders.
Follow these simple steps to learn how to change the Boot priority in Windows 10 using it:
Step 1. In the Search(🔎) bar, type in System Configuration. Select Open.
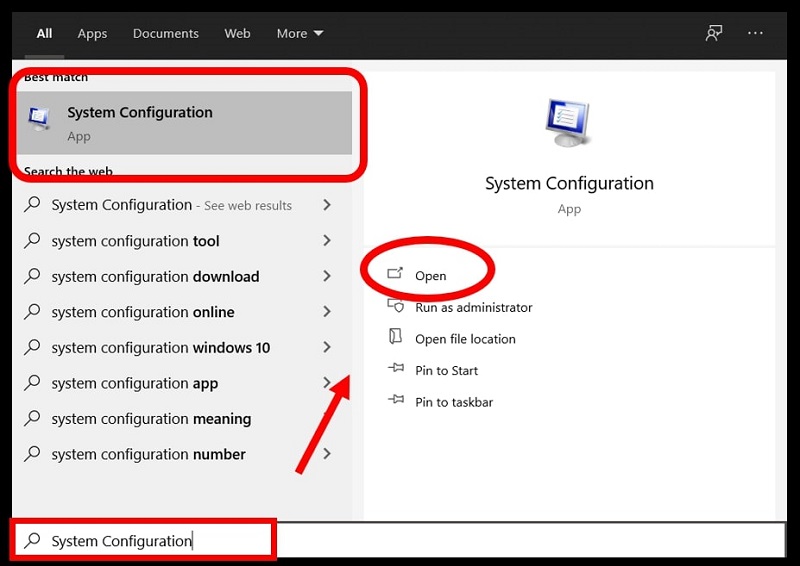
Step 2. Switch the Boot tab in the menu bar.
Step 3. From the list, select the desired operating system or inserted external drives. Click on Set as default > Apply > OK.
After the next start, your computer will boot via the chosen bootable media.
How to Change Boot Order in Windows 10 from Advanced Start-up (via PC Settings)
Of course, you can utilize the good-old Windows Advanced Start-up Options to change the boot order in Windows 10.
Here’s how to change the boot order from within Windows 10 (after logging in).
Step 1. Close all the open programs on your computer.
- Open Settings.
- Choose Update & Security.
- On the left pane, choose Recovery.
- On the right-pane, scroll down to the Advanced Startup option and choose Restart Now.

Note: Alternatively, press the Shift key, and while continuing to hold, choose to Restart (from Start menu) to open the Advanced-Startup option on Windows 10.
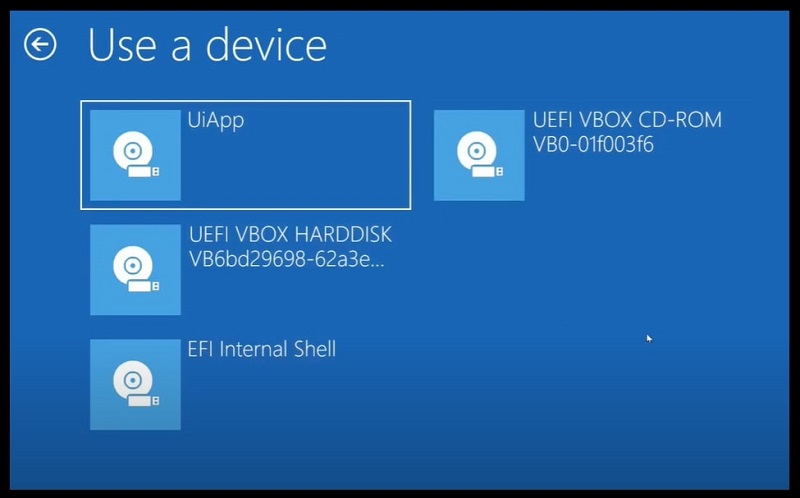
Step 2. When you see the Advanced Start-up screen, select the Use a device option.
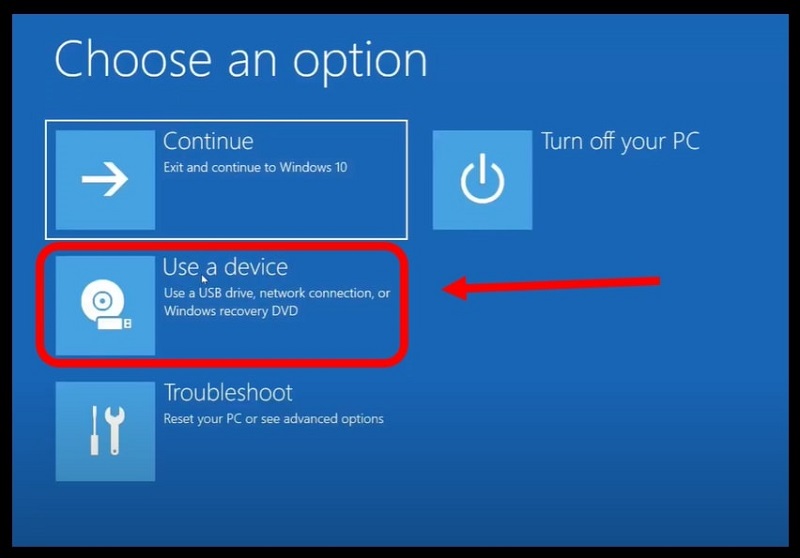
On the Use a device screen, choose the desired device to boot the computer via that.
Step 3. Once you select the desired device that your PC can boot from, you will see a (dark) blue screen (the install portion). Select the Live option.
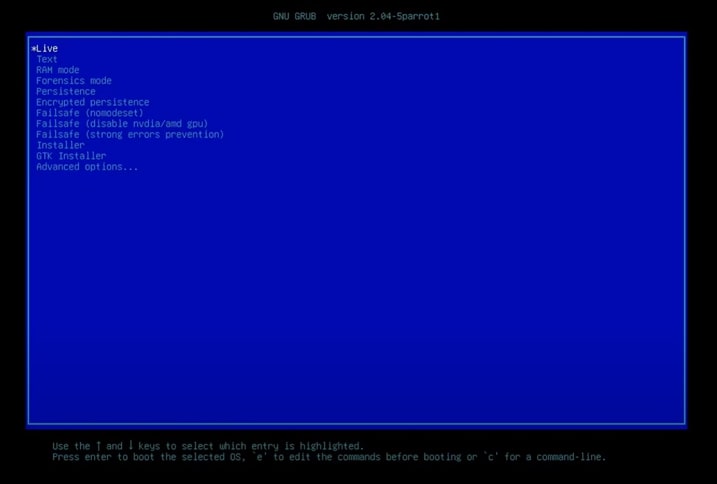
Note: The “Live” is the most common selection after choosing the desired device to boot from and should work for most of you. Nonetheless, if you have some special kind of hardware installed — then the option might differ.
How to change the boot order in Windows 10 using EasyBCD
EasyBCD, a third-party boot loader, is a suitable alternative to legacy BIOS, if not a superior one.
You can employ this tool to change the boot order not only on Windows 10 but also on Mac and Linux OS. Plus, it is free to download (for a single user).
Here’s how to change the boot sequence in Windows 10 using the EasyBCD:
Step 1. Download and Install EasyBCD into Windows10.
Step 2. Open the application, select Edit Boot Menu on the left pane.
Step 3. Under Modify Menu Entries (right-side), you will see all the (bootable) devices connected to the motherboard.
- Use the Up and Down choices to move the boot order.
- Select the device you want to make default.
- Tick the assigned checkbox to change No to Yes.
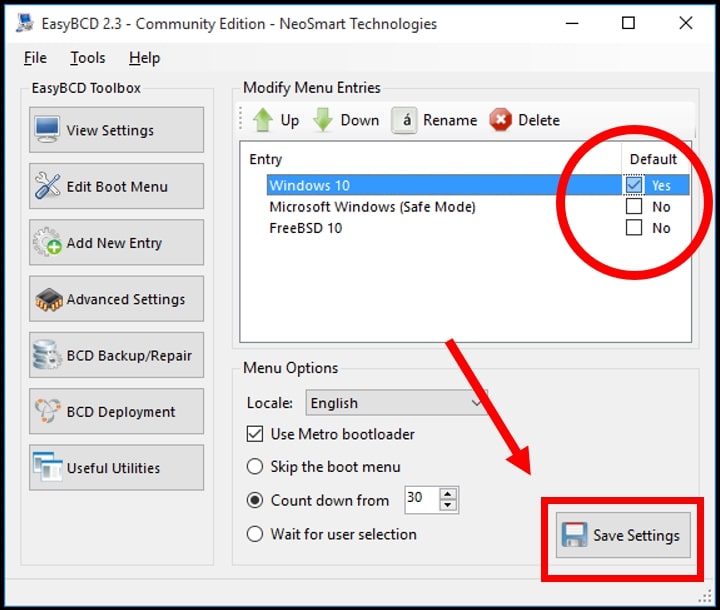
Step 4. Click on Save Settings.
Note: There are also other handy settings available, like Setting a timer and User selections. Kindly go through the setup guide of EasyBCD to personalize it.
That is it. As you see, it is more manageable than the BIOS. Nonetheless, the BIOS comes in handy when you cannot access Windows 10.
FAQs About Boot Order in Windows 10
What is the BIOS setup utility?
BIOS, the acronym for Basic Input Output System, is software installed on a microchip — placed on the motherboard of a computer or laptop.
The BIOS is the thread linking the hardware to the operating system.
The BIOS contains instructions to identify and configure hardware such as a hard drive or USB.
It performs the same task every time you turn the computer ON.
What is UEFI BIOS?
UEFI or the Unified Extensible Firmware Interface is a modern replacement for the legacy BIOS. The UEFI minimizes the boot time and is GUI enabled, even supporting the mouse to navigate.
How do I see my BIOS mode on Windows 10?
Follow these simple steps:
- Hover to the Search(🔎) bar.
- Type in System Information.
- Open it.
- On the right side, you can see the BIOS mode, i.e., Legacy or UEFI.
How can I enter UEFI on Windows 10?
Follow these simple steps:
- Boot to Advanced Start-up on Windows 10.
- Select Troubleshoot.
- Under Advanced options, choose UEFI Firmware Settings.
- On the next screen, select Restart.
Once chosen, Windows 10 will boot you to UEFI Firmware Settings in a matter of seconds.
Conclusion
As stated earlier, there isn’t anything arduous about changing the boot order on Windows 10.
Of course, given the distinct BIOS makes — this guide doesn’t make it completely clear when it comes to navigating within the BIOS menu. But, as stated, every BIOS menu contains instructions, reading which you can easily change the boot sequence on Windows 10.