Microsoft’s Windows 10 provides two different types of user accounts, namely Administrator and Standard User accounts. When you install and set up Windows 10 on a computer for the first time, you basically create an Administrator account that gives you unrestricted access to system control. Apart from this particular account, you can create additional accounts for other users with whom you share your computer. These accounts are Standard User accounts by default which gives limited access to your system, meaning they can’t be used to install new software or make any changes that could affect other users of the computer.
Having said all that, if you trust the person you’re sharing your computer with, you can level up their permissions by converting their account to an Administrator account so they can install new apps on your PC too. All you need to do is change the user account type, which is pretty straightforward to do in Windows 10. But, if you have no idea where to get started, we’re here to help. This article will cover in detail how to change account type in Windows 10 with or without password.
Part 1. How to Change Account Type on Windows 10 with Administrator Password
Microsoft offers multiple different ways to change the account type on Windows 10, so you’re not limited to a single method. However, this applies only if you have access to an administrator account since administrator privileges are required to make changes to your computer that affects other users, as we mentioned earlier. If you don’t know the admin password, you have one option where you’ll need to rely on third-party software to remove the Windows 10 password first before you proceed. So, without further ado, let’s take a look at four different methods that you can use to change the account type in Windows 10 with admin password.
1.1. Change Account Type on Windows 10 from Settings
In the first method, we’ll check out the most common way to change the account type in Windows 10, and that’s by using the Settings app. Here’s what you need to do:
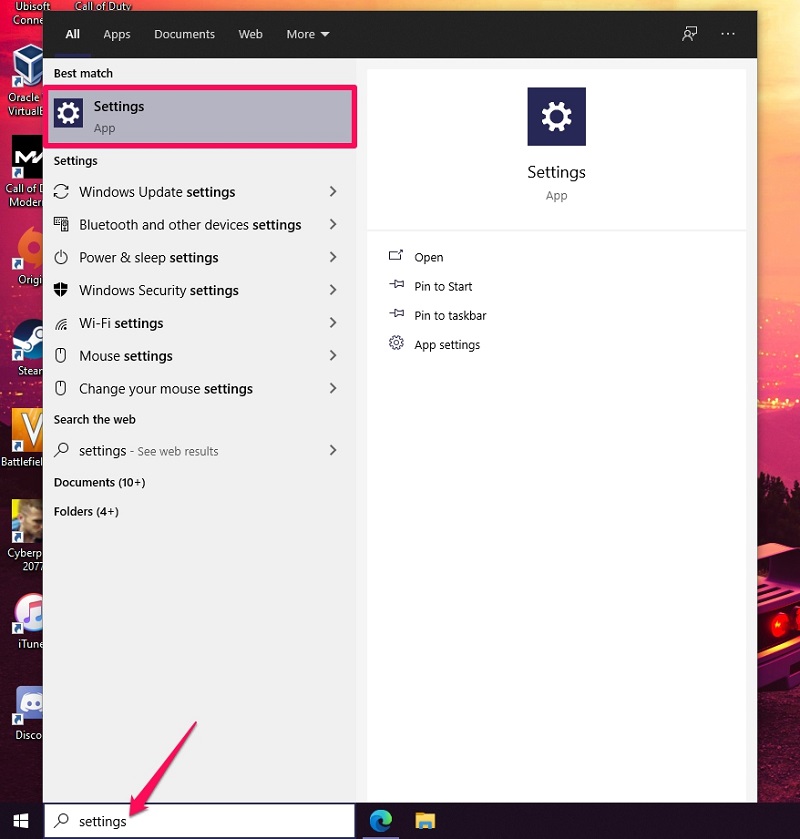
Step 1. Use the search field in your Windows taskbar to find and launch Settings on your computer.
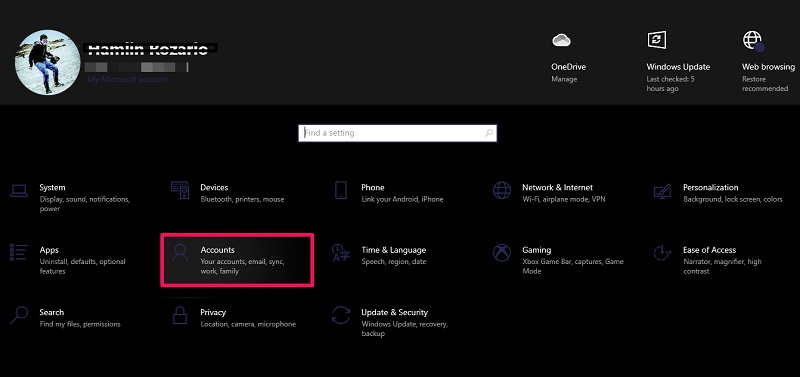
Step 2. In the Settings menu, select the option ‘Accounts’ to manage your user account-related settings.
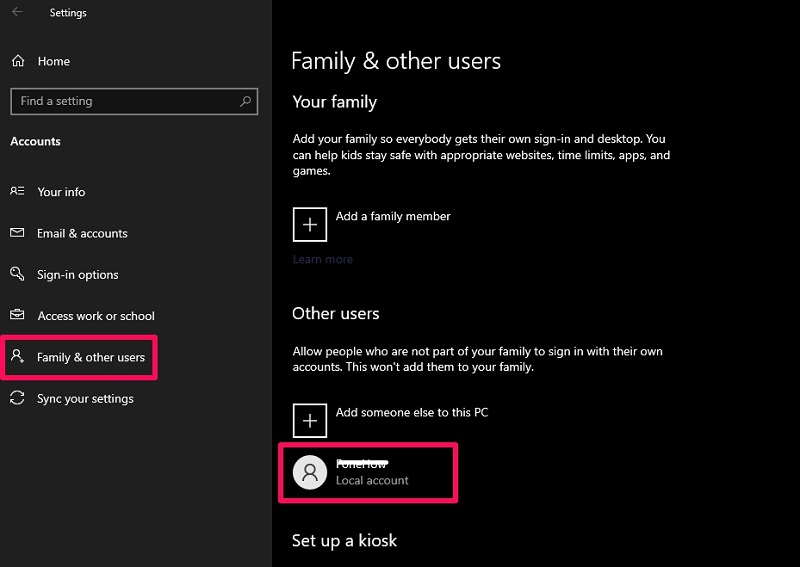
Step 3. Here, select ‘Family & other users’ from the left pane and then click on the user account you want to change the account type.
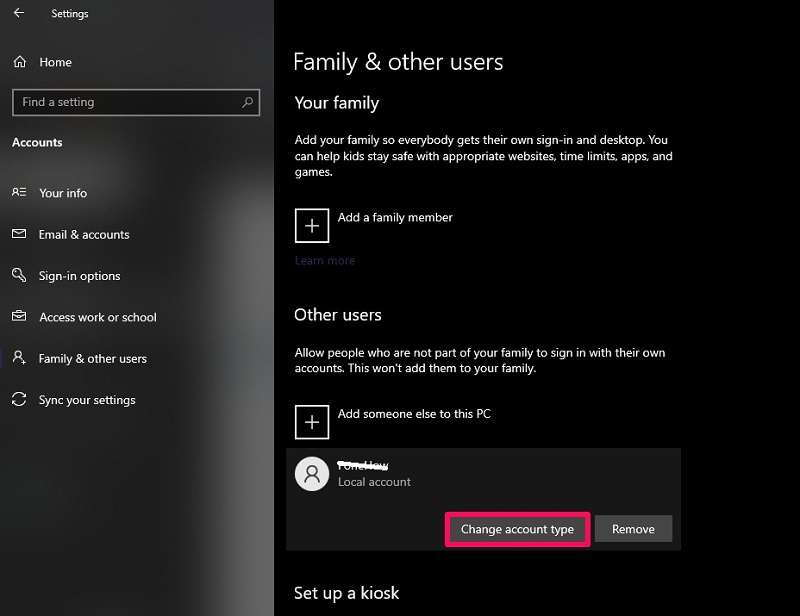
Step 4. Now, you’ll see additional options right below. Click on ‘Change account type’ to continue.
Step 5. You’ll now get a pop-up on your screen with an option to change the account type. Simply use the dropdown to switch between Administrator and Standard User permissions. Click ‘OK’ to save your changes.
That’s pretty much all you have to do. If you ever change your mind, you can always repeat these steps to change the account from administrator to standard user in Windows 10 as well.
1.2. Change Account Type on Windows 10 from Control Panel
Although the Settings app in Windows 10 is now the go-to place to access all the basic user settings, the Control Panel, an integral part of Windows devices for decades, is still reserved for making advanced system changes and performing other complicated tasks. This method may be familiar to long-time Windows users. Let’s check it out:
Step 1. You can find and launch the Control Panel on your computer using the search field in your Windows taskbar.
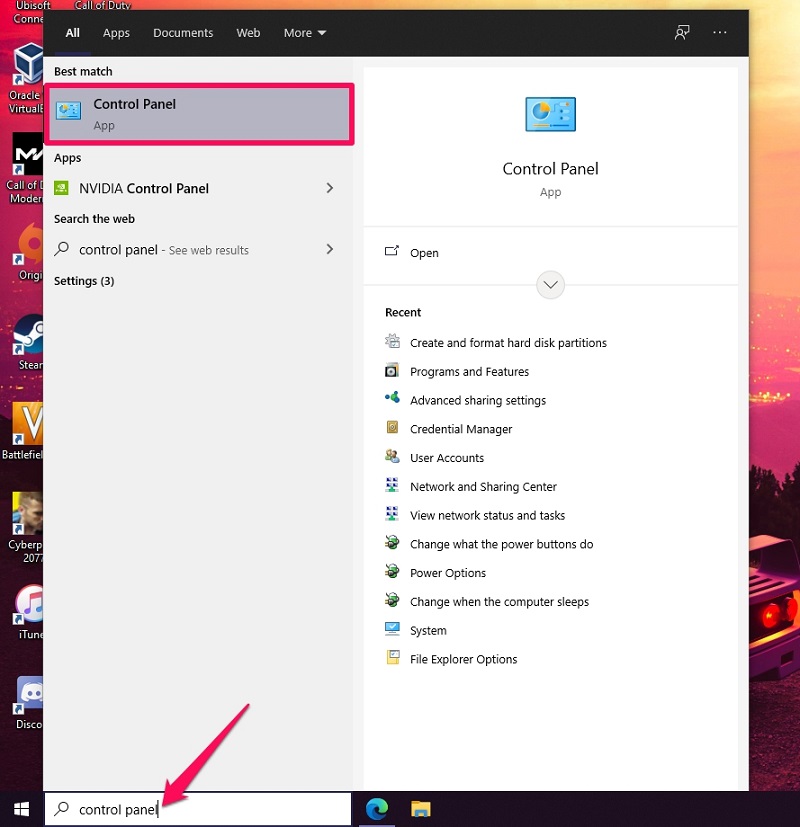
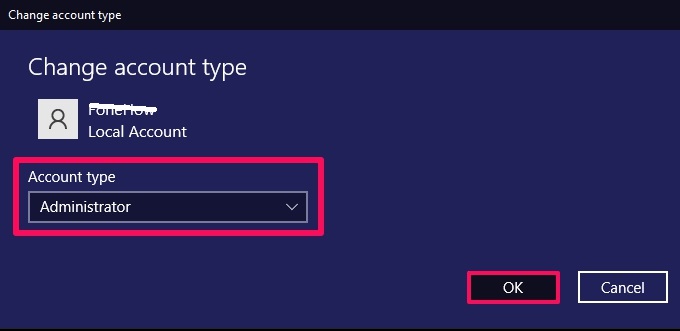
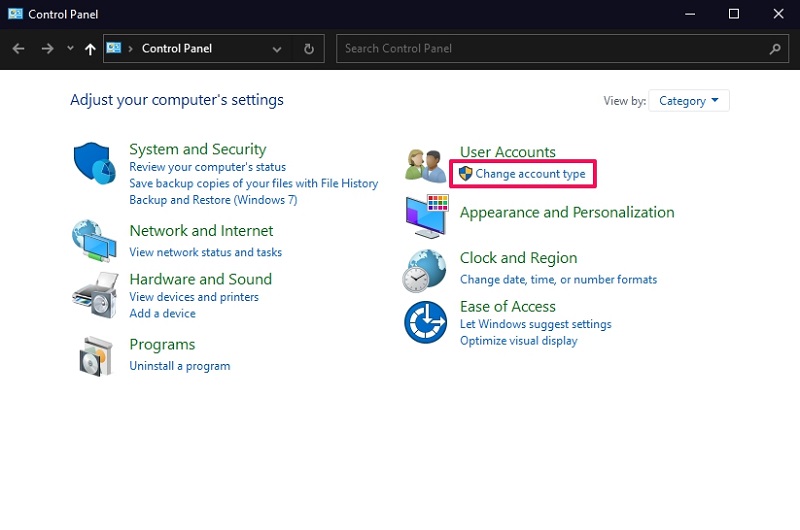
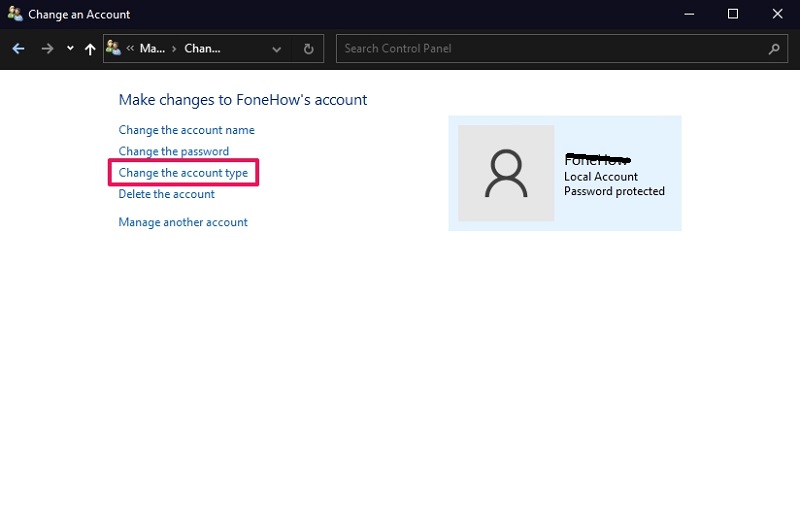
Step 2. The Control Panel items are categorized into sections. Here, click on ‘Change account type’ located under ‘User Accounts.’
Step 3. Now, you’ll be able to see all the user accounts on your computer. Just click on the account that you want to change the account type for to proceed.
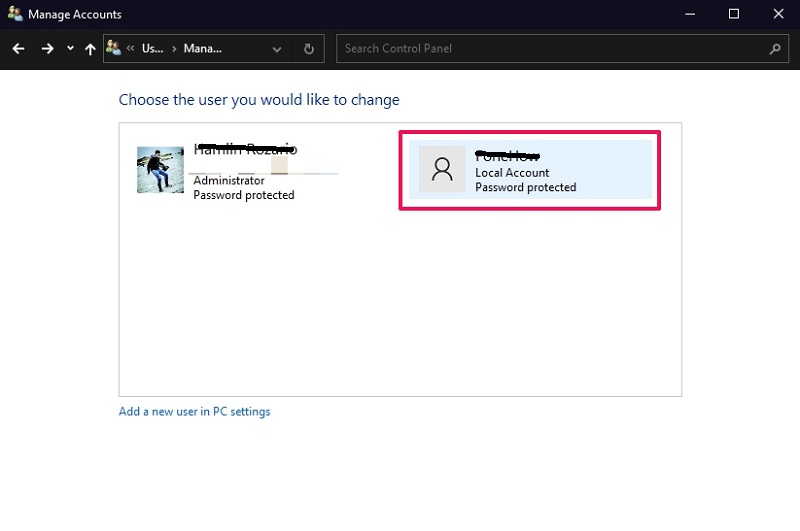
Step 4. Next, click on ‘Change the account type.’
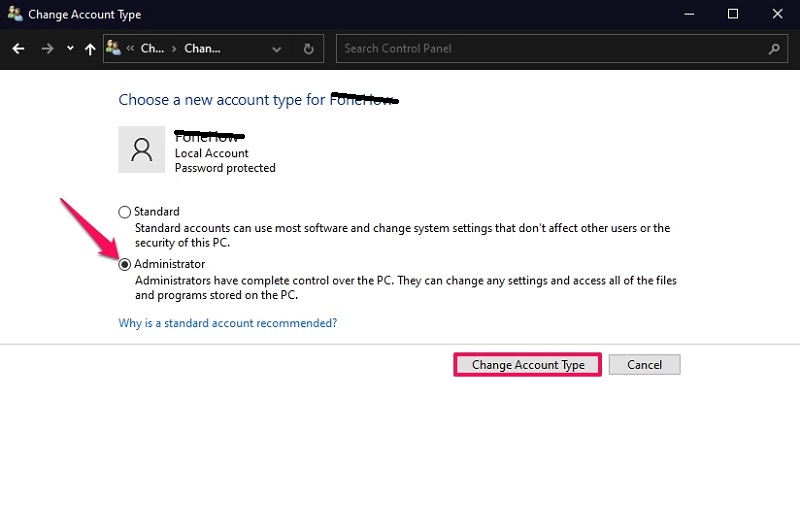
Step 5. In this step, you’ll be able to choose between Standard User and Administrator for the account type. Select your desired option and click on ‘Change Account Type’ to confirm your changes.
There you go. You’ve successfully changed the account type of the user account in Windows 10.
1.3. Change Account Type on Windows 10 with Netplwiz
Netplwiz is a dedicated tool for managing user accounts on Windows computers. Consider it as an Advanced User Accounts Control Panel. If you don’t want to go through unwanted options in the Control Panel and Settings menus, this might be the preferred method. Just follow these steps:
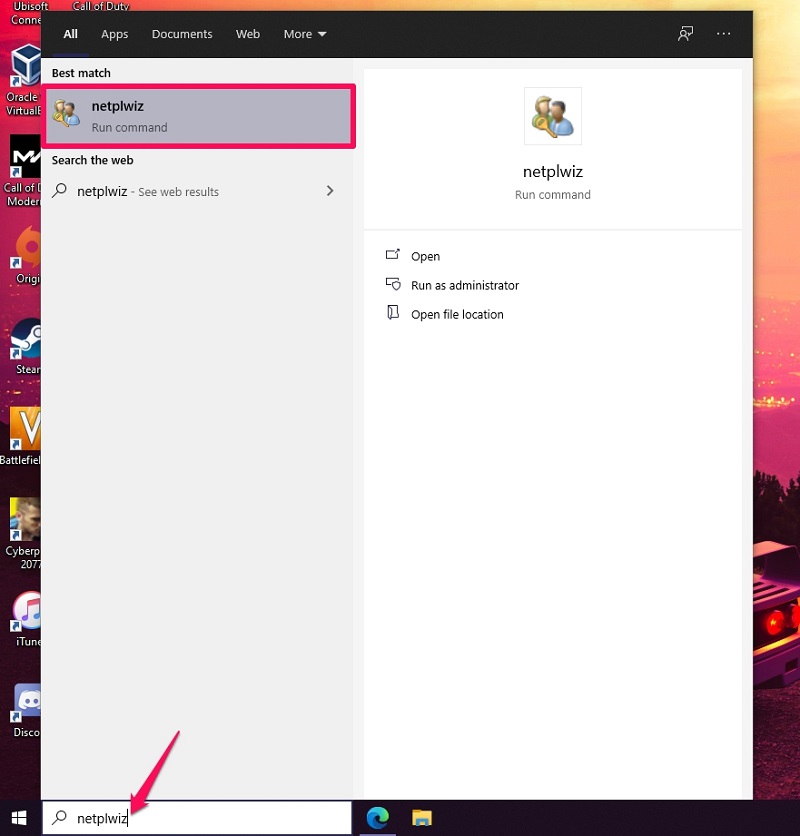
Step 1. Type ‘netplwiz’ in the search box located on your taskbar and click on the top result to get started.
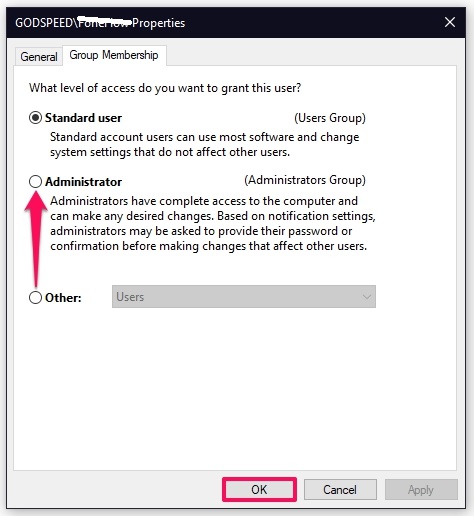
Step 2. This will directly bring up the User Accounts window, where you’ll see all the accounts. Select the user account that you want to change the type and then click on ‘Properties.’
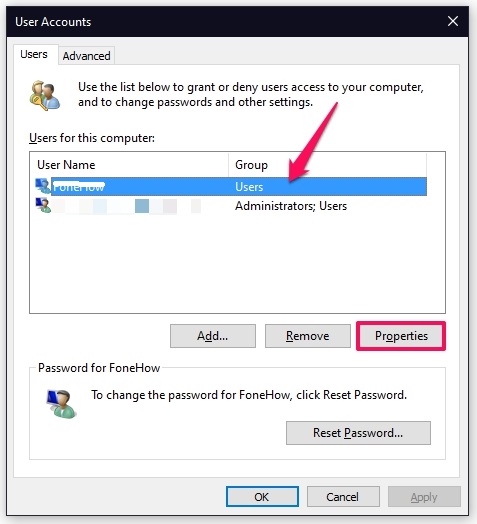
Step 3. Now, select your preferred option, whether it’s Administrator or Standard User, and then click on ‘OK’ to update your changes.
You’re pretty much done already. This might be the quickest way to change the account type in Windows 10 since you’re avoiding unnecessary menu items.
1.4. Change Account Type on Windows 10 Using Command Prompt
Moving on to the last method that requires the administrator password, we’ll use Command Prompt to change the account type on Windows 10. Here, we’ll be executing two command lines to switch between the user account types quickly:
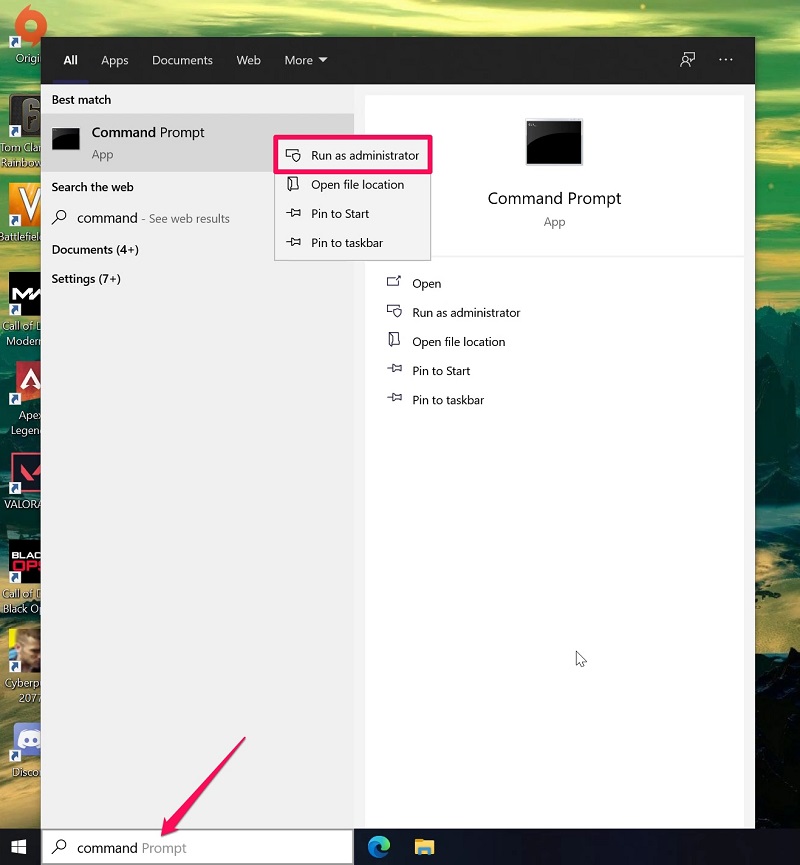
Step 1. First, you need to launch Command Prompt as an administrator. Use the search field in your taskbar to find Command Prompt, right-click on the result and choose ‘Run as administrator.’
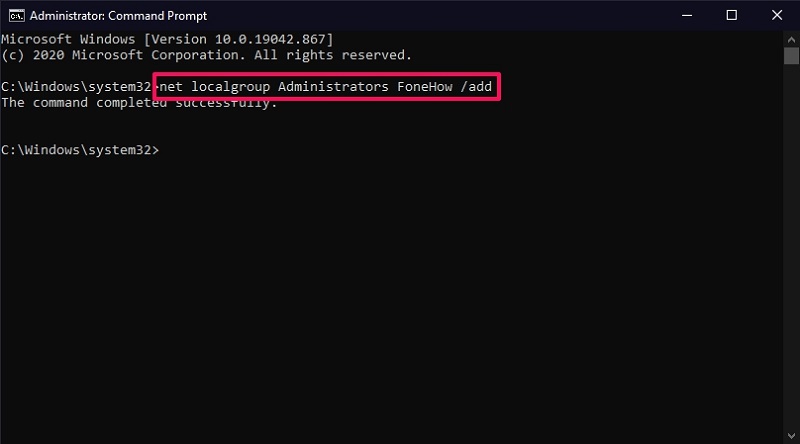
Step 2. When the Command Prompt window opens, type in the following command line and hit the ‘Enter’ key on your keyboard. This command will change the account type from Standard User to Administrator in Windows 10.
net localgroup Administrators USERNAME /add
Make sure to replace USERNAME with the name of the user account that you want to make all the changes for.
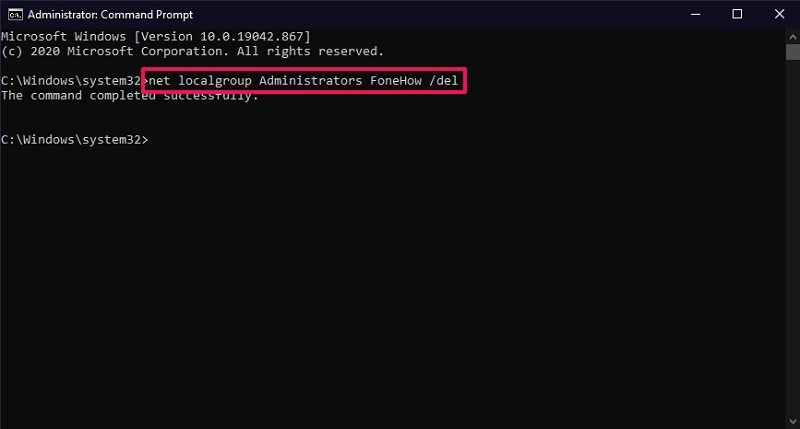
Step 3. To change the account type from Administrator back to a Standard User, you can enter the following command line and press the ‘Enter’ key. Don’t forget to replace the USERNAME field with the account name.
net localgroup Administrators USERNAME /del
That’s it. Once you get the hang of using this command line, you might find this method to be even easier than the Netplwiz technique that we just discussed above. Either way, you’re avoiding unwanted menu items to change the account type in Windows 10 quickly.
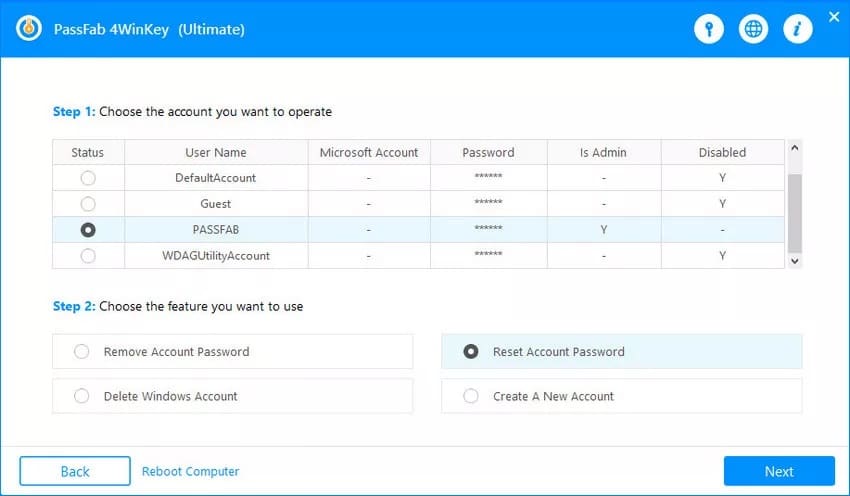
Part 2. How to Change Account Type on Windows 10 without Admin Password
Some users may have trouble changing the account type in Windows 10 because they don’t know the administrator account password. Since you cannot change the account type without administrator permissions natively, you’ll need to resort to a third-party solution. You can use PassFab 4WinKey to remove the administrator password first, but once you’re done, you can follow the other methods that we discussed above to change the account type in Windows 10. If you need any more help with the software, you can check out the detailed 4WinKey Review here.
Also Read: Best Windows 10 Password Reset Tools
Conclusion
After reading all this, you can probably tell that things are pretty easy and straightforward as long as you have access to one of your administrator accounts. Users who want to get straight to the setting would prefer the Netplwiz or the Command Prompt method, whereas others might take the popular approach and use the Settings menu or Control Panel instead. Apart from all these methods, you can use Windows PowerShell to change account type in Windows 10. It’s identical to the Command Prompt approach, and you can type in the same command lines to get it done. But, make no mistake, if you don’t have the admin password, using PassFab 4WinKey is your only option.
Hopefully, you were able to change the account type without having to go through much trouble. So, which method that we discussed here is your personal favorite? Do you know any additional ways to change the account type in Windows 10?