By default, Windows 10 users must sign in to their user accounts after turning on their laptops. That’s not a bad thing from a security perspective. If you don’t have to sign in to your PC, nobody else has to log in to Windows 10 on it either. Most laptop users who take their PCs out and about with them would undoubtedly never want to disable manual login. Yet, some users might prefer to enable Windows 10’s automatic login feature, so they don’t have to manually sign in all the time.
What is Windows 10 Auto Login?
Autologin is a Windows 10, 8.1, 8, 7, Vista, and XP feature that enables you to automatically log in to your user account. With Windows 10 auto-login enabled, you’ll never need to enter your user account’s password. Note that the Windows 10 automatic login feature doesn’t remove your password, but it enables you to bypass it by automatically signing you in.
However, the Windows 10 autologon feature still effectively renders your account password redundant. Any user can sign in to your Windows account without the password for it when you’ve enabled the autologon feature. So, it’s not recommended for users who take PCs that include important files beyond their bedrooms to enable the auto sign-in Windows 10 feature.
Yet, desktop users never take their PCs out with them. Manually logging into Windows with passwords might be a somewhat needless precaution for users who utilize their desktop PCs for little more than gaming and web browsing. The autologon feature is a much more appealing one for such users. If you’re convinced you don’t need manual login enabled for your user account, this is how you can activate Windows 10’s automatic login.
Method 1: The Easiest Way to Enable Auto-Login in Windows 10
Most users can enable auto-login in Windows 10 via the User Accounts window (netplwiz.exe). That’s a utility with which you can manage user accounts. User Accounts includes a checkbox option you can select to enable the autologon feature. You can enable automatic Windows 10 login with that utility as follows.
Step 1: To open User Accounts, you’ll first need to launch Run by pressing the Windows key + R hotkey.
Step 2: Type netplwiz in Run’s Open box.
Step 3: Then click “OK” to open the User Accounts window shown directly below.
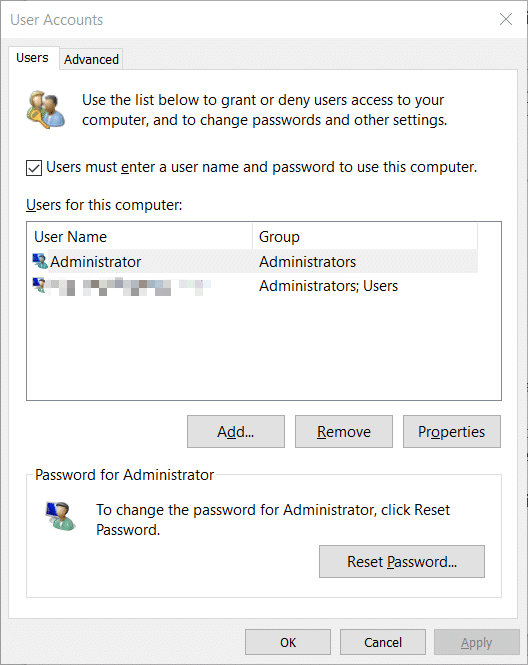
Step 4: Select the user account you need to set up automatic login for.
Step 5: Then deselect the checkbox for the “Users must enter a user name and password to use this computer” option so that the setting is no longer selected.
Step 6: Press the “OK” button to open an Automatically sign-in window.
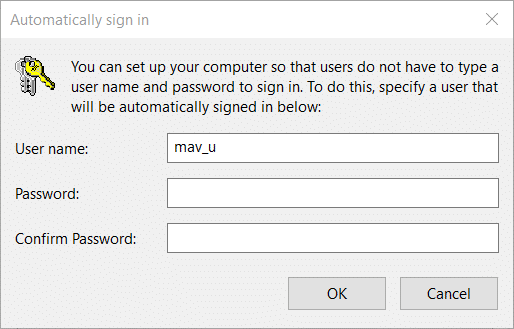
Step 7: Input the user name for the account you want to enable automatic login within the first text box. If you log in to Windows 10 with a Microsoft account, you’ll need to enter the full email address you sign in to within the User name box.
Step 8: Type the password for that user account within both password text boxes.
Step 9: Click “OK” on the Automatically sign-in window.
Step 10: Thereafter, Windows 10 will automatically log you in when you restart your PC.
If you can’t see the “Users must enter a user name and password to use this computer” option within User Accounts, you might need to disable Windows Hello. You can’t select that option with the Windows Hello login feature enabled. This is how you can turn off Windows Hello.
Step 1: Click the “Start” button in Window 10.
Step 2: Then click “Settings” on the Start menu.
Step 3: Select “Accounts” in Settings.
Step 4: Click the Sign-in options tab shown directly below.

Step 5: Turn off the “For improved security, only allow Windows Hello sign-in for Microsoft accounts on this device” option if it’s enabled.
Method 2: How to Enable Windows 10 Auto Login Using Registry Editor
Step 1: To enable Windows 10 auto login for PCs that are members of domains, which have domain logins, users need to edit the registry. First, press the Windows key (with the Microsoft logo on it) and R at the same time.
Step 2: Type regedit within the Open box of Run and click “OK” to open a Registry Editor window.
Step 3: Next, open this key path within the Registry Editor: Computer\HKEY_LOCAL_MACHINE\SOFTWARE\Microsoft\Windows NT\CurrentVersion\Winlogon.
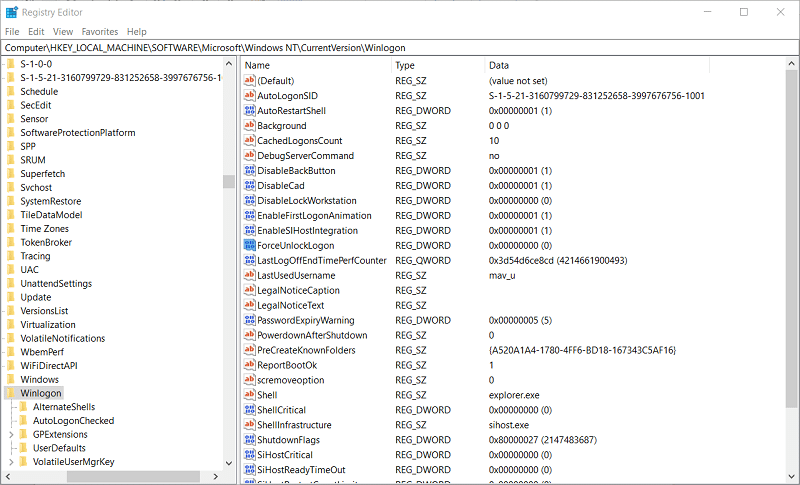
Step 4: Double-click the DefaultUserName string to open its Edit String window.
Step 5: If there isn’t a DefaultUserName string to click on, right-click Winlogon on the left of the Registry Editor to select the “New” and “String Values” option. Enter ‘DefaultUserName’ as the new string name, and then double-click that string to open the window shown directly below.
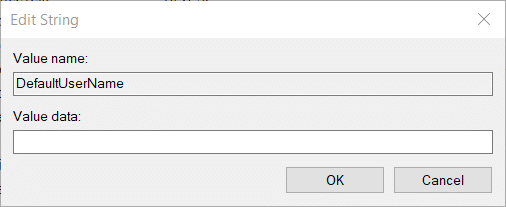
Step 6: The Value data box on the Edit String window must include the user account name you want to enable Windows 10 automatic login for. So, enter the required user account name in that Value data box.
Step 7: Press the “OK” button to close the Edit String window.
Step 8: Then look for the DefaultPassword string in the Winlogon key. If you can’t find it, set up a new DefaultPassword string as outlined within step 5.
Step 9: Open the Edit String window by double-clicking DefaultPassword.
Step 10: Input the password for the user account you want to enable autologin for within the Value data box of the Edit String window. Then click “OK” to exit that window.
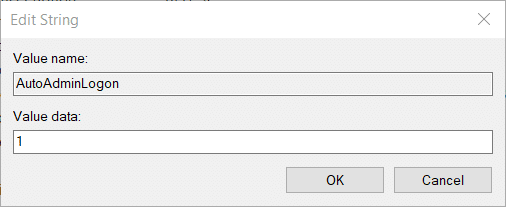
Step 11: Find and double-click the AutoAdminLogon string for the Winlogon key. If your PC’s Winlogon key does not include that string value, you’ll need to set up a new AutoAdminLogon string there.
Step 12: Input 1 within the Value data box of the Edit String window for AutoAdminLogon as shown directly below, and click the “OK” option.
Step 13: Thereafter, restart Windows 10 to automatically log in.
Step 14: Note that you can disable the automatic login by double-clicking the AutoAdminLogon string in the Registry Editor and replacing 1 in the Value data box with 0. Then press the “OK” button to close the window.
Conclusion
Enabling the Windows 10 auto login as outlined with the above two methods will ensure nobody needs to enter your user account password to utilize your desktop or laptop. If that sounds good to you, go ahead and disable the manual login on Windows 10. However, remember that activating automatic login is a security risk for your PC.